
Service Guide


Hardware Installations and Upgrades
Intel
®
Server System P4000IP and Intel
®
Workstation System P4000CR Service Guide 69
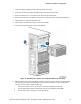
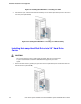
Figure 87. Installing Hard Disk Drive – Removing 2.5” HDD carrier
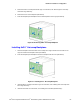
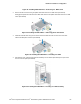
2. Remove the four screws securing the plastic drive blank from the 2.5" HDD carrier (see letter C).
Disengage the plastic drive blank from the HDD carrier. Remove the plastic drive blank from the 2.5" HDD
carrier (see letter D).
Figure 88. Installing Hard Disk Drive – Removing plastic drive blank
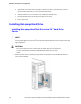
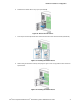
3. Install the hard disk drive using the four screws as shown. Make Sure the connector end of the drive
matches the backplane connector (see letter E).
Figure 89. Installing Hard Disk Drive – Installing 2.5” HDD
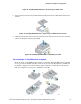
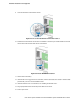
4. With the lever open, insert the hard disk drive assembly into the chassis (see letter G), then push in the
lever to lock it into place (see letter H).
Figure 90. Installing Hard Disk Drive – Inserting 2.5” HDD assembly