
Service Guide


Hardware Installations and Upgrades
86 Intel
®
Server System P4000IP and Intel
®
Workstation System P4000CR Service Guide
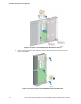
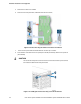
12. Pull back until the latch on the bracket is engaged with the power supply cage and make sure the
screw holes on the bracket is aligned with the screw holes on power supply cage and then secure the
bracket with the screws.
Figure 118. Install the Power Distribution Board into Power Supply Cage
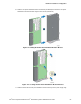
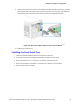
13. Reconnect the power cables as appropriate.
14. Insert the power supply(ies) into the power supply cage and push all the way until it clicks into place.
Figure 119. Installing Hot-swap Power Supply Module into Chassis
15. Reinstall the air duct. For instructions, see the Quick Start User’s Guide or Service Guide provided
with your Intel
®
server/workstation board.
16. Re-install the chassis cover. For instructions, see “Installing the Chassis Cover”.
17. Plug all peripheral devices and the AC power cable into the server.
18. Power up the server.