
Service Guide


Hardware Installations and Upgrades
Intel
®
Server System P4000IP and Intel
®
Workstation System P4000CR Service Guide 83
Replacing the Power Distribution Board
WARNING
Hazardous voltage, current, and energy levels are present inside the power supply. There are no
user-serviceable parts inside it; servicing should be done by technically qualified personnel.
1. Observe the safety and ESD precautions at the beginning of this book.
2. Power down the server and unplug all peripheral devices and the AC power cable.
3. Remove the chassis cover. For instructions, see “Removing the Chassis Cover”.
4. Remove the air duct. For instructions, see the Quick Start User’s Guide or Service Guide provided
with your Intel
®
server/workstation board.
5. Disconnect all internal power cables from chassis components and server board.
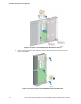
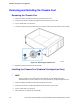
6. If present, press the green latch in the direction shown while pulling on handle to remove power
supply from chassis. Repeat this step for the second hot-swap power supply if it is installed.
Figure 113. Removing Hot-swap Power Supply Module from Chassis
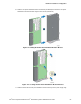
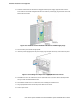
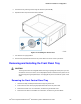
7. Loosen the screws securing the bracket with power distribution board to the chassis (see letter A).
8. Push the bracket forward to release the latch which secures the bracket; then pull out the bracket
from the chassis (see letter B).