
R2000LH2/LT2 Service Guide
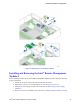


Hardware Installations and Upgrades
2. Remove the system cover. For instructions, see Removing the System Cover.
3. Remove the power supply modules. For instructions, see Removing the Power Supply Module(s).
4. Remove the PCI riser assemblies. For instructions, see Removing the PCI Riser Assembly.
5. Remove the air duct. For instructions, see Removing the Air Duct.
6. Remove the processor heatsink(s). For instructions, see Removing Processor Heatsink(s).
7. Remove the processor(s). For instructions, see Installing or Replacing the Processor.
8. Remove the memory. For instructions, see Removing Memory.
9. Remove all the Intel
®
I/O expansion module(s). For instructions, see Removing Intel
®
I/O Expansion
Module.
10. Remove Intel
®
Remote Management Module 4. For instructions, see Installing and Removing the
Intel
®
Remote Management Module 4.
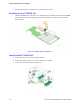
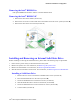
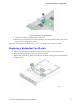
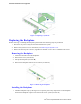
Removing the Server Board
1. Disconnect all cables from the server board.
2. Remove the thirteen screws from the server board (see letter A).
3. Lift the server board from the server system (see letter B).
Figure 70. Removing the Server Board
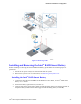
Installing the Server Board
1. Place the server board into the server system (see letter A).
2. Secure the server board with thirteen screws (see letter B).
Intel
®
Server System R2000LH2/LT2 Service Guide 45