
Quick Installation User's Guide


9
General Installation Process
20
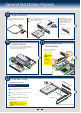
Install Bezel (optional)
A
B
Lock the right end of the front bezel to the rack handle.
Push in the left side of the bezel until it clicks into place.
NOTE: Before installing the bezel, you must install the rack handles.
A
B
B
A
Finger Hole
19
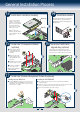
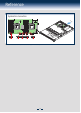
Install Second Power Supply Module (optional)
A
B
Use the 'finger hole' to remove the
filler panel.
Insert the power supply module into the power
supply cage and push all the way until it clicks
into place.
Using the handle, pull the module from the
chassis while pressing the green latch in the
direction shown.
Power Supply Removal
21
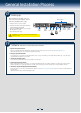
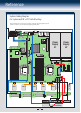
Install the Top Cover
Recessed
Edge
B
A
A
A
B
Place the top cover on system and slide towards
the front of chassis until the recessed front edge
is fully engaged.
Install the three screws at the front and torque to
7-9in-lbs, then install the screw at the back and
torque to 7-9in-lbs.
18
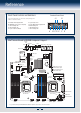
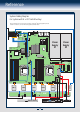
Install Intel® RAID Smart Battery (optional)
A
Locate the BBU bracket inside the chassis. Align the
tabs on the plastic battery holder with mounting holes
on the BBU bracket.
B
Slide the plastic battery holder toward the rear of the
system until the tabs engage with the mounting holes in
the BBU bracket.
A
B