Intel EtherExpress™ PRO/100 TX PCI Model B LAN Adapter Installation Guide
Contents Put the Adapter in the Computer ........................................ 2 Connect the Network Cable ................................................. 3 DOS and Windows* 3.1 - NetWare* Clients ........................ 4 Windows NT* 4.0 and 3.5x - Server or Workstation .......... 6 Windows 95 ............................................................................ 8 NetWare Server, Client 32, OS/2*, UNIX,* Banyan,* LANtastic* and Others ....................................................
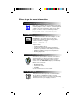
Where to go for more information Intel Fast Ethernet Networking Solutions Intel offers a complete line of Fast Ethernet products, including adapters, hubs, switches, and management software. For more information, data sheets, white papers, or demos, visit our networking website: http://www.intel.com/comm-net/sns README files Readme Files For detailed information about the adapter, see the README files.
Put the Adapter in the Computer 1 Turn off the computer and unplug the power cord. Then remove its cover. Warning: Turn off and unplug power to the computer before removing its cover. Failure to do so could shock you and may damage the adapter or computer. 2 Remove the cover bracket from a PCI busmaster adapter slot. In most computers, all slots are busmaster-enabled. If you have configuration problems, see your computer’s documentation to determine if the PCI slots are busmaster-enabled.
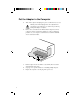
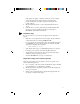
Connect the Network Cable 1 Connect a single network cable to the PRO/100B TX PCI adapter as shown below. For 100BASE-TX, your network cable must be four-pair, category 5, twisted-pair wiring. If you plan on running the adapter at 100 Mbps, it must be connected to a 100BASE-TX hub (not a 100BASE-T4 hub). For 10BASE-T, use two-pair wiring. 100BASE-TX Wiring Twisted Pair Ethernet (TPE). Use category 5 cable and RJ-45 connector for this adapter. Do not use category 3 wiring.
DOS and Windows 3.1 Setup for Novell NetWare Clients Important Note: Windows 95 users and Windows NT should skip the procedure on this page and go directly to page 6 for Windows NT or page 8 for Windows 95. NetWare Client 32 users, go to page 10. 1 Automatic configuration PCI computers automatically detect and configure PCI-compliant adapters while booting. The PRO/100B TX PCI adapter IRQ level and I/O memory address are automatically set by the BIOS each time you start your computer.
5 6 ! Setup displays the adapter’s configuration, then runs a series of diagnostic tests that makes sure the adapter and network are functioning properly. If Setup finds a problem, it displays the results and some possible solutions. When Setup finishes the tests, you’ll see the Install Network Drivers screen. Select the driver you want to install. Setup can install a NetWare client driver for you. If you’re installing other drivers, Setup displays a README file with installation instructions.
Windows NT Server or Workstation 1 Automatic configuration PCI computers automatically detect and configure PCI-compliant adapters while booting. The PRO/100B TX PCI adapter IRQ level and I/O address are automatically set by the BIOS each time you start your computer. Start your computer to automatically configure the adapter. Configuration is complete when Windows NT starts or the DOS prompt appears. If your computer displays an error while booting, it may require additional steps to configure.
5 6 7 PROSet is an enhanced utility that you can use to easily configure and test your adapter in Windows NT. PROSet also displays the computer resources that were assigned to each PRO adapter installed. Click OK in the main PROSet window to return to Windows NT. The Intel adapter now appears as the “Intel 82557-based 10/100 Ethernet Adapter” on the list in the Network window. Click Close to finish. Restart Windows NT when prompted. To install multiple adapters, repeat this procedure for each new adapter.
! Troubleshooting If Windows NT reports an error or you can’t connect to the network, try the suggestions here first, then turn to page 14 if necessary. • Make sure you’re using the drivers for this adapter. Drivers are located on the Windows NT CD-ROM or on the Intel Drivers and Configuration disk version 2.3 or later. • Make sure the driver is loaded and the protocols are bound. Check the Network Bindings dialog box in Windows NT. • Check the Windows NT Event Viewer for error messages.
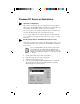
4 5 Specify A:\ (or B:\) as the path, then click OK. Follow prompts for any Windows 95 installation disks and restart when prompted. (If you installed from CD-ROM, the installation files are typically located at D:\Win95, where D is your CD-ROM drive.) After restarting Windows 95, you should be able to connect to your network by double-clicking the Network Neighboorhood.
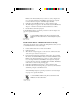
Manually Adding an Adapter If the New Hardware Found dialog box does not appear at startup and you cannot connect to the network, check the Device Manager list to see if the new adapter is present. If it is not, use the following procedure. 1 2 3 4 5 6 7 8 ! From the Control Panel, double click the System icon. Click the Device Manager tab in the window that appears. Double-click Other Devices (question mark icon) in the list area. Double-click PCI Ethernet Controller.
Installing Multiple Adapters All users: The adapter’s 12-digit, hexadecimal Ethernet address is on a sticker near the edge of the adapter. The Ethernet address is sometimes called the node address or the MAC address. Note that the PCI slot number may not correspond with the physical connector in your computer. NetWare users: The server drivers use the PCI slot number to identify each installed adapter.
Manually Configuring for Full Duplex If your switch supports auto-negotiation with the N-way standard, duplex configuration is automatic and no action is required on your part. However, few switches in the current installed base support auto-negotiation. Check with your network system administrator to verify. Most installations will require manual configuration to change to full duplex.
5 6 7 8 9 Click 100 or 10 Mbps, depending on hub speed. Click the menu for Duplex Mode Click Full. Click OK when finished. Click Restart Windows NT. Windows 95 While running Windows 95: 1 From the Control Panel, double-click the Intel PROSet icon. 2 PROSet examines your system and displays the Adapter Setup window. If you have multiple adapters, click the adapter you are configuring (you can identify it by its Ethernet address). Each adapter must be configured separately.
Troubleshooting If the adapter can’t connect to the network Make sure the cable is installed properly. The network cable must be securely attached at both RJ-45 connections (adapter and hub). If the cable is attached but the problem persists, try a different cable. The maximum allowable distance from adapter to hub is 100 meters. If you’re directly connecting two computers (no hub), use a crossover cable.
LED Indication Meaning LNK On The adapter and hub are receiving power; the cable connection between the hub and adapter is good. Off The adapter and hub are not receiving power; the cable connection between the hub and adapter is faulty; or you have a driver configuration problem. On or flashing The adapter is sending or receiving network data. The frequency of the flashes varies with the amount of network traffic. Off The adapter is not sending or receiving network data.
The computer hangs when the drivers are loaded. • Change the PCI BIOS interrupt settings. See the next page for PCI installation tips. • If you are using EMM386, it must be version 4.49 or newer (this version ships with MS-DOS 6.22 or newer). Diagnostics pass, but the connection fails or errors occur. • Make sure you are using category 5 wiring and the network cable is securely attached. • For NetWare clients, make sure you specify the correct frame type in your NET.CFG file.
Technical Information PCI Installation Tips PCI computers are designed to automatically configure add-in cards each time the computer starts. Your PCI computer sets the I/O address and IRQ level for your Intel network adapter when the computer starts. These values cannot be changed by Intel adapter software. If you experience a problem when the computer starts, additional configuration steps may be required. On these computers, manual configuration is possible through the computer’s PCI BIOS setup utility.
Fast Ethernet Wiring 100BASE-TX Specification: The 100BASE-TX specification supports 100 Mbps transmission over two pairs of category 5 twisted-pair Ethernet (TPE) wiring. One pair is for transmit operations and the other for receive operations. Segment lengths are limited to 100 meters with 100BASE-TX for signal timing reasons. This complies with the EIA 568B wiring standard. Fast Ethernet Hubs and Switches The two basic types of hubs are shared hubs and switching hubs.
Network software license agreement BY USING THIS SOFTWARE, YOU ARE AGREEING TO BE BOUND BY THE TERMS OF THIS AGREEMENT. DO NOT USE THIS SOFTWARE UNTIL YOU HAVE CAREFULLY READ AND AGREED TO THE FOLLOWING TERMS AND CONDITIONS. IF YOU DO NOT AGREE TO THE TERMS OF THIS AGREEMENT, PROMPTLY RETURN THE SOFTWARE PACKAGE AND ANY ACCOMPANYING ITEMS. LICENSE: Intel Corporation (“Intel”) grants you the non-exclusive right to use the enclosed software program (the “Software”).
Limited lifetime hardware warranty Intel warrants to the original owner that the hardware product delivered in this package will be free from defects in material and workmanship. This warranty does not cover the product if it is damaged in the process of being installed or improperly used.
FCC compliance statement This product has been tested and found to comply with the limits for a Class B computing device pursuant to Part 15 of the FCC rules. These limits are designed to provide reasonable protection against harmful interference in a residential installation. Installed correctly, it probably will not interfere with radio or TV reception. However, we do not guarantee the absence of interference. This product generates and uses energy of about the same frequency as radio and TV broadcasts.
643998-004