
Intel Rapid Start Technology User Guide for UEFI Mode

Intel® Rapid Start Technology User Guide for UEFI Mode
With Intel® Rapid Start Technology, your computer can go from being in a very deep-sleep to fully
awake in a flash. This responsiveness capability enables your device to consume lower levels of
power when you’re not using it, yet resume quickly when you want to use it.
System Requirements:
Intel® Z87, Q87, H87, B85, Z77, Z75, Q77, or H77 Express Chipset-based desktop board
Intel® Core™ Processor in the LGA1155 package
Solid State Drive (SSD)
Hard disk drive (optional for Intel® Smart Response Technology)
Operating system: Microsoft Windows 8* or Windows 7* 64-bit edition installed in UEFI
mode
Intel Rapid Start Technology software
Before you begin
If you plan to also install Intel Smart Response Technology:
o Set SATA mode in BIOS to RAID
o Install the operating system on a hard disk drive (HDD) instead of the SSD
o Install Smart Response Technology BEFORE setting up Rapid Start Technology
Instructions for enabling Intel Smart Response Technology will not be covered in this user
guide.
If installing the operating system on a solid state drive (SSD), make sure there is enough
unallocated partition space on the SSD to create a hibernation partition. The size of the
hibernation partition must be equal to or larger than the amount of system memory.
Setup Guide for Intel Rapid Storage Technology
Configuring your computer for Intel Rapid Start Technology is a 6-step process:
1. Install the operating system
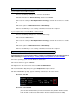
2. Enable Intel Rapid Start Technology in BIOS Setup
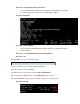
3. Create a primary store partition on the SSD
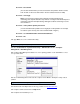
4. Verify the primary store partition
5. Install the Intel Rapid Start Technology software
6. Test the Intel Rapid Start Technology
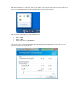
1.1. Install the operating system in UEFI mode on the SSD.
1.2. Install all required device drivers. Do not install the Intel Rapid Start Technology software
yet.
Step 1: Install the operating system