
All-in-One (AIO) Integration with Thin Mini-ITX Intel Desktop Boards

AIO Integration with Thin Mini-ITX Intel® Desktop Boards – v3.0
26
6.4 Configuring the BIOS
To simplify flat panel configurations, LVDS is enabled by default in BIOS (panel settings: 1920x1080, dual-
channel, 24bpp) in the following circumstances:
Intel Desktop Board
BIOS version
Board revision
DH61AGL
0011 and later (all versions)
G71256-202 and later (all revisions)
DQ77KB
0036 and later (all versions)
G40294-402 and later (all revisions)
DH61AG
0040 and later
G23736-504 and later
DN2800MT
0158 and later
G23738-802 and later
Warning
Incorrect selection of an AIO chassis may result in incorrect operation or potential damage to AIO chassis
hardware.
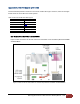
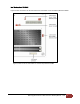
To select your AIO chassis in BIOS setup:
1. During boot, enter the BIOS setup by pressing
F2
.
2. Go to the
Configuration
>
Video
menu.
3. In the
All-in-One Chassis
option, select your chassis vendor/model.
4. Press
F10
to save and exit BIOS setup.
Selecting a pre-programmed chassis model automatically maps all the necessary values for that chassis.
Intel recommends locking the configuration once an AiO chassis is selected to avoid users disabling a working AIO
system.
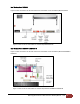
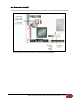
To lock the LVDS configuration:
1. During boot, enter the BIOS setup by pressing
F2
.
2. Go to the
Configuration
>
Video
>
Advanced Flat Panel Display Settings
menu.
3. Set
Flat Panel Configuration Changes
to
Locked
.
4. Press
F10
to save and exit BIOS setup.
Once a configuration is locked, it can only be unlocked in either of the following two methods:
• In Maintenance Mode, on the
Configuration
>
Video
>
Advanced Flat Panel Display Settings
menu.
• With Intel® Integrator Toolkit, using the
itoolkit remove –config
command.
See
Appendix B
for details on unlocking an LVDS configuration.