
All-in-One (AIO) Integration with Thin Mini-ITX Intel Desktop Boards


AIO Integration with Thin Mini-ITX Intel® Desktop Boards – v3.0
12
4
ECS: There is an extra cable for 1x2 “monitor off” feature in ECS G11 which is not defined in the AIO Design
Guide, so the Intel boards don’t support this feature.
5
Gigabyte: There is an extra cable for “Wi-Fi LED” feature introduced by Gigabyte, not defined in the AIO Design
Guide. There are no plans to add the “WiFi LED” feature to Intel boards.
6
Gigabyte: Intel Desktop Board DN2800MT board rev -600 is not compatible with the single-channel LVDS cable
provided with the Gigabyte AEBN (18.5”) chassis. Use board rev -800 or later. Refer to published Technical
Advisory for details:
Intel® Desktop Board DN2800MT - Technical Advisory – Single-Channel LVDS
7
Wibtek A21:
a. The A21 I/O shield opening is not compliant with Thin Mini-ITX motherboard specification. Wibtek has
acknowledged the issue. They are considering including a for Intel Desktop Board DN2800MT back panel ports
which can be used in place of the Intel Desktop Board DN2800MT I/O shield.
b. Backlight driver board cable: Chassis cable connecting backlight driver board to motherboard is just long enough,
requiring it to run over where the stand hinge needs to attach.
8
Mitac: The Maestro 650 uses a custom heat pipe thermal solution. The CPU fan header connector on the Intel
Desktop Board DQ77KB is underneath the heat pipe. The Mitac thermal solution is in violation of the Intel
HTS1155LP KOZ, causing CPU blower cables to touch heat pipe.
9
AIO chassis does not support a system fan. ODM uses alternative ways (e.g. thermal pad) to cool the VRs.
10
AIO chassis supports a 3-wire system fan. The Version 1.0 of the AIO Design Guide recommends AIO Chassis to
use a 4-wire system fan.
11
Chassis requires full profile (Mini ITX) I/O shield
6.
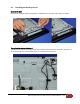
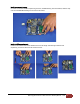
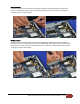
Integration steps (case study with Intel Desktop Board DH61AG)
This section is a case study of the integration of an Intel Desktop Board DH61AG in a Mitac Maestro 650 AIO
chassis. The Mitac chassis comes with the AIO enclosure with the panel integrated, the power adapter, and the
hard drive and optical drive cages pre-installed in the chassis.
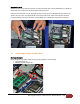
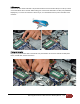
6.1 Opening the chassis
Open the chassis by unscrewing the single screw on the top middle of the back cover.