Intel® Edison Quick Start Guide September 2014 Revision ww29 Intel Confidential Document Number: EQSG-ww29
Notice: This document contains information on products in the design phase of development. The information here is subject to change without notice. Do not finalize a design with this information. INFORMATION IN THIS DOCUMENT IS PROVIDED IN CONNECTION WITH INTEL PRODUCTS. NO LICENSE, EXPRESS OR IMPLIED, BY ESTOPPEL OR OTHERWISE, TO ANY INTELLECTUAL PROPERTY RIGHTS IS GRANTED BY THIS DOCUMENT.
Contents 1 2 3 4 5 6 7 Introduction ......................................................................................................................................................... 6 1.1 References ............................................................................................................................................. 6 1.2 Terminology....................................................................................................
Figures Figure 1 Figure 2 Figure 3 Figure 4 Figure 5 Figure 6 Figure 7 Figure 8 Figure 9 Figure 10 Figure 11 Figure 12 Intel® Edison Quick Start Guide 4 What’s included in the box ................................................................................................................. 7 PuTTY configuration .......................................................................................................................... 9 Zadig setup .
Revision History Revision Description Date ww27 Initial release July 9, 2014 ww29 Overhaul to align documentation with OOBE, follow a linear process, and fix errors.
Introduction 1 Introduction This document provides the necessary steps to install the Intel® Edison software and make the initial configurations in the supported environments. 1.
Overview 2 Overview Thank you for participating in the Intel® Edison development program. Your development pacakge includes an Intel® Edison development (daughter) board and an Arduino expansion board (Figure 1). This figure also shows some of the key components on the Intel® Edison development board that you might need to access for the purposes of this document.
Overview 2.1 Before you begin Release contents are available at file://aceslab/SLC/NDG-Edison/Software/Release. To follow this document, download the following: • • Flash image: Edison-image-ww29-14.zip Cross-compilation SDK installers (to compile your applications). Download the file for your host OS: − Win32: edison-sdk-win32-weekly-19.zip − WIn64: edison-sdk-win64-weekly-19.zip − Linux32: edison-sdk-linux32-weekly-19.zip − Linux64: edison-sdk-linux64-weekly-19.
Windows Configuration 3 Windows Configuration Complete these one-time instructions to configure your Intel® Edison board for Windows. 3.1 Connect to Edison through USB/UART serial The easiest way to connect to Edison is to use a terminal emulator through the USB/UART serial debug interface. 3.1.1 Downloads To connect to the Edison through UART, you need an FTDI UART driver and a terminal emulator such as PuTTY that can connect to a UART interface. • • FTDI Driver: http://www.ftdichip.
Windows Configuration 3.2 Connect through RNDIS Setting up RNDIS will allow you to access Edison using an Ethernet over USB connection. This allows SSH, SCP, and SFTP to all occur over a USB cable. This method does not require a driver to be installed. 3.2.1 Downloads In this case, you’ll need to install something with a SSH client such as Cygwin, Git for Windows, or Putty. In our examples, we’ll be using Putty. PuTTY (or another COM Port terminal emulator): http://the.earth.
Windows Configuration Phone Flash Tool: https://wiki.ith.intel.com/display/DRD/Phone+Flash+Tool dfu-util: http://dfu-util.gnumonks.org/releases/dfu-util-0.7-binaries.7z Zadig: http://zadig.akeo.ie/downloads/zadig_2.1.0.exe • • • Also, go to file://aceslab/SLC/NDG-Edison/Software/Release and download the latest Edison image zip file (edisonimage-wwXX-XX.zip, where “XX-XX” is the workweek and year), and extract a prebuilt Edison image archive to flash. 3.3.
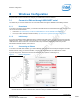
Windows Configuration Figure 4 Verifying dfu-util installation You can also verify the availability of the USB download gadget by launching the Device Manager Go to Start > Control Panel > Hardware and Sound and select the Device Manager under Devices and Printers. Then look under Universal Serial Bus devices (at the bottom of Figure 5). Figure 5 Windows Device Manager — USB devices 3.3.3 Flashing an image Use a USB 2.0 port for all flashing operations on the Intel® Edison board. 1.
Windows Configuration .\flashall.bat –b 3. When the script starts to search for the Edison, connect the micro USB cable to the inner Micro USB port as shown in Figure 6, and connect the power supply afterwards. If the flashing does not start, unplug both cables, reinsert the microUSB cable, and then reconnect the power supply. 4. After the flashing starts, allow the script to completely run and do not interrupt. 5. After flashing, the board will reboot a couple of times and partition the file system.
Linux Configuration 4 Linux Configuration Complete these one-time instructions to configure your Intel® Edison board forLinux. 4.1 Connect through USB/UART 4.1.1 Initial setup If you do not have a terminal program that can connect to a UART interface such as PuTTY, minicom, teraterm, or screen, you will need to install one. For the sake of simplicity, we will be using screen in this guide. Ubuntu: sudo apt-get install screen 4.1.
Linux Configuration Figure 7 Linux > Edit connections Depending on how many wired connections you have, the wired connection to the Intel® Edison board will usually be the most recently created one, with the highest identifier. In this case, it is Wired Connection 3. You can verify which wired connection is the correct one by going to the dropdown menu shown above, and seeing which connection has “edison” in the name.
Linux Configuration Figure 9 Linux > Editing wired connection Click Save. You should now be able to network with and connect to the Intel® Edison board without issue. 4.2.2 Connecting to Edison To connect to the Edison, SSH to 192.168.2.15 with root as the username. For example, from the terminal; ssh root@192.168.2.15 Because this IP address is statically set on the Edison, it will not be possible to have two Edisons connected over RNDIS without changing the static IP on one of the two devices.
Linux Configuration 4.3 Flash an image onto the Edison 4.3.1 Downloads Before starting the process, download the following dependencies: Phone Flash Tool: https://wiki.ith.intel.com/display/DRD/Phone+Flash+Tool • Also, go to file://aceslab/SLC/NDG-Edison/Software/Release and download the latest Edison image zip file (edisonimage-wwXX-XX.zip, where “XX-XX” is the workweek and year), and extract a prebuilt Edison image archive to flash. 4.3.2 Initial setup For Ubuntu 12.
Linux Configuration Figure 10 Intel® Edison board 4.4 Cross-compile “hello world” To build a native application for the target using the cross-compilation toolchain, do the following: 1. Extract the script from the zip, which should be in the format Edison-sdk-linux-weekly-51.zip. Run the script with sudo, which should prompt for a target install directory. Install the cross-compiler in a directory of your choice, which by default is /opt/poky-edison/1.6. sudo .
Mac OS X Configuration 5 Mac OS X Configuration 5.1 Connect through USB/UART Open up a terminal and use the screen command to connect to the UART USB interface. The following command will do so as long as there is only one UART interface connected to the Mac. sudo screen /dev/tty.usbserial* 115200 5.2 Connect through RNDIS MacOS X does not come with the needed Remote Network Driver Interface Specification (RNDIS) driver preinstalled. A possible solution is the open-source HoRNDIS driver. (Visit www.
Mac OS X Configuration Figure 12 Configure RNDIS driver To connect to the Edison, SSH to 192.168.2.15 with root as the username. For example, from the terminal: ssh root@192.168.2.15 Note: Because this IP address is statically set on the Edison board, it will not be possible to have two Edison boards connected over RNDIS without changing the static IP on at least one of the two devices.
Connecting to the Intel® Edison Board 6 Connecting to the Intel® Edison Board Make sure your host computer (Linux, Windows, or Mac) has been set up following the steps in the preceding chapters, then connect to the Intel® Edison module using one of the following methods. 6.
Connecting to the Intel® Edison Board 6.3 Changing an Edison board’s static IP address If you more than one Intel® Edison device, you will need to change the static IP address of each additional board in the same host via SSH. To change an Edison’s IP address, do the following: 1. Log on to the Edison board via SSH. 2. Edit the /lib/systemd/system/network-gadget-init.service file and change the default IP address listed in following two lines: ExecStart=-/bin/sh –c “ ifconfig usb0 192.168.2.
Regulatory Statements 7 Regulatory Statements Model: Edison FCC Statement: This device complies with Part 15 of the FCC Rules. Operation is subject to the following two conditions: • This device may not cause harmful interference • This device must accept any interference received including interference that may cause undesired operation.
Regulatory Statements The modular certification for this device covers installation of the device using only an integral antenna for the configurations described in the installation instructions. Use of an external antenna requires host device certification, which OEM may obtain on their own.