Intel® Optane™ Memory Installation Guide For Intel® Rapid Storage Technology Release Versions 15.5 and newer. Revision 2.
INFORMATION IN THIS DOCUMENT IS PROVIDED IN CONNECTION WITH INTEL® PRODUCTS. NO LICENSE, EXPRESS OR IMPLIED, BY ESTOPPEL OR OTHERWISE, TO ANY INTELLECTUAL PROPERTY RIGHTS IS GRANTED BY THIS DOCUMENT.
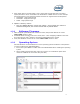
Contents 1 Intel® Optane™ Memory ..................................................................................... 4 1.1 1.2 2 Intel® Optane™ Memory SW/Driver Package ........................................................ 6 2.1 2.2 3 Intel® Optane™ Memory UI ..................................................................... 6 2.1.1 Platforms starting in AHCI mode .................................................. 6 2.1.2 Platforms starting in RST Premium Mode .................................
Intel® Optane™ Memory 1 1.1 Overview Intel® Optane™ Memory is Intel® RST’s latest system acceleration solution. It is a dual-media/disk solution (fast media for file and block caching + slow media for storage capacity) that is presented to the host OS as a single SSD. It utilizes PCIe NVMe SSDs that are based on Intel ® OptaneTM technology. 1.2 Minimum Requirements 1.2.1 Hardware The following platforms are supported at the time this document was created. Please visit https://downloadcenter.intel.
3. Slow media (disk to be accelerated): Only a single pass-through disk that is the active system/boot drive can be accelerated. The acceleration of RAID volumes or other multiple disk configurations is not supported. Please see below for supported slow media options. SATA HDD – single pass-through SATA SSD - single pass-through SSHD - single pass-through 4. Optane™ Memory volume Only one Optane Memory volume per system.
2 2.1 Intel® Optane™ Memory SW/Driver Package Intel® Optane™ Memory UI This section provides an overview of steps to configure Intel® Optane™ memory with the Intel® Optane™ memory application on a computer that already contains the Windows* 10 Operating System. Some motherboards may require a BIOS update before the Intel® Optane™ memory SW/driver package can be installed. Consult the Motherboard vendor’s support website for the latest Intel® Optane™ memory supported BIOS.
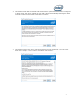
3. This window shows that the installer has discovered the system SATA controller is configured in ‘AHCI’ mode. This screen notifies the user that it will be automatically switching the SATA controller to RST Premium Mode. Click Next to continue. 4. This window requires the user to read and accept the License agreement. The user must check the “I accept...” box in order to click ‘Next’ and continue.
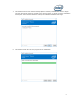
5. This window provides the user with information about the Rapid Storage Technology software that is going to be loaded on the system. The user must click next to continue the install. 6. 8 This window allows the user to select where the software files will be loaded on the system. The user can either navigate to a location using the “Change...” button, or use the default provided. The user must click ‘Next’ to continue the installation.
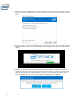
7. This window tells the user that the Intel® Optane™ Memory installation is about to begin. The user still has the option to go back to the previous page, or cancel out of the installation at this point. Once the Next button is clicked, the software installation will begin. 8. This window shows the user the progress of the installation.
9. At this point in the installation process, the system will need to restart. During this time, the system will boot into “Safe Mode” in order to change the system from AHCI to RST Premium mode. 10. After the system restarts, the installation will continue in safe mode with the window below appearing on the screen. Once the installation has completed, the system will automatically restart. 11. At this time, the system will boot back into the Windows OS and the Optane™ Memory application will launch.
2.1.2 Platforms starting in RST Premium Mode 1. Go to https://downloadcenter.intel.com/download/26979/Intel-Optane-Memory?v=t, and select the most recent Intel® Rapid Storage Technology 15.5 or later driver available. 2. Run the executable SetupOptaneMemory.exe from the downloaded package. The window pictured below will appear. Click ‘Next’ to continue. 3. This screen informs the user that the driver may be used to control which drive the computer boots from. The user must click next to continue.
4. This screen requires the user to read and accept the License agreement. The user must check the “I accept...” box in order to click ‘Next’ and continue. 5. This window provides the user with information about the Rapid Storage Technology software that is going to be loaded on the system. The user must click next to continue the install.
6. This window allows the user to select where the software files will be loaded on the system. The user can either navigate to a location using the “Change...” button, or use the default provided. The user must click ‘Next’ to continue the installation. 7. This window tells the user that the Intel® Optane™ Memory installation is about to begin. The user still has the option to go back to the previous page, or cancel out of the installation at this point.
8. This window shows the user the progress of the installation. 9. At this point in the installation process, the system will need to restart. 10. Once the system has completed the reboot and has entered the OS, the user will be prompted to complete the Optane™ installation process. This may take several minutes to launch. Click “Yes” to continue.
2.1.3 Enabling Optane™ with the Intel® Optane™ Memory UI 1. When the user chooses to continue the setup process, the window below will appear at the startup of the Optane™ Application UI. This may take several seconds to appear. If the user clicked ‘No’ to enable Optane™ at a later time, they can choose to open the UI to start the same process. 2. Once the UI opens, click on the “Setup” tab on the left side to view the status. To continue enabling Optane™, click on the Enable button.
3. This window will allow the user to start the Optane™ volume creation. Please note that all data that is on the Optane™ drive will be deleted at this time if the user clicks ‘Yes’ to proceed. 4. This window shows that the volume creation process has started.
5. Once the volume creation has finished, the system will require a restart to complete. The user can click restart in either the UI or the tray icon. 6. Once the system has restarted into the OS, the user can open the Setup page of the Optane™ UI and now see that Optane™ Memory is enabled on the system. The enablement process is now complete.
2.1.4 Disabling Optane™ with the Intel® Optane™ Memory UI 1. Select the “Setup” tab on the left side of the Optane™ UI. Click on the “Disable” button to continue disabling Optane™. 2. Once the process to disable Optane™ has started, the progress will appear in the UI window.
3. To complete the disabling process, the user must restart the system. 4. Once the system has been rebooted into the OS, the user can open the Optane™ UI Setup page to verify that the memory volume is no longer enabled.
2.1.5 Uninstalling the Intel® Optane™ Memory UI. 1. Verify that Optane™ has been disabled before uninstalling the UI. 2.
3. Select the ‘Uninstall a program’ link, located under “Programs’ in the Control Panel 4. Highlight the ‘Intel® Optane™ Memory’ driver from the list. Click the uninstall option.
5. After clicking the option to uninstall in control panel, the Optane™ Memory window below will appear. Click next to continue with uninstalling the Optane™ Memory UI. 6. This window provides information about what the Optane™ Memory driver controls on the system. Click ‘Next’ to continue uninstalling the Optane™ Memory UI.
7. The progress bar shows the status of the uninstall. 10. A reboot is required to complete the process of uninstalling the Optane™ Memory UI from the platform. Please click ‘Finish’ to continue and reboot the system.
2.2 RST UI 1. Go to downloadcenter.intel.com, and select the most recent Intel® Rapid Storage Technology 15.5 or later driver available. 2. Run the executable SetupRST.exe from the downloaded package. The window pictured below will appear. Click ‘Next’ to continue. 3. This window provides a brief caution to the user that the driver itself will not be able to be uninstalled after installation completes.
4. This window informs the user of the License Agreement for this product. The user must check the box before clicking ‘Next’ to continue. 5. This window provides the ReadMe information regarding the options of the SetupRST.exe. The user can click ‘Next’ to continue with the install.
6. This window shows the location where the RST files will be saved to. The user can change the location by clicking on the ‘Change’ button, or continue the install by clicking ‘Next’. 7. This window informs the user for a final time that the software is about to be installed. The user can choose to go ‘Back’, ‘Cancel’ out the installation or click ‘Next’ to continue.
8. The next window will show the progress of the installation. No user input is required. 9. The installation process has been successful. The system will need to be rebooted in order to complete the installation process. The user can choose to do the reboot at this point, or decide to do it at a later time. Click ‘Finish’ to either close the window or reboot the system.
2.2.1 Enabling Optane™ with the RST Legacy UI 1. Ensure that the UI shows the Optane module and slow media. If system is correctly configured, there will be an option to “Enable” on the Status page. 2. The option to “Enable” will also be available on the “Intel Optane™ Memory page.
3. If multiple Optane™ modules are installed on the system, use the drop down menu to select the desired device to use for acceleration. 4. If the Optane™ module is 32GB or larger, a progress bar will appear during the Optane™ creation process.
5. Once the volume creation is complete, the system will need to be rebooted. 6. After the system has rebooted, reopen the UI to verify that the Optane™ volume is functioning normally.
2.2.2 Disabling Optane™ with the RST Legacy UI 1. On the status page, click on the ‘Disable’ link. 2. A pop up will appear to confirm if the user wants to disable. Click ‘Yes’ to continue. 3. Once the volume is disabled, the user will be asked to reboot the system.
4. If using the ‘Intel ® Optane™ Memory page, a ‘reboot’ button will appear once the Optane™ volume is disabled. 5. After rebooting, UI will show both disks in a normal state and have the option to ‘Enable’ Optane™ available.
2.2.3 Uninstalling the UI 1. Verify that Optane™ has been disabled before uninstalling the UI. 2.
3. Select the ‘Uninstall a program’ link, located under “Programs’ in the Control Panel 4. If the Legacy UI is loaded on the system, highlight the ‘Intel® Rapid Storage Technology’ driver from the list. Click the uninstall option.
5. At this point, the RST installer will begin the uninstallation process. Click ‘Next’ to continue. 6. Click ‘Next’ to continue uninstalling. Check the box if the user would like to see the process on reconfiguring the system to use the native operating system software. Most uninstalls do not require this step.
7. The next window will show a progress bar of the driver being uninstalled. 8. Once prompted, click the ‘Finish’ button to complete the uninstallation process. This will cause the system to reboot.
3 Troubleshooting This chapter includes examples of errors that could occur during installation of the Intel® Optane™ memory SW/driver package. For more information and help on these errors, please contact Intel Customer Support at www.intel.com/support/optane-memory. Please also refer to the error code and message article for more details: https://www.intel.com/content/www/us/en/support/memoryand-storage/intel-optane-memory/000024113.html 3.1 Optane™ UI Installation Failures 3.1.
3.1.2 Unsupported Chipset This windows will appear if the installation package is run on a system with an unsupported chipset. Please check the minimum requirements provided in section 1.2 of this document for further details. 3.1.3 Unsupported Operating System This window will appear if the installation package is run on a system with an unsupported OS. Please check the minimum requirements provided in section 1.2 of this document for further details.
3.1.4 Unsupported BIOS This window will appear if the installation is run on a system with an unsupported BIOS. This could be caused by the following: Check the motherboard vendor website for possible BIOS updates or other procedures. This window will appear if the installation is on a system in Legacy mode, which is an unsupported BIOS mode for Optane™. To resolve this issue, a BIOS update may be required.
3.1.5 Unsupported System Drive This window will appear if the installation is attempted on a system that has an unsupported MBR system drive partition table. To resolve this issue, the drive partition table will need to be changed to GPT and the operating system reinstalled. Consult the platform vender’s User Manual for instructions on how to complete this process.
This window will appear if the installation is run on a system where the last partition cannot be resized, because it does not have enough free space. 3.1.6 Error Checking System Compatibility This window will appear if installer has a failure while checking the platform for chipset compatibility.
This window will appear if the installation package is run and fails to check system for drive partition table. This window will appear if the installation package is run and fails to check the available space on the last partition of the system drive. Please refer to the following link for more details: https://www.intel.com/content/www/us/en/support/memory-and-storage/intel-optanememory/000024253.
3.1.7 Intel® Rapid Storage Technology is Already Installed This window will appear if the installation package runs on a system that already has a version of the Intel® Rapid Storage Technology user interface installed. To continue, uninstall the loaded Intel® Rapid Storage Technology user interface and then install the new Intel® Optane™ memory application. 3.1.
3.2 Hardware Failure 3.2.1 Fast Media Missing At Boot If the system boots and the Optane™ module is not detected by the RST UEFI driver, the RST UEFI driver will protect the current data on the slow media by disabling it and not exposing it to the boot manager.
3.2.3 Slow Media Failure and Recovery Options No Intel® RST data recovery tools are available for a drive that has experienced mechanical or electrical failure and is considered ‘inoperable’. If the system encounters an unrecoverable catastrophic failure of the slow media, there is no recovery/repair available. There may be third party tools available; However, Intel has no recommendations regarding third party data recovery tools.
3.2.4.2 Replace the Intel® Optane™ memory module: 1. Power down the computer 2. Open the computer and locate the old or faulty Optane™ memory module to be replaced. Note: Consult the computer manufacturer for the location of the slot for the Optane™ memory module and instructions to remove/insert the M.2 module. 3. Remove the old or faulty module and insert the new module. 4. Close the computer and power it on. 5. Boot into the Windows OS. 3.2.4.3 Re-enable Intel® Optane™ Memory: 1.
4 4.1 Windows Recovery Environment Post-factory Built Systems For systems built using the default Windows setup, the Windows Recovery Environment will most likely be configured using the in-box Windows storage driver. Since this driver does not support Intel® Optane™ Memory volumes, the WinRE.wim file can be updated with an Optane™ compatible driver in order to detect it.
4.2 Preparing the Windows* 10 OS Recovery (Advanced) This section walks through the process of preparing a Windows* 10 OS image for Windows* Recovery. By “Injecting” the Intel® RST driver into the OS Recovery Image/tools before OS installation allows possible recovery of a system in the event the OS image gets damaged. Requirements: Windows* Assessment and Deployment Kit (ADK) installed Windows* 10 64b ISO F6 Intel® Rapid Storage Technology 15.
5. From the Windows* 10 USB Install key, copy the “install.wim” file from the “sources” directory to the working directory C:\Win10USB 6. Open a Command Prompt as Administrator, and change to the working directory (Ex. cd C:\Win10USB). Make sure that all folders and Windows* explorer is closed before starting this process. 7. Based on the Windows* 10 version, determine which index number to modify. Choose the index that matches the Windows* 10 version being used.
8. Modify the ”install.wim” file by running the following commands: Mount the Windows* Image: dism /mount-image /imagefile:install.wim /index:2 /mountdir:windows 9. Add the Intel® Rapid Storage Technology drivers to the Windows* Image: dism /image:windows /add-driver /driver:drivers /forceunsigned /recurse 10. Mount the Windows* Recovery Image: dism /mount-image /imagefile:c:\Win10USB\windows\windows\system32\recovery\winre.wim /Index:1 /mountdir:winre 11.
12. Un-mount the Windows* Recovery Image: dism /unmount-wim /mountdir:winre /commit 13. Un-Mount the Windows* Image: dism /unmount-wim /mountdir:windows /commit 14. Copy the updated “install.wim” in the working directory back to the “sources” directory on the USB install key.