
Intel Desktop Board DQ57TM Product Guide - English


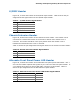


Table Of Contents
- Intel® Desktop Board DQ57TML Product Guide
- Revision History
- Preface
- Contents
- 1 Desktop Board Features
- 2 Installing and Replacing Desktop Board Components
- Before You Begin
- Installation Precautions
- Installing the I/O Shield
- Installing and Removing the Desktop Board
- Installing and Removing a Processor
- Installing and Removing System Memory
- Installing and Removing PCI Express x16 Graphics Cards
- Connecting the SATA Drive Cables
- Connecting a Diskette Drive
- Installing an Intel Z-U130 USB Solid-state Drive or Compatible Device
- Connecting to the Internal Headers
- Connecting to the Audio System
- Connecting Chassis Fan and Power Supply Cables
- Setting the BIOS Configuration Jumper
- Clearing Passwords in the BIOS Setup Program
- Replacing the Battery
- 3 Updating the BIOS
- A Error Messages and Indicators
- B Regulatory Compliance

Installing and Replacing Desktop Board Components
53
Connecting a Diskette Drive
A diskette drive cable can be used to connect a single diskette drive to the Desktop
Board.
For correct function of the diskette drive:
1. Observe the precautions in "Before You Begin" on page 35.
2. Attach t
he cable end labeled P1 to the diskette drive connector on the Intel
Desktop Board (Figure 24, A).
3. Attach the c
a
ble end labeled P2 to the connector on the diskette drive
(Figure 24, B).
Figure 24. Connecting a Diskette Drive