
Product guide


Table Of Contents
- Intel® Desktop Board DH57JG Product Guide
- Revision History
- Preface
- Contents
- 1 Desktop Board Features
- 2 Installing and Replacing Desktop Board Components
- Before You Begin
- Installation Precautions
- Installing the I/O Shield
- Installing and Removing the Desktop Board
- Installing and Removing a Processor
- Installing and Removing System Memory
- Installing and Removing PCI Express x16 Graphics Cards
- Connecting Serial ATA (SATA) Cables
- Connecting to the Internal Headers
- Connecting to the Audio System
- Connecting Chassis Fan and Power Supply Cables
- Setting the BIOS Configuration Jumper
- Clearing Passwords
- Replacing the Battery
- 3 Updating the BIOS
- A Error Messages and Indicators
- B Regulatory Compliance
Installing and Replacing Desktop Board Components
31
Installing and Removing a Processor
Instructions on how to install the processor on the Desktop Board are given below.
Installing a Processor
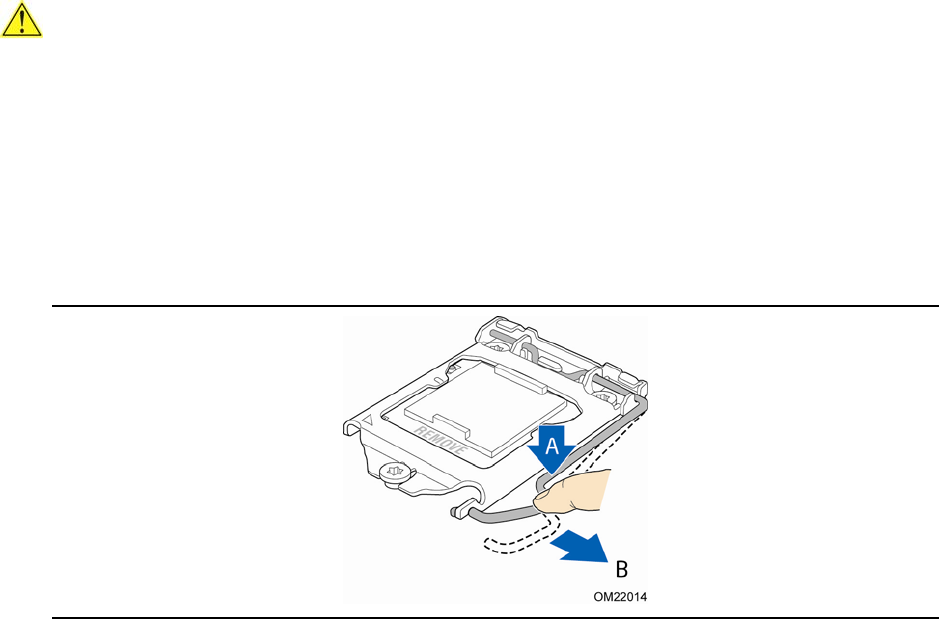
CAUTION
Before installing or removing a processor, make sure the AC power has been removed
by unplugging the power cord from the computer; the standby power LED should not
be lit (see Figure 3 on page 24). Failure to do so could damage the processor and the
board.
T
o install a processor, follow these instructions:
1. Observe the precautions in "Before You Begin" on page 27.
2. Un
latch the socket lever by pushing the lever down and away from the socket
(Figure 6, A and B).
Figure 6. Unlatch the Socket Lever