
Computer Hardware User Manual
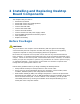


Table Of Contents
- Intel® Desktop Board D945GCLF Product Guide
- Revision History
- Preface
- Contents
- 1 Desktop Board Features
- 2 Installing and Replacing Desktop Board Components
- Before You Begin
- Installation Precautions
- Installing the I/O Shield
- Installing and Removing the Desktop Board
- Installing and Removing Memory
- Connecting the IDE Cable
- Connecting the Serial ATA (SATA) Cable
- Connecting Internal Headers
- Connecting a Chassis Fan
- Connecting Power Supply Cables
- Setting the BIOS Configuration Jumper
- Replacing the Battery
- 3 Updating the BIOS
- A BIOS Error Messages
- B Regulatory Compliance

Installing and Replacing Desktop Board Components
23
Installing the I/O Shield
The Desktop Board comes with an I/O shield. When installed in the chassis, the shield
blocks radio frequency transmissions, protects internal components from dust and
foreign objects, and promotes correct airflow within the chassis.
Install the I/O shield before installing the Desktop Board in the chassis. Place the
shield inside the chassis as shown in Figure 5. Press the shield into place so that it fits
tightly and securely. If the shield does not fit, obtain a properly-sized shield from the
chassis supplier.
Figure 5. Installing the I/O Shield