
Building a Responsive PC with Intel Responsiveness Technologies

Building a Responsive PC with NUC – v4.0 Hardware and Software Configuration
BIOS Setup
Step 3: Configure the BIOS
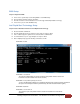
A. Power on the system and press F2 during POST to enter BIOS Setup.
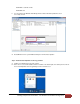
B. Click on Advanced Setup and then click Power.
C. Click the check boxes for Intel Smart Connect Technology and Intel Rapid Start Technology.
D. Press F10 key to save and exit BIOS Setup.
Intel Rapid Start Technology Setup
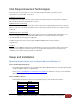
Step 4: Create a Hibernation Partition for Intel Rapid Start Technology
A. Boot the Intel NUC to Windows.
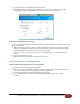
B. Click the Start button and in the Search box, type cmd.exe and press Enter.
C. In the result that appears, right-click on it and select Run as administrator.
D. A command line tool opens. Type diskpart.exe and press Enter.
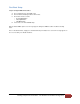
E. At the diskpart prompt, type the following commands as shown:
DISKPART> list disk
DISKPART> select disk X
(X is the disk number where you want to create the store partition. Refer to results from
list disk for exact disk number. Disk must be as SSD.)
DISKPART> create partition primary size=YYYY
(YYYY is the hibernation partition size in megabytes larger than the amount of memory installed on
the system. For example, for 4GB of system memory, the value should be 4096 or higher.)
DISKPART> detail disk
DISKPART> select Volume Z
(Z is Volume of your store partition. Refer to results from
detail
disk for exact volume
number.)