
User Manual


User Guide for NUC7i3DNHNC
6
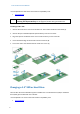
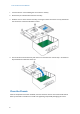
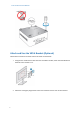
1. Unscrew the four screws holding the current drive in the bay.
2. Remove the pre-installed drive from the drive bay.
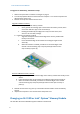
3. Slide the new 2.5” drive into the drive bay, ensuring the SATA connectors are fully seated into
the connectors of the SATA daughter card (A).
4. Secure the drive into the drive bay with the four screws that were used in step 1. Set the drive
bay bracket down inside the chassis (C).
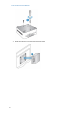
Close the Chassis
After all components have been installed, close the Intel NUC chassis. Intel recommends this be
done by hand with a screwdriver to avoid over-tightening and possibly damaging the screws.