Intel® NUC 11 Performance Laptop Kit • LAPBC510 • LAPBC710 • LAPBC5V0 • LAPBC7V0 User Guide Regulatory Model: BC57
Table of Contents English ................................................... 2 French ................................................... 17 German ................................................. 31 Italian ..................................................... 45 Japanese .............................................. 59 Norwegian ............................................ 73 Spanish ................................................. 87 Simplified Chinese ...........................
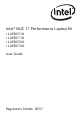
Preparing your Computer Connect the power cord to the AC adapter then to a grounded 100-240VAC outlet. DC Output Plug ADA AC PTE R Power Cord Connect the AC adapter’s DC output plug to either of the Thunderbolt connectors. 20V NOTE: The AC adapter must be used the first time the laptop is powered on. The laptop will not power on the first time if the AC adapter is not plugged into the laptop and into an AC power source.
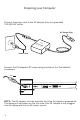
Preparing your Computer The display panel can be opened to a wide range of angles for optimal viewing. Attempting to force the lid open beyond 180 degrees will cause damage to the hinges and/or the display. Press the power button to turn on your laptop computer. f11 / ) 0 { [ P L - : ; > . del backspace } ] | \ “ ‘ + ctrl num lk scr lk + = * .
Product Overview US Keyboard A B C D E F G esc ~ ` ! 1 – f2 @ 2 tab X ^ 6 Y G V f7 7 T F C x f6 R D alt f5 % 5 E S Z fn x f4 $ 4 W A shift + f3 # 3 Q caps lock ctrl x f1 fn f8 & 7 8 4 H B * 8 U 1 N f9 9 5 J I 2 0 f10 M ( 9 f11 / 6 K alt _ - ) 0 O L - . : ; > . del backspace } ] | \ “ ‘ + ctrl num lk scr lk + = { [ P * 3 < , prt sc insert f12 enter ? / H shift pg up home pg dn end I J K 4
Product Overview UK Keyboard A B C D E F G esc x f1 fn ! 1 – f2 “ 2 tab £ 3 Q caps lock shift ctrl fn X ^ 6 Y G V f7 7 T F C x f6 R D alt f5 % 5 E S Z x f4 $ 4 W A | \ + f3 f8 & 7 8 4 H B * 8 U 1 N f9 9 5 J I 2 0 f10 M ( 9 f11 / 6 K alt _ - ) 0 O L - . : ; > .
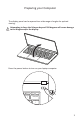
Product Overview A Time of Flight Sensor A sensor that detects when you approach or leave the laptop. B Infrared LED Used to support Windows Hello feature C Infrared LED Used to support Windows Hello feature D Camera High Definition Camera E Ambient Light Sensor A sensor that detects the amount of ambient light present and automatically optimizes the screen brightness. F LCD Screen Internal display/panel G Power Button Press once to turn the laptop on when it is powered off or asleep.
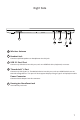
Right Side A B C D E 20V A Wireless Antenna B Headset Jack Connect amplified speakers or headphones into this jack C USB 3.2 Gen2 Port Connect any USB device into this port, such as a USB flash drive, keyboard, or mouse. D Thunderbolt™ 4 Port Connect any USB Type C or Thunderbolt device into this port, such as a USB Flash drive or an external storage device. This port will also support displays using a Type-C to DisplayPort cable.
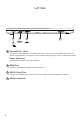
Left Side A B C D 20V A Thunderbolt™ 4 Port Connect any USB Type C or Thunderbolt device into this port, such as a USB Flash drive or an external storage device. This port will also support displays using a Type-C to DisplayPort cable. Power Connector Connect the AC adapter into this connector B HDMI Port Supports high-definition digital video connections C USB 3.2 Gen2 Port Connect any USB device into this port, such as a USB flash drive, keyboard, or mouse.
Bottom Side A B C A Speakers Stereo audio output B Back Cover Screws Modification of any of the laptop’s components will void the warranty C Vents The thermal vents are designed to cool the internal components and avoid overheating 9
Front Side A B C A Battery Indicator LED Charging: Breathing White, Charging Finish (w/AC): White, Battery Low: Amber B Digital Microphones Quad built-in Digital Microphone Array C RGB Light Bar Used to support personal voice assistants such as Alexa 10
Back Side A A Vents The thermal vents are designed to cool the internal components and avoid overheating 11
Understanding the US Keyboard The following defines the row of function keys which also contain a secondary hotkeys/shortcuts which can be accessed by pressing and holding down the Function Key (FN) while simultaneously pressing the desired hotkey/shortcut.
Understanding the UK Keyboard The following defines the row of function keys which also contain a secondary hotkeys/shortcuts which can be accessed by pressing and holding down the Function Key (FN) while simultaneously pressing the desired hotkey/shortcut. esc fn x f1 esc – f2 x f1 fn ! 1 fn fn + f3 x alt f5 ^ 6 R Y G V f7 f8 f7 7 T F C x f6 % 5 D X x f6 f4 E S Z f5 $ 4 W A | \ x f4 £ 3 Q caps lock ctrl – f2 “ 2 tab shift + f3 f8 & 7 8 4 H B f9
Keyboard Shortcuts To activate these functions, press the hotkey associated with the desired function as indicated below: Function Lock: Press this key combination (fn + esc) to toggle control for primary/secondary Fn row assignment. Sleep: Press this key combination (fn + f1) to initiate low power state. f2 Mute Audio: Press this key combination (fn + f2) to toggle between mute and unmute. f3 Volume Down: Press this key combination (fn + f3) to turn the audio volume down.
Keyboard Shortcuts fn + prt sc insert prt sc: Press this key combination (fn + esc) to send the current screen image to the printer. fn + num lk scr lk num lk: Press this key combination (fn + f1) to toggle enable/disable for the number lock. LED is illuminated when enabled. fn + pg up Page Up: Press this key combination (fn + f2) to enable standard page up. fn + pg dn Page Down: Press this key combination (fn + f3) to enable standard page down.
Using the Touchpad/Clickpad The touchpad / clickpad is a rectangular electronic panel located just below your keyboard. Clicking twice within the 15mm x 15mm corner in the top left will enable or disable (lighted indicator) touchpad functionality. You can use the static-sensitive panel of the touchpad / clickpad and slide it to move the cursor. You can use the buttons below the touchpad as left and right mouse buttons.
FRENCH Intel® NUC 11 Performance Laptop Kit • LAPBC510 • LAPBC710 • LAPBC5V0 • LAPBC7V0 User Guide Regulatory Model: BC57 17
Preparing your Computer Connect the power cord to the AC adapter then to a grounded 100-240VAC outlet. DC Output Plug ADA AC PTE R Power Cord Connect the AC adapter’s DC output plug to either of the Thunderbolt connectors. 20V NOTE: The AC adapter must be used the first time the laptop is powered on. The laptop will not power on the first time if the AC adapter is not plugged into the laptop and into an AC power source.
Preparing your Computer The display panel can be opened to a wide range of angles for optimal viewing. Attempting to force the lid open beyond 180 degrees will cause damage to the hinges and/or the display. Press the power button to turn on your laptop computer. f11 / ) 0 { [ P L - : ; > . del backspace } ] | \ “ ‘ + ctrl num lk scr lk + = * .
Product Overview A B C D E NEED FRENCH KEYBOARD F G esc ~ ` ! 1 – f2 @ 2 tab X ^ 6 Y G V f7 7 T F C x f6 R D alt f5 % 5 E S Z fn x f4 $ 4 W A shift + f3 # 3 Q caps lock ctrl x f1 fn f8 & 7 8 4 H B * 8 U 1 N f9 9 5 J I 2 0 f10 M ( 9 f11 / 6 K alt _ - ) 0 O L - . : ; > . del backspace } ] | \ “ ‘ + ctrl num lk scr lk + = { [ P * 3 < , prt sc insert f12 enter ? / H shift pg up home pg dn end I J K 20
Product Overview A Time of Flight Sensor A sensor that detects when you approach or leave the laptop. B Infrared LED Used to support Windows Hello feature C Infrared LED Used to support Windows Hello feature D Camera High Definition Camera E Ambient Light Sensor A sensor that detects the amount of ambient light present and automatically optimizes the screen brightness. F LCD Screen Internal display/panel G Power Button Press once to turn the laptop on when it is powered off or asleep.
Right Side A B C D E 20V A Wireless Antenna B Headset Jack Connect amplified speakers or headphones into this jack C USB 3.2 Gen2 Port Connect any USB device into this port, such as a USB flash drive, keyboard, or mouse. D Thunderbolt™ 4 Port Connect any USB Type C or Thunderbolt device into this port, such as a USB Flash drive or an external storage device. This port will also support displays using a Type-C to DisplayPort cable.
Left Side A B C D 20V A Thunderbolt™ 4 Port Connect any USB Type C or Thunderbolt device into this port, such as a USB Flash drive or an external storage device. This port will also support displays using a Type-C to DisplayPort cable. Power Connector Connect the AC adapter into this connector B HDMI Port Supports high-definition digital video connections C USB 3.2 Gen2 Port Connect any USB device into this port, such as a USB flash drive, keyboard, or mouse.
Bottom Side A B C A Speakers Stereo audio output B Back Cover Screws Modification of any of the laptop’s components will void the warranty C Vents The thermal vents are designed to cool the internal components and avoid overheating 24
Front Side A B C A Battery Indicator LED Charging: Breathing White, Charging Finish (w/AC): White, Battery Low: Amber B Digital Microphones Quad built-in Digital Microphone Array C RGB Light Bar Used to support personal voice assistants such as Alexa 25
Back Side A A Vents The thermal vents are designed to cool the internal components and avoid overheating 26
Understanding the Keyboard The following defines the row of function keys which also contain a secondary hotkeys/shortcuts which can be accessed by pressing and holding down the Function Key (FN) while simultaneously pressing the desired hotkey/shortcut.
Keyboard Shortcuts To activate these functions, press the hotkey associated with the desired function as indicated below: Function Lock: Press this key combination (fn + esc) to toggle control for primary/secondary Fn row assignment. Sleep: Press this key combination (fn + f1) to initiate low power state. f2 Mute Audio: Press this key combination (fn + f2) to toggle between mute and unmute. f3 Volume Down: Press this key combination (fn + f3) to turn the audio volume down.
Keyboard Shortcuts fn + prt sc insert prt sc: Press this key combination (fn + esc) to send the current screen image to the printer. fn + num lk scr lk num lk: Press this key combination (fn + f1) to toggle enable/disable for the number lock. LED is illuminated when enabled. fn + pg up Page Up: Press this key combination (fn + f2) to enable standard page up. fn + pg dn Page Down: Press this key combination (fn + f3) to enable standard page down.
Using the Touchpad/Clickpad The touchpad / clickpad is a rectangular electronic panel located just below your keyboard. Clicking twice within the 15mm x 15mm corner in the top left will enable or disable (lighted indicator) touchpad functionality. You can use the static-sensitive panel of the touchpad / clickpad and slide it to move the cursor. You can use the buttons below the touchpad as left and right mouse buttons.
GERMAN Intel® NUC 11 Performance Laptop Kit • LAPBC510 • LAPBC710 • LAPBC5V0 • LAPBC7V0 User Guide Regulatory Model: BC57 31
Preparing your Computer Connect the power cord to the AC adapter then to a grounded 100-240VAC outlet. DC Output Plug ADA AC PTE R Power Cord Connect the AC adapter’s DC output plug to either of the Thunderbolt connectors. 20V NOTE: The AC adapter must be used the first time the laptop is powered on. The laptop will not power on the first time if the AC adapter is not plugged into the laptop and into an AC power source.
Preparing your Computer The display panel can be opened to a wide range of angles for optimal viewing. Attempting to force the lid open beyond 180 degrees will cause damage to the hinges and/or the display. Press the power button to turn on your laptop computer. f11 / ) 0 { [ P L - : ; > . del backspace } ] | \ “ ‘ + ctrl num lk scr lk + = * .
Product Overview A B C D E NEED GERMAN KEYBOARD F G esc ~ ` ! 1 – f2 @ 2 tab X ^ 6 Y G V f7 7 T F C x f6 R D alt f5 % 5 E S Z fn x f4 $ 4 W A shift + f3 # 3 Q caps lock ctrl x f1 fn f8 & 7 8 4 H B * 8 U 1 N f9 9 5 J I 2 0 f10 M ( 9 f11 / 6 K alt _ - ) 0 O L - . : ; > . del backspace } ] | \ “ ‘ + ctrl num lk scr lk + = { [ P * 3 < , prt sc insert f12 enter ? / H shift pg up home pg dn end I J K 34
Product Overview A Time of Flight Sensor A sensor that detects when you approach or leave the laptop. B Infrared LED Used to support Windows Hello feature C Infrared LED Used to support Windows Hello feature D Camera High Definition Camera E Ambient Light Sensor A sensor that detects the amount of ambient light present and automatically optimizes the screen brightness. F LCD Screen Internal display/panel G Power Button Press once to turn the laptop on when it is powered off or asleep.
Right Side A B C D E 20V A Wireless Antenna B Headset Jack Connect amplified speakers or headphones into this jack C USB 3.2 Gen2 Port Connect any USB device into this port, such as a USB flash drive, keyboard, or mouse. D Thunderbolt™ 4 Port Connect any USB Type C or Thunderbolt device into this port, such as a USB Flash drive or an external storage device. This port will also support displays using a Type-C to DisplayPort cable.
Left Side A B C D 20V A Thunderbolt™ 4 Port Connect any USB Type C or Thunderbolt device into this port, such as a USB Flash drive or an external storage device. This port will also support displays using a Type-C to DisplayPort cable. Power Connector Connect the AC adapter into this connector B HDMI Port Supports high-definition digital video connections C USB 3.2 Gen2 Port Connect any USB device into this port, such as a USB flash drive, keyboard, or mouse.
Bottom Side A B C A Speakers Stereo audio output B Back Cover Screws Modification of any of the laptop’s components will void the warranty C Vents The thermal vents are designed to cool the internal components and avoid overheating 38
Front Side A B C A Battery Indicator LED Charging: Breathing White, Charging Finish (w/AC): White, Battery Low: Amber B Digital Microphones Quad built-in Digital Microphone Array C RGB Light Bar Used to support personal voice assistants such as Alexa 39
Back Side A A Vents The thermal vents are designed to cool the internal components and avoid overheating 40
Understanding the Keyboard The following defines the row of function keys which also contain a secondary hotkeys/shortcuts which can be accessed by pressing and holding down the Function Key (FN) while simultaneously pressing the desired hotkey/shortcut.
Keyboard Shortcuts To activate these functions, press the hotkey associated with the desired function as indicated below: Function Lock: Press this key combination (fn + esc) to toggle control for primary/secondary Fn row assignment. Sleep: Press this key combination (fn + f1) to initiate low power state. f2 Mute Audio: Press this key combination (fn + f2) to toggle between mute and unmute. f3 Volume Down: Press this key combination (fn + f3) to turn the audio volume down.
Keyboard Shortcuts fn + prt sc insert prt sc: Press this key combination (fn + esc) to send the current screen image to the printer. fn + num lk scr lk num lk: Press this key combination (fn + f1) to toggle enable/disable for the number lock. LED is illuminated when enabled. fn + pg up Page Up: Press this key combination (fn + f2) to enable standard page up. fn + pg dn Page Down: Press this key combination (fn + f3) to enable standard page down.
Using the Touchpad/Clickpad The touchpad / clickpad is a rectangular electronic panel located just below your keyboard. Clicking twice within the 15mm x 15mm corner in the top left will enable or disable (lighted indicator) touchpad functionality. You can use the static-sensitive panel of the touchpad / clickpad and slide it to move the cursor. You can use the buttons below the touchpad as left and right mouse buttons.
ITALIAN Intel® NUC 11 Performance Laptop Kit • LAPBC510 • LAPBC710 • LAPBC5V0 • LAPBC7V0 User Guide Regulatory Model: BC57 45
Preparing your Computer Connect the power cord to the AC adapter then to a grounded 100-240VAC outlet. DC Output Plug ADA AC PTE R Power Cord Connect the AC adapter’s DC output plug to either of the Thunderbolt connectors. 20V NOTE: The AC adapter must be used the first time the laptop is powered on. The laptop will not power on the first time if the AC adapter is not plugged into the laptop and into an AC power source.
Preparing your Computer The display panel can be opened to a wide range of angles for optimal viewing. Attempting to force the lid open beyond 180 degrees will cause damage to the hinges and/or the display. Press the power button to turn on your laptop computer. f11 / ) 0 { [ P L - : ; > . del backspace } ] | \ “ ‘ + ctrl num lk scr lk + = * .
Product Overview A B C D E NEED ITALIAN KEYBOARD F G esc ~ ` ! 1 – f2 @ 2 tab X ^ 6 Y G V f7 7 T F C x f6 R D alt f5 % 5 E S Z fn x f4 $ 4 W A shift + f3 # 3 Q caps lock ctrl x f1 fn f8 & 7 8 4 H B * 8 U 1 N f9 9 5 J I 2 0 f10 M ( 9 f11 / 6 K alt _ - ) 0 O L - . : ; > . del backspace } ] | \ “ ‘ + ctrl num lk scr lk + = { [ P * 3 < , prt sc insert f12 enter ? / H shift pg up home pg dn end I J K 48
Product Overview A Time of Flight Sensor A sensor that detects when you approach or leave the laptop. B Infrared LED Used to support Windows Hello feature C Infrared LED Used to support Windows Hello feature D Camera High Definition Camera E Ambient Light Sensor A sensor that detects the amount of ambient light present and automatically optimizes the screen brightness. F LCD Screen Internal display/panel G Power Button Press once to turn the laptop on when it is powered off or asleep.
Right Side A B C D E 20V A Wireless Antenna B Headset Jack Connect amplified speakers or headphones into this jack C USB 3.2 Gen2 Port Connect any USB device into this port, such as a USB flash drive, keyboard, or mouse. D Thunderbolt™ 4 Port Connect any USB Type C or Thunderbolt device into this port, such as a USB Flash drive or an external storage device. This port will also support displays using a Type-C to DisplayPort cable.
Left Side A B C D 20V A Thunderbolt™ 4 Port Connect any USB Type C or Thunderbolt device into this port, such as a USB Flash drive or an external storage device. This port will also support displays using a Type-C to DisplayPort cable. Power Connector Connect the AC adapter into this connector B HDMI Port Supports high-definition digital video connections C USB 3.2 Gen2 Port Connect any USB device into this port, such as a USB flash drive, keyboard, or mouse.
Bottom Side A B C A Speakers Stereo audio output B Back Cover Screws Modification of any of the laptop’s components will void the warranty C Vents The thermal vents are designed to cool the internal components and avoid overheating 52
Front Side A B C A Battery Indicator LED Charging: Breathing White, Charging Finish (w/AC): White, Battery Low: Amber B Digital Microphones Quad built-in Digital Microphone Array C RGB Light Bar Used to support personal voice assistants such as Alexa 53
Back Side A A Vents The thermal vents are designed to cool the internal components and avoid overheating 54
Understanding the Keyboard The following defines the row of function keys which also contain a secondary hotkeys/shortcuts which can be accessed by pressing and holding down the Function Key (FN) while simultaneously pressing the desired hotkey/shortcut.
Keyboard Shortcuts To activate these functions, press the hotkey associated with the desired function as indicated below: Function Lock: Press this key combination (fn + esc) to toggle control for primary/secondary Fn row assignment. Sleep: Press this key combination (fn + f1) to initiate low power state. f2 Mute Audio: Press this key combination (fn + f2) to toggle between mute and unmute. f3 Volume Down: Press this key combination (fn + f3) to turn the audio volume down.
Keyboard Shortcuts fn + prt sc insert prt sc: Press this key combination (fn + esc) to send the current screen image to the printer. fn + num lk scr lk num lk: Press this key combination (fn + f1) to toggle enable/disable for the number lock. LED is illuminated when enabled. fn + pg up Page Up: Press this key combination (fn + f2) to enable standard page up. fn + pg dn Page Down: Press this key combination (fn + f3) to enable standard page down.
Using the Touchpad/Clickpad The touchpad / clickpad is a rectangular electronic panel located just below your keyboard. Clicking twice within the 15mm x 15mm corner in the top left will enable or disable (lighted indicator) touchpad functionality. You can use the static-sensitive panel of the touchpad / clickpad and slide it to move the cursor. You can use the buttons below the touchpad as left and right mouse buttons.
JAPANESE Intel® NUC 11 Performance Laptop Kit • LAPBC510 • LAPBC710 • LAPBC5V0 • LAPBC7V0 User Guide Regulatory Model: BC57 59
Preparing your Computer Connect the power cord to the AC adapter then to a grounded 100-240VAC outlet. DC Output Plug ADA AC PTE R Power Cord Connect the AC adapter’s DC output plug to either of the Thunderbolt connectors. 20V NOTE: The AC adapter must be used the first time the laptop is powered on. The laptop will not power on the first time if the AC adapter is not plugged into the laptop and into an AC power source.
Preparing your Computer The display panel can be opened to a wide range of angles for optimal viewing. Attempting to force the lid open beyond 180 degrees will cause damage to the hinges and/or the display. Press the power button to turn on your laptop computer. f11 / ) 0 { [ P L - : ; > . del backspace } ] | \ “ ‘ + ctrl num lk scr lk + = * .
Product Overview A B C D E NEED JAPANESE KEYBOARD F G esc ~ ` ! 1 – f2 @ 2 tab X ^ 6 Y G V f7 7 T F C x f6 R D alt f5 % 5 E S Z fn x f4 $ 4 W A shift + f3 # 3 Q caps lock ctrl x f1 fn f8 & 7 8 4 H B * 8 U 1 N f9 9 5 J I 2 0 f10 M ( 9 f11 / 6 K alt _ - ) 0 O L - . : ; > . del backspace } ] | \ “ ‘ + ctrl num lk scr lk + = { [ P * 3 < , prt sc insert f12 enter ? / H shift pg up home pg dn end I J K 62
Product Overview A Time of Flight Sensor A sensor that detects when you approach or leave the laptop. B Infrared LED Used to support Windows Hello feature C Infrared LED Used to support Windows Hello feature D Camera High Definition Camera E Ambient Light Sensor A sensor that detects the amount of ambient light present and automatically optimizes the screen brightness. F LCD Screen Internal display/panel G Power Button Press once to turn the laptop on when it is powered off or asleep.
Right Side A B C D E 20V A Wireless Antenna B Headset Jack Connect amplified speakers or headphones into this jack C USB 3.2 Gen2 Port Connect any USB device into this port, such as a USB flash drive, keyboard, or mouse. D Thunderbolt™ 4 Port Connect any USB Type C or Thunderbolt device into this port, such as a USB Flash drive or an external storage device. This port will also support displays using a Type-C to DisplayPort cable.
Left Side A B C D 20V A Thunderbolt™ 4 Port Connect any USB Type C or Thunderbolt device into this port, such as a USB Flash drive or an external storage device. This port will also support displays using a Type-C to DisplayPort cable. Power Connector Connect the AC adapter into this connector B HDMI Port Supports high-definition digital video connections C USB 3.2 Gen2 Port Connect any USB device into this port, such as a USB flash drive, keyboard, or mouse.
Bottom Side A B C A Speakers Stereo audio output B Back Cover Screws Modification of any of the laptop’s components will void the warranty C Vents The thermal vents are designed to cool the internal components and avoid overheating 66
Front Side A B C A Battery Indicator LED Charging: Breathing White, Charging Finish (w/AC): White, Battery Low: Amber B Digital Microphones Quad built-in Digital Microphone Array C RGB Light Bar Used to support personal voice assistants such as Alexa 67
Back Side A A Vents The thermal vents are designed to cool the internal components and avoid overheating 68
Understanding the Keyboard The following defines the row of function keys which also contain a secondary hotkeys/shortcuts which can be accessed by pressing and holding down the Function Key (FN) while simultaneously pressing the desired hotkey/shortcut.
Keyboard Shortcuts To activate these functions, press the hotkey associated with the desired function as indicated below: Function Lock: Press this key combination (fn + esc) to toggle control for primary/secondary Fn row assignment. Sleep: Press this key combination (fn + f1) to initiate low power state. f2 Mute Audio: Press this key combination (fn + f2) to toggle between mute and unmute. f3 Volume Down: Press this key combination (fn + f3) to turn the audio volume down.
Keyboard Shortcuts fn + prt sc insert prt sc: Press this key combination (fn + esc) to send the current screen image to the printer. fn + num lk scr lk num lk: Press this key combination (fn + f1) to toggle enable/disable for the number lock. LED is illuminated when enabled. fn + pg up Page Up: Press this key combination (fn + f2) to enable standard page up. fn + pg dn Page Down: Press this key combination (fn + f3) to enable standard page down.
Using the Touchpad/Clickpad The touchpad / clickpad is a rectangular electronic panel located just below your keyboard. Clicking twice within the 15mm x 15mm corner in the top left will enable or disable (lighted indicator) touchpad functionality. You can use the static-sensitive panel of the touchpad / clickpad and slide it to move the cursor. You can use the buttons below the touchpad as left and right mouse buttons.
NORWEGIAN Intel® NUC 11 Performance Laptop Kit • LAPBC510 • LAPBC710 • LAPBC5V0 • LAPBC7V0 User Guide Regulatory Model: BC57 73
Preparing your Computer Connect the power cord to the AC adapter then to a grounded 100-240VAC outlet. DC Output Plug ADA AC PTE R Power Cord Connect the AC adapter’s DC output plug to either of the Thunderbolt connectors. 20V NOTE: The AC adapter must be used the first time the laptop is powered on. The laptop will not power on the first time if the AC adapter is not plugged into the laptop and into an AC power source.
Preparing your Computer The display panel can be opened to a wide range of angles for optimal viewing. Attempting to force the lid open beyond 180 degrees will cause damage to the hinges and/or the display. Press the power button to turn on your laptop computer. f11 / ) 0 { [ P L - : ; > . del backspace } ] | \ “ ‘ + ctrl num lk scr lk + = * .
Product Overview A B C D E NEED NORWEGIAN KEYBOARD F G esc ~ ` ! 1 – f2 @ 2 tab X ^ 6 Y G V f7 7 T F C x f6 R D alt f5 % 5 E S Z fn x f4 $ 4 W A shift + f3 # 3 Q caps lock ctrl x f1 fn f8 & 7 8 4 H B * 8 U 1 N f9 9 5 J I 2 0 f10 M ( 9 f11 / 6 K alt _ - ) 0 O L - . : ; > . del backspace } ] | \ “ ‘ + ctrl num lk scr lk + = { [ P * 3 < , prt sc insert f12 enter ? / H shift pg up home pg dn end I J K 76
Product Overview A Time of Flight Sensor A sensor that detects when you approach or leave the laptop. B Infrared LED Used to support Windows Hello feature C Infrared LED Used to support Windows Hello feature D Camera High Definition Camera E Ambient Light Sensor A sensor that detects the amount of ambient light present and automatically optimizes the screen brightness. F LCD Screen Internal display/panel G Power Button Press once to turn the laptop on when it is powered off or asleep.
Right Side A B C D E 20V A Wireless Antenna B Headset Jack Connect amplified speakers or headphones into this jack C USB 3.2 Gen2 Port Connect any USB device into this port, such as a USB flash drive, keyboard, or mouse. D Thunderbolt™ 4 Port Connect any USB Type C or Thunderbolt device into this port, such as a USB Flash drive or an external storage device. This port will also support displays using a Type-C to DisplayPort cable.
Left Side A B C D 20V A Thunderbolt™ 4 Port Connect any USB Type C or Thunderbolt device into this port, such as a USB Flash drive or an external storage device. This port will also support displays using a Type-C to DisplayPort cable. Power Connector Connect the AC adapter into this connector B HDMI Port Supports high-definition digital video connections C USB 3.2 Gen2 Port Connect any USB device into this port, such as a USB flash drive, keyboard, or mouse.
Bottom Side A B C A Speakers Stereo audio output B Back Cover Screws Modification of any of the laptop’s components will void the warranty C Vents The thermal vents are designed to cool the internal components and avoid overheating 80
Front Side A B C A Battery Indicator LED Charging: Breathing White, Charging Finish (w/AC): White, Battery Low: Amber B Digital Microphones Quad built-in Digital Microphone Array C RGB Light Bar Used to support personal voice assistants such as Alexa 81
Back Side A A Vents The thermal vents are designed to cool the internal components and avoid overheating 82
Understanding the Keyboard The following defines the row of function keys which also contain a secondary hotkeys/shortcuts which can be accessed by pressing and holding down the Function Key (FN) while simultaneously pressing the desired hotkey/shortcut.
Keyboard Shortcuts To activate these functions, press the hotkey associated with the desired function as indicated below: Function Lock: Press this key combination (fn + esc) to toggle control for primary/secondary Fn row assignment. Sleep: Press this key combination (fn + f1) to initiate low power state. f2 Mute Audio: Press this key combination (fn + f2) to toggle between mute and unmute. f3 Volume Down: Press this key combination (fn + f3) to turn the audio volume down.
Keyboard Shortcuts fn + prt sc insert prt sc: Press this key combination (fn + esc) to send the current screen image to the printer. fn + num lk scr lk num lk: Press this key combination (fn + f1) to toggle enable/disable for the number lock. LED is illuminated when enabled. fn + pg up Page Up: Press this key combination (fn + f2) to enable standard page up. fn + pg dn Page Down: Press this key combination (fn + f3) to enable standard page down.
Using the Touchpad/Clickpad The touchpad / clickpad is a rectangular electronic panel located just below your keyboard. Clicking twice within the 15mm x 15mm corner in the top left will enable or disable (lighted indicator) touchpad functionality. You can use the static-sensitive panel of the touchpad / clickpad and slide it to move the cursor. You can use the buttons below the touchpad as left and right mouse buttons.
SPANISH Intel® NUC 11 Performance Laptop Kit • LAPBC510 • LAPBC710 • LAPBC5V0 • LAPBC7V0 User Guide Regulatory Model: BC57 87
Preparing your Computer Connect the power cord to the AC adapter then to a grounded 100-240VAC outlet. DC Output Plug ADA AC PTE R Power Cord Connect the AC adapter’s DC output plug to either of the Thunderbolt connectors. 20V NOTE: The AC adapter must be used the first time the laptop is powered on. The laptop will not power on the first time if the AC adapter is not plugged into the laptop and into an AC power source.
Preparing your Computer The display panel can be opened to a wide range of angles for optimal viewing. Attempting to force the lid open beyond 180 degrees will cause damage to the hinges and/or the display. Press the power button to turn on your laptop computer. f11 / ) 0 { [ P L - : ; > . del backspace } ] | \ “ ‘ + ctrl num lk scr lk + = * .
Product Overview A B C D E NEED SPANISH KEYBOARD F G esc ~ ` ! 1 – f2 @ 2 tab X ^ 6 Y G V f7 7 T F C x f6 R D alt f5 % 5 E S Z fn x f4 $ 4 W A shift + f3 # 3 Q caps lock ctrl x f1 fn f8 & 7 8 4 H B * 8 U 1 N f9 9 5 J I 2 0 f10 M ( 9 f11 / 6 K alt _ - ) 0 O L - . : ; > . del backspace } ] | \ “ ‘ + ctrl num lk scr lk + = { [ P * 3 < , prt sc insert f12 enter ? / H shift pg up home pg dn end I J K 90
Product Overview A Time of Flight Sensor A sensor that detects when you approach or leave the laptop. B Infrared LED Used to support Windows Hello feature C Infrared LED Used to support Windows Hello feature D Camera High Definition Camera E Ambient Light Sensor A sensor that detects the amount of ambient light present and automatically optimizes the screen brightness. F LCD Screen Internal display/panel G Power Button Press once to turn the laptop on when it is powered off or asleep.
Right Side A B C D E 20V A Wireless Antenna B Headset Jack Connect amplified speakers or headphones into this jack C USB 3.2 Gen2 Port Connect any USB device into this port, such as a USB flash drive, keyboard, or mouse. D Thunderbolt™ 4 Port Connect any USB Type C or Thunderbolt device into this port, such as a USB Flash drive or an external storage device. This port will also support displays using a Type-C to DisplayPort cable.
Left Side A B C D 20V A Thunderbolt™ 4 Port Connect any USB Type C or Thunderbolt device into this port, such as a USB Flash drive or an external storage device. This port will also support displays using a Type-C to DisplayPort cable. Power Connector Connect the AC adapter into this connector B HDMI Port Supports high-definition digital video connections C USB 3.2 Gen2 Port Connect any USB device into this port, such as a USB flash drive, keyboard, or mouse.
Bottom Side A B C A Speakers Stereo audio output B Back Cover Screws Modification of any of the laptop’s components will void the warranty C Vents The thermal vents are designed to cool the internal components and avoid overheating 94
Front Side A B C A Battery Indicator LED Charging: Breathing White, Charging Finish (w/AC): White, Battery Low: Amber B Digital Microphones Quad built-in Digital Microphone Array C RGB Light Bar Used to support personal voice assistants such as Alexa 95
Back Side A A Vents The thermal vents are designed to cool the internal components and avoid overheating 96
Understanding the Keyboard The following defines the row of function keys which also contain a secondary hotkeys/shortcuts which can be accessed by pressing and holding down the Function Key (FN) while simultaneously pressing the desired hotkey/shortcut.
Keyboard Shortcuts To activate these functions, press the hotkey associated with the desired function as indicated below: Function Lock: Press this key combination (fn + esc) to toggle control for primary/secondary Fn row assignment. Sleep: Press this key combination (fn + f1) to initiate low power state. f2 Mute Audio: Press this key combination (fn + f2) to toggle between mute and unmute. f3 Volume Down: Press this key combination (fn + f3) to turn the audio volume down.
Keyboard Shortcuts fn + prt sc insert prt sc: Press this key combination (fn + esc) to send the current screen image to the printer. fn + num lk scr lk num lk: Press this key combination (fn + f1) to toggle enable/disable for the number lock. LED is illuminated when enabled. fn + pg up Page Up: Press this key combination (fn + f2) to enable standard page up. fn + pg dn Page Down: Press this key combination (fn + f3) to enable standard page down.
Using the Touchpad/Clickpad The touchpad / clickpad is a rectangular electronic panel located just below your keyboard. Clicking twice within the 15mm x 15mm corner in the top left will enable or disable (lighted indicator) touchpad functionality. You can use the static-sensitive panel of the touchpad / clickpad and slide it to move the cursor. You can use the buttons below the touchpad as left and right mouse buttons.
SIMPLIFIED CHINESE Intel® NUC 11 Performance Laptop Kit • LAPBC510 • LAPBC710 • LAPBC5V0 • LAPBC7V0 User Guide Regulatory Model: BC57 101
Preparing your Computer Connect the power cord to the AC adapter then to a grounded 100-240VAC outlet. DC Output Plug ADA AC PTE R Power Cord Connect the AC adapter’s DC output plug to either of the Thunderbolt connectors. 20V NOTE: The AC adapter must be used the first time the laptop is powered on. The laptop will not power on the first time if the AC adapter is not plugged into the laptop and into an AC power source.
Preparing your Computer The display panel can be opened to a wide range of angles for optimal viewing. Attempting to force the lid open beyond 180 degrees will cause damage to the hinges and/or the display. Press the power button to turn on your laptop computer. f11 / ) 0 { [ P L - : ; > . del backspace } ] | \ “ ‘ + ctrl num lk scr lk + = * .
Product Overview A B C D E NEED SIMPLIFIED KEYBOARD F G esc ~ ` ! 1 – f2 @ 2 tab X ^ 6 Y G V f7 7 T F C x f6 R D alt f5 % 5 E S Z fn x f4 $ 4 W A shift + f3 # 3 Q caps lock ctrl x f1 fn f8 & 7 8 4 H B * 8 U 1 N f9 9 5 J I 2 0 f10 M ( 9 f11 / 6 K alt _ - ) 0 O L - . : ; > . del backspace } ] | \ “ ‘ + ctrl num lk scr lk + = { [ P * 3 < , prt sc insert f12 enter ? / H shift pg up home pg dn end I J K 104
Product Overview A Time of Flight Sensor A sensor that detects when you approach or leave the laptop. B Infrared LED Used to support Windows Hello feature C Infrared LED Used to support Windows Hello feature D Camera High Definition Camera E Ambient Light Sensor A sensor that detects the amount of ambient light present and automatically optimizes the screen brightness. F LCD Screen Internal display/panel G Power Button Press once to turn the laptop on when it is powered off or asleep.
Right Side A B C D E 20V A Wireless Antenna B Headset Jack Connect amplified speakers or headphones into this jack C USB 3.2 Gen2 Port Connect any USB device into this port, such as a USB flash drive, keyboard, or mouse. D Thunderbolt™ 4 Port Connect any USB Type C or Thunderbolt device into this port, such as a USB Flash drive or an external storage device. This port will also support displays using a Type-C to DisplayPort cable.
Left Side A B C D 20V A Thunderbolt™ 4 Port Connect any USB Type C or Thunderbolt device into this port, such as a USB Flash drive or an external storage device. This port will also support displays using a Type-C to DisplayPort cable. Power Connector Connect the AC adapter into this connector B HDMI Port Supports high-definition digital video connections C USB 3.2 Gen2 Port Connect any USB device into this port, such as a USB flash drive, keyboard, or mouse.
Bottom Side A B C A Speakers Stereo audio output B Back Cover Screws Modification of any of the laptop’s components will void the warranty C Vents The thermal vents are designed to cool the internal components and avoid overheating 108
Front Side A B C A Battery Indicator LED Charging: Breathing White, Charging Finish (w/AC): White, Battery Low: Amber B Digital Microphones Quad built-in Digital Microphone Array C RGB Light Bar Used to support personal voice assistants such as Alexa 109
Back Side A A Vents The thermal vents are designed to cool the internal components and avoid overheating 110
Understanding the Keyboard The following defines the row of function keys which also contain a secondary hotkeys/shortcuts which can be accessed by pressing and holding down the Function Key (FN) while simultaneously pressing the desired hotkey/shortcut.
Keyboard Shortcuts To activate these functions, press the hotkey associated with the desired function as indicated below: Function Lock: Press this key combination (fn + esc) to toggle control for primary/secondary Fn row assignment. Sleep: Press this key combination (fn + f1) to initiate low power state. f2 Mute Audio: Press this key combination (fn + f2) to toggle between mute and unmute. f3 Volume Down: Press this key combination (fn + f3) to turn the audio volume down.
Keyboard Shortcuts fn + prt sc insert prt sc: Press this key combination (fn + esc) to send the current screen image to the printer. fn + num lk scr lk num lk: Press this key combination (fn + f1) to toggle enable/disable for the number lock. LED is illuminated when enabled. fn + pg up Page Up: Press this key combination (fn + f2) to enable standard page up. fn + pg dn Page Down: Press this key combination (fn + f3) to enable standard page down.
Using the Touchpad/Clickpad The touchpad / clickpad is a rectangular electronic panel located just below your keyboard. Clicking twice within the 15mm x 15mm corner in the top left will enable or disable (lighted indicator) touchpad functionality. You can use the static-sensitive panel of the touchpad / clickpad and slide it to move the cursor. You can use the buttons below the touchpad as left and right mouse buttons.
TRADITIONAL CHINESE Intel® NUC 11 Performance Laptop Kit • LAPBC510 • LAPBC710 • LAPBC5V0 • LAPBC7V0 User Guide Regulatory Model: BC57 115
Preparing your Computer Connect the power cord to the AC adapter then to a grounded 100-240VAC outlet. DC Output Plug ADA AC PTE R Power Cord Connect the AC adapter’s DC output plug to either of the Thunderbolt connectors. 20V NOTE: The AC adapter must be used the first time the laptop is powered on. The laptop will not power on the first time if the AC adapter is not plugged into the laptop and into an AC power source.
Preparing your Computer The display panel can be opened to a wide range of angles for optimal viewing. Attempting to force the lid open beyond 180 degrees will cause damage to the hinges and/or the display. Press the power button to turn on your laptop computer. f11 / ) 0 { [ P L - : ; > . del backspace } ] | \ “ ‘ + ctrl num lk scr lk + = * .
Product Overview A B C D E NEED TRADITIONAL KEYBOARD F G esc ~ ` ! 1 – f2 @ 2 tab X ^ 6 Y G V f7 7 T F C x f6 R D alt f5 % 5 E S Z fn x f4 $ 4 W A shift + f3 # 3 Q caps lock ctrl x f1 fn f8 & 7 8 4 H B * 8 U 1 N f9 9 5 J I 2 0 f10 M ( 9 f11 / 6 K alt _ - ) 0 O L - . : ; > . del backspace } ] | \ “ ‘ + ctrl num lk scr lk + = { [ P * 3 < , prt sc insert f12 enter ? / H shift pg up home pg dn end I J K 118
Product Overview A Time of Flight Sensor A sensor that detects when you approach or leave the laptop. B Infrared LED Used to support Windows Hello feature C Infrared LED Used to support Windows Hello feature D Camera High Definition Camera E Ambient Light Sensor A sensor that detects the amount of ambient light present and automatically optimizes the screen brightness. F LCD Screen Internal display/panel G Power Button Press once to turn the laptop on when it is powered off or asleep.
Right Side A B C D E 20V A Wireless Antenna B Headset Jack Connect amplified speakers or headphones into this jack C USB 3.2 Gen2 Port Connect any USB device into this port, such as a USB flash drive, keyboard, or mouse. D Thunderbolt™ 4 Port Connect any USB Type C or Thunderbolt device into this port, such as a USB Flash drive or an external storage device. This port will also support displays using a Type-C to DisplayPort cable.
Left Side A B C D 20V A Thunderbolt™ 4 Port Connect any USB Type C or Thunderbolt device into this port, such as a USB Flash drive or an external storage device. This port will also support displays using a Type-C to DisplayPort cable. Power Connector Connect the AC adapter into this connector B HDMI Port Supports high-definition digital video connections C USB 3.2 Gen2 Port Connect any USB device into this port, such as a USB flash drive, keyboard, or mouse.
Bottom Side A B C A Speakers Stereo audio output B Back Cover Screws Modification of any of the laptop’s components will void the warranty C Vents The thermal vents are designed to cool the internal components and avoid overheating 122
Front Side A B C A Battery Indicator LED Charging: Breathing White, Charging Finish (w/AC): White, Battery Low: Amber B Digital Microphones Quad built-in Digital Microphone Array C RGB Light Bar Used to support personal voice assistants such as Alexa 123
Back Side A A Vents The thermal vents are designed to cool the internal components and avoid overheating 124
Understanding the Keyboard The following defines the row of function keys which also contain a secondary hotkeys/shortcuts which can be accessed by pressing and holding down the Function Key (FN) while simultaneously pressing the desired hotkey/shortcut.
Keyboard Shortcuts To activate these functions, press the hotkey associated with the desired function as indicated below: Function Lock: Press this key combination (fn + esc) to toggle control for primary/secondary Fn row assignment. Sleep: Press this key combination (fn + f1) to initiate low power state. f2 Mute Audio: Press this key combination (fn + f2) to toggle between mute and unmute. f3 Volume Down: Press this key combination (fn + f3) to turn the audio volume down.
Keyboard Shortcuts fn + prt sc insert prt sc: Press this key combination (fn + esc) to send the current screen image to the printer. fn + num lk scr lk num lk: Press this key combination (fn + f1) to toggle enable/disable for the number lock. LED is illuminated when enabled. fn + pg up Page Up: Press this key combination (fn + f2) to enable standard page up. fn + pg dn Page Down: Press this key combination (fn + f3) to enable standard page down.
Using the Touchpad/Clickpad The touchpad / clickpad is a rectangular electronic panel located just below your keyboard. Clicking twice within the 15mm x 15mm corner in the top left will enable or disable (lighted indicator) touchpad functionality. You can use the static-sensitive panel of the touchpad / clickpad and slide it to move the cursor. You can use the buttons below the touchpad as left and right mouse buttons.
Disclaimer INFORMATION IN THIS DOCUMENT IS PROVIDED IN CONNECTION WITH INTEL® PRODUCTS. NO LICENSE, EXPRESS OR IMPLIED, BY ESTOPPEL OR OTHERWISE, TO ANY INTELLECTUAL PROPERTY RIGHTS IS GRANTED BY THIS DOCUMENT.