
User's Guide
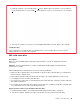

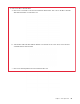
Table Of Contents

5. Install the new base cover assembly in place 1 . Ensure that the latches of the base cover assembly are
secured under the base cover assembly
2 . Then, tighten the screws to secure the base cover assembly
3 .
6. Turn over the computer. Connect the ac power adapter and all disconnected cables to the computer.
Troubleshooting
If the computer does not start up after you reinstall the base cover assembly, disconnect the ac power
adapter and then reconnect it to the computer.
M.2 solid-state drive
Prerequisite
Before you start, read Appendix A “Important safety information” on page 73 and print the following
instructions.
Attention: The M.2 solid-state drive is sensitive. Inappropriate handling might cause damage and
permanent loss of data.
When handling the M.2 solid-state drive, observe the following guidelines:
• Replace the M.2 solid-state drive only for upgrade or repair. The M.2 solid-state drive is not designed for
frequent changes or replacement.
• Before replacing the M.2 solid-state drive, make a backup copy of all the data that you want to keep.
• Do not apply pressure to the M.2 solid-state drive.
• Do not touch the contact edge or circuit board of the M.2 solid-state drive. Otherwise, the M.2 solid-state
drive might get damaged.
• Do not make the M.2 solid-state drive subject to physical shocks or vibration. Put the M.2 solid-state drive
on a soft material, such as cloth, to absorb physical shocks.
Replacement procedure for the short M.2 solid-state drive
1. Disable the built-in battery. See “Disable Fast Startup and the built-in battery” on page 53.
2. Turn off the computer and disconnect the computer from ac power and all connected cables.
Chapter 7. CRU replacement 55