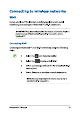
Connecting to wireless networks WI-Fi Access emails, surf the Internet, and share applications via social networking sites using your Notebook PC's WI-Fi connection. IMPORTANT! Airplane mode disables this feature. Ensure that Airplane mode is turned off before enabling the WI-Fi connection of your Notebook PC. Connecting WI-Fi Connect your Notebook PC to a WI-Fi network by using the following steps: ay Select the icon from the taskbar. 2. Select the BE icon to enable WI-Fi. 3.
Bluetooth Use Bluetooth to facilitate wireless data transfers with other Bluetooth enabled devices. IMPORTANT! Airplane mode disables this feature. Ensure that Airplane mode is turned off before enabling the Bluetooth connection of your Notebook PC. Pairing with other Bluetooth-enabled devices You need to pair your Notebook PC with other Bluetooth-enabled devices to enable data transfers. Connect your devices by using the following steps: 1. Launch Settings from the Start menu.
Airplane mode Airplane mode disables wireless communication, allowing you to use your Notebook PC safely while in-flight. NOTE: Contact your airline provider to learn about related in-flight services that can be used and restrictions that must be followed when using your Notebook PC in-flight. Turning Airplane mode on 1. Launch Action Center from the taskbar. 2. Select the icon to enable Airplane mode. Turning Airplane mode off 1. Launch Action Center from the taskbar. 2.
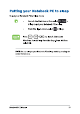
Turning your Notebook PC off You can turn off your Notebook PC by doing either of the following procedures: . Launch the Start menu, then select @ = > Shut down to do a normal shutdown. . From the log-in screen, select| & > Shut down, . Press [+E] to launch Shut down Windows. Select Shut down from the drop-down list then select OK. . If your Notebook PC is unresponsive, press and hold the power button for at least four (4) seconds until your Notebook PC turns off.
Putting your Notebook PC to sleep To put your Notebook PC to Sleep mode: #t . Launch the Start menu, then select Sleep to put your Notebook PC to sleep. . From the log-in screen, select [8] > Sleep. Press to launch Shut down Windows. Select Sleep from the drop-down list then select OK. NOTE: You can also put your Notebook PC to Sleep mode by pressing the power button once.
The Power-On Self-Test (POST) The POST (Power-On Self-Test) is a series of software-controlled diagnostic tests that run when you turn on or restart your Notebook PC. The software that controls the POST is installed as a permanent part of the Notebook PC's architecture. Using POST to access BIOS and Troubleshoot During POST, you can access the BIOS settings or run troubleshooting options using the function keys of your Notebook PC. You may refer to the following information for more details.
Accessing BIOS Enter the BIOS settings by using any of the following methods: . Restart your Notebook PC then press |» | during POST. . Launch the Start menu, and choose Settings > Update & security > Recovery, then select Restart now under Advanced startup. When you enter the Advanced startup screen, select Troubleshoot > Advanced options > EFFIE Firmware Settings > Restart.
BIOS Settings NOTE: The BIOS screens in this section are for reference only. The actual screens may differ by model and territory. Boot This menu allows you to set your boot option priorities. You may refer to the following procedures when setting your boot priority. 1. Ont he Boot screen, select Boot Option #1.
2. Press stet, | and select a device as the Boot Option #1. Patio Setup Utility Copyright (C} 2018 American Grandstands, Ina. Main Advanced c..Bacuribty Save i Brit Fast Hoot [Enabled] Sat the system boot larder Boot Option Priorities PF Add New Hoot option Delete Boot Notion Boot Option #1 Windows Boot Manager Disabled | Select Sureness Seiko stem Select Change Op, General Help Optimized Defaults Fave 5 Exit Exit Version 22.20.1271. Copyright (C} 2018 American Trendsetting, Inc.
Security This menu allows you to set up the administrator and user password of your Notebook PC. It also allows you to control the access to your Notebook PC's hard disk drive, input/output (1/0) interface, and USB interface. NOTE: «If you install a User Password, you will be prompted to input this before entering your Notebook PC's operating system. + If you install an Administrator Password, you will be prompted to input this before entering BIOS.
To set the password: 1. On the Security screen, select Administrator Password or User Password. 2. Type in a password then press earn, 3. Re-type to confirm the password then press ten |. To clear the password: 1. On the Security screen, select Administrator Password or User Password. 2. Type in the current password then press ester |, 3. Leave the Create New Password field blank then press stet | 4. Select Yes in the confirmation box then press en |.
1/0 Interface Security In the Security menu, you can access 1/0 Interface Security to lock or unlock some interface functions of your Notebook PC. Pv) 1/0 Interface Security If Locked, LAN controlling will be dissimilar, Wireless Network Interface [Unlock] HD AUDIO Interface [info] B USE Interface Security LAN Network Interface pl oon d : Select Serene : Selena item : Select i Change Opt. : General Hal : Optimized Defaults : Lava § Bal: : Emir a To lock an interface: 1.
USB Interface Security Through the I/0 Interface Security menu, you can also access USB Interface Security to lock or unlock ports and devices. Pv) UBB Interface Security If Locked, all USE device will be dispensed External Ports Unlock] CHEWS Camera [neck] Card Deader interlock] : Select Serene : Selena item : Select i Change Opt. : General Hal : Optimized Defaults : Lava § Bal: : Emir a To lock the USB interface: 1. On the Security screen, select I/O Interface Security > USB Interface Security. 2.
Save & Exit To keep your configuration settings, select Save Changes and Exit before exiting the BIOS.
To update the BIOS: 1. Verify the Notebook PC's exact model then download the latest BIOS file for your model from the ASS website. 2. Save a copy of the downloaded BIOS file to a flash disk drive. 3. Connect your flash disk drive to your Notebook PC. 4. Restart your Notebook PC then press | during POST. 5. From the BIOS menu, select Advanced > ASS EZ Flash 3 Utility, then press le |, Patio Setup Utility Copyright (C} 2018 American Grandstands, Ino.
6. Locate your downloaded BIOS file in the flash disk drive then press apr, |, Texas Splashiness Utility Econ cme Siam 0 a Version © 208 cae Gen After the BIOS update process, select Save & Exit > Restore Defaults to restore the system to its default settings.
Recovering your system Using recovery options on your Notebook PC allows you to restore the system to its original state or simply refresh its settings to help improve performance. IMPORTANT! « Backup all your data files before doing any recovery option on your Notebook PC. « Note down important customized settings such as network settings, user names, and passwords to avoid data loss. + Ensure that your Notebook PC is plugged in to a power source before resetting your system.
. Go back to an earlier build This option allows you to go back to an earlier build. Use this option if this build is not working for you. . Advanced startup Using this option allows you to perform other advanced recovery options on your Notebook PC such as: Using a USB drive, network connection or Windows recovery DVD to startup your Notebook PC.
2. Under the Update and security option, select Recovery then select the recovery option you would like to perform.
Useful tips for your Notebook PC To help you maximize the use of your Notebook PC, maintain its system performance, and ensure all your data are kept secured, here are some useful tips that you can follow: . Update Windows® periodically to ensure that your applications have the latest security settings. . Use an anti-virus software to protect your data and keep this updated too. . Unless absolutely necessary, refrain from using force shutdown to turn off your Notebook PC. .
Hardware FAQs 1. A black dot, or sometimes a colored dot, appears onscreen when | turn on the Notebook PC. What should | do? Although these dots normally appear onscreen, they will not affect your system. If the incident continues and subsequently affects system performance, consult an authorized ASS service center. My display panel has an uneven color and brightness. How can | fix this? The color and brightness of your display panel may be affected by the angle and current position of your Notebook PC.
5. My battery charge indicator does not light up. What's wrong? . Check whether the power adapter or battery pack is attached correctly. You may also disconnect the power adapter or battery pack, wait for a minute, then reconnect them again to the power outlet and Notebook PC. . If the problem still exists, contact your local ASS service center for assistance. Why is my touch pad not working? Press (x3) to enable your touch pad.
8. My Notebook PC cannot do keystrokes correctly because my cursor keeps on moving. What should | do? Make sure that nothing accidentally touches or presses on your touch pad while you type on the keyboard.
Software FAQs 1. 2, When | turn on my Notebook PC, the power indicator lights up but nothing appears on my screen. What can | do to fix this? You can try doing any of the following suggestions: . Force shutdown your Notebook PC by pressing the power button for at least four (4) seconds. Check if the power adapter and battery pack are inserted correctly then turn on your Notebook PC. . If the problem still exists, contact your local ASS service center for assistance.
4. My Notebook PC does not boot up. How can | fix this? You can try doing any of the following suggestions: . Remove all connected devices to your Notebook PC then restart your system. . If the problem still exists, contact your local ASS service center for assistance. 5. Why can’t my Notebook PC wake up from sleep mode? . You need to press the power button to resume your last working state. + Your system might have completely used up its battery power.
DVD-ROM Drive Information The DVD-ROM drive allows you to view and create your own CDs and DVDs. You can purchase an optional DVD viewer software to view DVD titles. NOTE: The DVD-ROM Drive is available on selected models. Regional Playback Information Playback of DVD movie titles involves decoding MPEG video, digital AC3 audio and decryption of CSS protected content.
Region Definitions Region 1 Canada, US, US Territories Region 2 Czech, Egypt, Finland, France, Germany, Gulf States, Hungary, Iceland, Iran, Iraq, Ireland, Italy, Japan, Netherlands, Norway, Poland, Portugal, Saudi Arabia, Scotland, South Africa, Spain, Sweden, Switzerland, Syria, Turkey, UK, Greece, Former Yugoslav Republics, Slovakia Region 3 Burma, Indonesia, South Korea, Malaysia, Philippines, Singapore, Taiwan, Thailand, Vietnam Region 4 Australia, Caribbean (Except US Territories), Central America, Ne
Blu-ray ROM Drive Information The Blu-ray ROM Drive allows you to view HD (High-Definition) videos and other disc file formats such as DVDs and CDs. NOTE: The Blu-ray ROM Drive is available on selected models. Region Definitions Region A North, Central and South American countries, and their territories; Taiwan, Hong Kong, Macao, Japan, Korea (South and North), South East Asian countries and their territories.
Overview On 4th August 1998 the European Council Decision regarding the CTR 21 has been published in the Official Journal of the EC. The CTR 21 applies to all non voice terminal equipment with MDT-dialling which is intended to be connected to the analogue PST (Public Switched Telephone Network).
This table shows the countries currently under the CTR standard.
This information was copied from COMPETE and is supplied without liability. For updates to this table, you may visit HTML, 1 National requirements will apply only if the equipment may use pulse dialing {manufacturers may state in the user guide that the equipment is only intended to support MDT signaling, which would make any additional testing superfluous). In The Netherlands additional testing is required for series connection and caller ID facilities.
Federal Communications Commission Interference Statement This device complies with FCC Rules Part 15. Operation is subject to the following two conditions: . This device may not cause harmful interference. . This device must accept any interference received, including interference that may cause undesired operation. This equipment has been tested and found to comply with the limits for a class B digital device, pursuant to Part 15 of the Federal Communications Commission (FCC) rules.
FCC Radio Frequency (RF) Exposure Caution Statement WARNING! Any changes or modifications not expressly approved by the party responsible for compliance could void the user's authority to operate this equipment. This equipment complies with FCC radiation exposure limits set forth for an uncontrolled environment. To maintain compliance with FCC RF exposure compliance requirements, please avoid direct contact to the transmitting antenna during transmitting.
UL Safety Notices Required for UL 1459 covering telecommunications (telephone) equipment intended to be electrically connected to a telecommunication network that has an operating voltage to ground that does not exceed 200V peak, 300V peak-to-peak, and 105V rms, and installed or used in accordance with the National Electrical Code (PAN 70).
Power Safety Requirement Products with electrical current ratings up to 6A and weighing more than 3Kg must use approved power cords greater than or equal to: HOOVES-F, 3G, 0.75mm’ or HOVE-F, 2G, 0.75mm’. TV Notices Note to CATV System Installer—Cable distribution system should be grounded (earthed) in accordance with EXPANSION 70, the National Electrical Code (NECK, in particular Section 820.
Declaration of Compliance for Product Environmental Regulation ASS follows the green design concept to design and manufacture our products, and makes sure that each stage of the product life cycle of ASS product is in line with global environmental regulations. In addition, ASS disclose the relevant information based on regulation requirements. Please refer to for information disclosure based on regulation requirements ASS is complied with.
ASS Recycling/Takeback Services ASS recycling and take back programs come from our commitment to the highest standards for protecting our environment. We believe in providing solutions for you to be able to responsibly recycle our products, batteries, other components as well as the packaging materials. Please go to htm for detailed recycling information in different regions.
ENERGY STAR Qualified Product ] ENERGY STAR is a joint program of the U.S. Environmental Protection Agency and the U.S. Department of Energy helping us all save money and protect the environment through energy | efficient products and practices. All ASS products with the ENERGY STAR logo comply with the ENERGY STAR standard, and the power management feature is enabled by default.
Simplified EU Declaration of Conformity Astute Computer Inc. hereby declares that this device is in compliance with the essential requirements and other relevant provisions of Directive 2014/53/EU. Full text of EU declaration of conformity is available at m/support/.