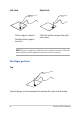
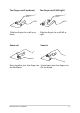
Left-click Right-click • Click an app to select it. • Double-click an app to launch it. Click this button to open the rightclick menu. NOTE: The areas inside the dotted line represent the locations of the left mouse button and the right mouse button on the touchpad. Two-finger gestures Tap Tap two fingers on the touchpad to simulate the right-click function.
Two-finger scroll (up/down) Two-finger scroll (left/right) Slide two fingers to scroll up or down. Slide two fingers to scroll left or right. Zoom out Zoom in Bring together your two fingers on Spread apart your two fingers on the touchpad. the touchpad.
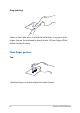
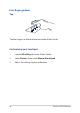
Drag and drop Select an item then press and hold the left button. Using your other finger, slide on the touchpad to drag the item, lift your finger off the button to drop the item. Three-finger gestures Tap Tap three fingers on the touchpad to invoke Cortana.
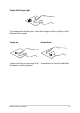
Swipe left/Swipe right If you opened multiple apps, swipe three fingers left or right to switch between these apps. Swipe up Swipe down Swipe up to see an overview of all Swipe down to show the desktop. the apps currently opened.
Four-finger gestures Tap Tap four fingers on the touchpad to invoke Action Center. Customizing your touchpad 1. Launch All settings from the Action Center. 2. Select Devices, then select Mouse & touchpad. 3. Adjust the settings to your preference.
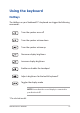
Using the keyboard HotKeys The HotKeys on your Notebook PC’s keyboard can trigger the following commands: Turns the speaker on or off Turns the speaker volume down Turns the speaker volume up Decreases display brightness Increases display brightness Enables or disables the touchpad Adjusts brightness for the backlit keyboard* Toggles the display mode NOTE: Ensure that the second display is connected to your Notebook PC.
Home key End key Page up key Page down key Function keys Press to enable or disable the function keys feature. When the function keys feature is enabled, you can also access HotKeys by holding down in combination with the top row keys.
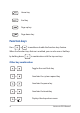
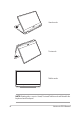
Rotating the display panel Your Notebook PC’s display panel is adjustable up to 360 degrees. You may adjust the display panel as shown below. 360 degrees adjustable Magnetic attachment Notebook PC mode Magnetic attachment WARNING! Keep the magnetic attachment away from external storage drives and cards with magnetic strips to prevent demagnetization.
Stand mode Tent mode Tablet mode NOTE: Rotating the screen to Stand, Tent and Tablet mode will disable the keyboard and touchpad.
Chapter 3: Working with Windows® 10 Notebook PC E-Manual 45
Starting for the first time When you start your Notebook PC for the first time, a series of screens appear to guide you in configuring your Windows® 10 operating system. To start your Notebook PC for the first time: 1. Press the power button on your Notebook PC. Wait for a few minutes until the setup screen appears. 2. From the setup screen, pick your region and a language to use on your Notebook PC. 3. Carefully read the License Terms. Select I accept. 4.
Start menu The Start menu is the main gateway to your Notebook PC’s programs, Windows® apps, folders, and settings.
Launching the Start menu Tap the Start button in the lower-left corner of your desktop. Position your mouse pointer over the Start button in the lower-left corner of your desktop then click it. Press the Windows logo key on your keyboard. Opening programs from the Start menu One of the most common uses of the Start menu is opening programs installed on your Notebook PC. Tap the program to launch it. Position your mouse pointer over the program then click to launch it.
Windows® apps These are apps pinned on the right pane of the Start menu and displayed in tiled-format for easy access. NOTE: Some Windows® apps require signing in to your Microsoft account before they are fully launched.
Working with Windows® apps Use your Notebook PC’s touch screen, touchpad, or keyboard to launch, customize, and close apps. Launching Windows® apps from the Start menu Tap the app to launch it. Position your mouse pointer over the app then click to launch it. Use the arrow keys to browse through the apps. Press to launch an app.
Resizing apps Press and hold the app, then tap and select an app tile size. Position your mouse pointer over the app and right-click it, then click Resize and select an app tile size. Use the arrow keys to navigate to the app. Press or (on selected models), then select Resize and select an app tile size. Unpinning apps Press and hold the app, then tap the icon. Position your mouse pointer over the app and right-click it, then click Unpin from Start. Use the arrow keys to navigate to the app.
Pinning apps to the taskbar Press and hold the app, then tap Pin to taskbar. Position your mouse pointer over the app and right-click it, then click Pin to taskbar. Use the arrow keys to navigate to the app. Press or (on selected models), then select Pin to taskbar. Pinning more apps to the Start menu From All apps, press and hold the app you want to add to the Start menu, then tap Pin to Start.
Task view Quickly switch between opened apps and programs using the task view feature, you can also use task view to switch between desktops. Launching task view Tap the icon on the taskbar or swipe form the left edge of the screen. Position your mouse pointer over the icon on the taskbar and click it. Press Notebook PC E-Manual on your keyboard.
Snap feature The Snap feature displays apps side-by-side, allowing you to work or switch between apps. Snap hotspots You can drag and drop apps to these hotspots to snap them into place.
Using Snap or 1. Launch the app you wish to snap. 2. Drag the title bar of your app and drop the app to the edge of the screen to snap. 3. Launch another app and repeat the above steps to snap another app. 1. Launch the app you wish to snap. 2. Press and hold the key, then use the arrow keys to snap the app. 3. Notebook PC E-Manual Launch another app and repeat the above steps to snap another app.