
User's Guide
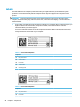
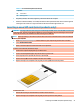

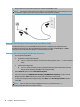
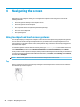
Table Of Contents
- Getting started
- Components
- Network connections
- Connecting to a wireless network
- Connecting to a wired network
- Using HP MAC Address Pass Through to identify your computer on a network (select products only)
- Navigating the screen
- Using touchpad and touch screen gestures
- Tap
- Two-finger pinch zoom
- Two-finger slide (touchpad and precision touchpad)
- Two-finger tap (touchpad and precision touchpad)
- Three-finger tap (touchpad and precision touchpad)
- Four-finger tap (touchpad and precision touchpad)
- Three-finger swipe (touchpad and precision touchpad)
- Four-finger swipe (precision touchpad)
- One-finger slide (touch screen)
- Using an optional keyboard or mouse
- Using an on-screen keyboard (select products only)
- Using touchpad and touch screen gestures
- Entertainment features
- Using a camera (select products only)
- Using audio
- Using video
- Connecting a DisplayPort device using a USB Type-C cable (select products only)
- Connecting a Thunderbolt device using a USB Type-C cable (select products only)
- Connecting video devices using an HDMI cable (select products only)
- Discovering and connecting wired displays using MultiStream Transport
- Discovering and connecting to Miracast-compatible wireless displays (select products only)
- Using data transfer
- Managing power
- Using Sleep and Hibernation
- Shutting down (turning off) the computer
- Using the Power icon and Power Options
- Running on battery power
- Running on external power
- Security
- Protecting the computer
- Using passwords
- Setting passwords in Windows
- Setting passwords in Computer Setup
- Managing a BIOS administrator password
- Using DriveLock Security Options
- Windows Hello (select products only)
- Using antivirus software
- Using firewall software
- Installing software updates
- Using HP Client Security (select products only)
- Using HP Device as a Service (select products only)
- Using an optional security cable (select products only)
- Using a fingerprint reader (select products only)
- Maintenance
- Backing up, restoring, and recovering
- Computer Setup (BIOS), TPM, and HP Sure Start
- Using HP PC Hardware Diagnostics
- Specifications
- Electrostatic discharge
- Accessibility
- Index

Table 2-12 Service label components (continued)
Component
(3) Serial number
(4) Warranty period
● Regulatory label(s)—Provide(s) regulatory information about the computer.
● Wireless certication label(s)—Provide(s) information about optional wireless devices and the approval
markings for the countries or regions in which the devices have been approved for use.
Inserting a nano SIM card (select products only)
CAUTION: Inserting a SIM card of the wrong size could damage the SIM card or cause the SIM card to become
stuck in the slot. The use of nano SIM card adapters is not recommended. To prevent damage to the nano SIM
card or the connectors, use minimal force when inserting a nano SIM card.
NOTE: Before purchasing a nano SIM card, follow these instructions to determine the correct nano SIM card
size for your computer:
1. Go to http://www.hp.com/support, and then search for your computer by product name or number.
2. Select Product Information.
3. Refer to the listed options to determine which card to purchase.
To insert a nano SIM card, follow these steps:
1. Position the computer display-side up on a at surface.
2. Insert a small straightened paper clip into the card tray access hole.
3. Press in gently on the clip until the card tray is ejected (1) .
4. Remove the tray (2) from the computer and insert the card (3).
5. Replace the tray in the computer. Press in gently on the tray (4) until it is rmly seated.
To remove the card:
1. Release the card tray as described above, and then remove the card.
2. Replace the tray in the computer. Press in gently on the tray until it is rmly seated.
Inserting a nano SIM card (select products only) 21