
User's Guide


7. Install a new M.2 solid-state drive:
a. Align the contact edge of the new M.2 solid-state drive with the key in the slot. Then, carefully insert
the drive into the slot
and pivot the M.2 solid-state drive downward.
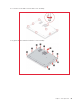
b. Install the screw to secure the M.2 solid-state drive
.
8. Reinstall the base cover assembly.
9. Turn over the computer. Connect the ac power adapter and all disconnected cables to the computer.
Replacement procedure for the short M.2 solid-state drive
1. Disable the built-in battery. See “Disable Fast Startup and the built-in battery” on page 53.
2. Turn off the computer and disconnect the computer from ac power and all connected cables.
3. Close the computer display and turn the computer over.
4. Remove the base cover assembly. See “Base cover assembly” on page 54.
5. Remove the screw
and then remove the M.2 solid-state drive with the bracket .
60 X13 Yoga Gen 1 User Guide