User Guide
First Edition (September 2020) © Copyright Lenovo 2020. LIMITED AND RESTRICTED RIGHTS NOTICE: If data or software is delivered pursuant to a General Services Administration “GSA” contract, use, reproduction, or disclosure is subject to restrictions set forth in Contract No. GS35F-05925.
&RQWHQWV Chapter 1. Welcome to your ThinkPad X1 Fold Gen 1 . . . . . . . . . 1 Overview . . . . . . . . . . . . . . . . . . 1 Features and specifications . . . . . . . . . . . 3 Chapter 2. Let’s get started . . . . . . . 5 Integrated kickstand . . . . . . . . . . . Work with the foldable screen . . . . . . . Split-screen function . . . . . . . . . . . Connect to networks . . . . . . . . . . . Connect to Wi-Fi networks. . . . . . . Connect to a cellular network. . . . . . Airplane mode . . . . . . . . . . .
Read this first Thank you for choosing Lenovo notebook! We are dedicated to delivering best-value solutions to you. Important information about OLED screen and folio cover Do not push or rub the screen with glass, tweezers, or any other hard objects that are not recommended to use with the X1 Fold Gen 1. Wipe off liquids from screen as soon as possible. Any extended contact with computer screen could result in deformations and color fading. Handle the folio cover gently.
• Documentation content is subject to change without notice. To get the latest documentation, go to https:// pcsupport.lenovo.com.
Chapter 1. Welcome to your ThinkPad X1 Fold Gen 1 Enjoy your tour with ThinkPad X1 Fold Gen 1, the world’s first foldable-OLED PC.
Power button The LED indicator in the power button shows the system status of your computer. • Blinking for three times: The computer is initially connected to power. • On: The computer is on or the computer is connected to power. • Off: – The computer is off. – The computer is in hibernation mode while disconnected from power. • Blinking slowly: The computer is in sleep mode. / USB-C connector V (USB 3.2 Gen 2) • Charge your computer.
Features and specifications Maximum heat output (depending on the model) • 45 W (154 Btu/hr) Power source (ac power adapter) • Sine-wave input at 50 Hz to 60 Hz • 65 W (222 Btu/hr) • Input rating of the ac power adapter: 100 V to 240 V ac, 50 Hz to 60 Hz Microprocessor To view the microprocessor information of your computer, right-click the Start button and then click System.
USB device Data rate (Gbit/s) 3.2 Gen 1 / 3.1 Gen 1 5 3.2 Gen 2 / 3.1 Gen 2 10 3.
Chapter 2. Let’s get started Integrated kickstand Open the kickstand at an angle up to 85 degrees so that your foldable PC works as a hands-off, full-screen display. The kickstand is not designed to open more than 85 degrees. Note: The folio cover is designed to protect your foldable PC. Do not try to remove it from your foldable PC. Do not use the kickstand in portrait mode.
• For better folding experience, the center of the folio cover is made of soft genuine leather. Therefore, the center of the folio cover looks thinner. You may notice a slight bumping or gap after using the foldable PC for a long period of time. This is a normal characteristic of the genuine leather, and it will not affect the folio cover quality.
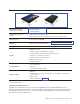
Work with the foldable screen Your foldable PC features the following modes. Switch between different modes to experience the most of the 4-in-1 foldable PC. Mode Recommended scenario(s) • Giving a presentation Landscape mode • Watching movies • Multi-tasking Mini clamshell mode • Writing emails • Browsing multiple web pages Book mode • Reading books on e-reader • Note-taking while reading • Browsing extra-long documents Portrait mode • Drawing or sketching Chapter 2.
Split-screen function In book mode and mini clamshell mode , the split-screen function allows you to handle multiple tasks. Select one of below methods of your preference: • Rotate the screen to switch between split-screen view and full-screen view as shown. • Tap the desktop splitter icon view.
Connect to networks Your computer helps you connect to the world through a wired or wireless network. Connect to Wi-Fi networks Click the network icon in the Windows notification area. Select a network available for connection. Connect to a cellular network If your computer has a wireless wide area network (WAN) card and a micro-SIM card installed, you can connect to a cellular data network and get online using the cellular signal.
2. Install a nano-SIM card as shown. 3. Turn on the computer. 4. Click the network icon in the Windows notification area, and then select the cellular network icon the list. from 5. Provide required information, if needed. Airplane mode When the Airplane mode is enabled, all wireless features are disabled. To enable or disable the Airplane mode: 1. Open the Start menu. 2. Click Settings ᇆ Network & Internet ᇆ Airplane mode. 3. Turn on or turn off the Airplane mode switch.
7. Click Improve Recognition to improve the image so that Windows Hello can recognize you in different light conditions or when your appearance changes. Log in with face authentication 1. On the Windows lock screen, select the smiling face icon from the sign-in options. 2. Follow the on-screen instructions and ensure that you are centered and looking directly at the camera. When the program recognizes your face, it automatically unlocks the screen and signs you in to the Windows operating system.
Drag an item to the location you want Move an object. Move two fingers closer together Zoom out. Move two fingers farther apart Zoom in. Swipe in from the right edge Open the action center to see your notifications and quick actions. Swipe in from the left edge View all your open windows in task view. • Swipe downwards shortly from the top edge (for full-screened app or when your computer is in the tablet mode) Show a hidden title bar.
• Do not press the OLED screen with hard or sharp objects except the Lenovo Mod Pen or Lenovo Pen Pro. Do not apply excessive pressure to it. • Do not use fingernails, gloved fingers, or incompatible objects for input on the screen. • Regularly calibrate the accuracy of the finger input to avoid a discrepancy. • Turn off your foldable PC before cleaning the screen. • Use a dry, soft, and lint-free cloth or a piece of absorbent cotton to remove fingerprints or dust from the screen.
Wireless keyboard (for selected models) Your foldable PC might come with the Lenovo Fold Mini Keyboard (a wireless, magnetic keyboard with touchpad). Use the keyboard to work more easily and effectively. The keyboard is available as an option. You can purchase one from Lenovo at https://www.lenovo.com/ accessories. Pair the keyboard To pair the keyboard with your foldable PC, do the following: 1. Enable Bluetooth function on your foldable PC.
Use the keyboard in different modes The keyboard works with your foldable PC in two modes, landscape mode and mini clamshell mode. Landscape mode Mini clamshell mode Your keyboard and foldable PC both come with integrated magnet for automatic attachment. When placing the keyboard on your foldable PC, ensure that the camera side is upward as shown, otherwise the keyboard does not attach properly. Chapter 2.
Keyboard overview Special keys • Press F1–F12 key to invoke the special function printed as an icon on each key. • Press Fn Key and F1–F12 key simultaneously to invoke the standard function of F1–F12 function keys.
• Blinking red slowly: (battery power lower than 25%) Micro USB connector: On rare occasions, you might need to work with your foldable PC and charge the keyboard at the same time. As an alternative, use a 5V ac power adapter and a Micro USB cable to charge the keyboard. Your keyboard does not come with a 5V ac power adapter or a Micro USB cable, prepare them by yourself. Expressive Input key: Press the key and choose punctuations, emojis, or symbols as you like.
Charge the keyboard Wireless charging (recommended) Place the foldable PC with the camera side upward and put the keyboard on the lower half of the computer screen. Fold the computer screen, the keyboard starts to charge automatically. One four-hour charge enables you to use the keyboard for up to eight hours. Ensure that the remaining battery power of the computer is higher than 50%, otherwise the keyboard does not charge.
Lenovo Mod Pen (for selected models) The Lenovo Mod pen (a rechargeable stylus pen) enables you to write and draw in a natural and precise manner. To purchase the pen, go to https://www.lenovo.com/accessories. Notes: • The default function of each barrel button might vary in different apps. Overview Bottom barrel button To erase text or drawings, hold the button to erase the object in supported apps. Top barrel button To right-click, hold the button and tap the screen in supported apps.
One full-charge delivers up to 14 days of battery standby time for continuous use. To check the remaining battery power, go to Lenovo Pen Settings and follow the on-screen instructions. Maintenance tips • The pen is not waterproof. Keep the pen away from water and excessive moisture. • The pen contains pressure sensors. Apply an appropriate amount of pressure when writing on the screen. Do not subject the pen to shock or vibration.
Pen overview Top pen button: Hold the top pen button for at least three seconds to enable Bluetooth pairing on the pen. LED indicator: When the LED indicator blinks in amber, the pen battery power is low. The LED indicator is in solid amber during charging and is solid green when the pen is fully charged. The pen is fully charged in abouW WZR hours. USB-C connector: Use the ac power adapter that come with your foldable PC to charge the pen.
• The pen contains pressure sensors. Apply an appropriate amount of pressure when writing on the screen. Do not subject the pen to shock or vibration. • If possible, place your pen in a well-ventilated and dry area without direct exposure to sunshine. • Do not use or store the pen in a place where excessive changes in temperature may occur such as in a car.
Use USB-C connector The USB-C connector delivers quick and easy connections between your foldable PC and accessories. On very rare occasions, the USB-C compatible devices connected to the USB-C connector might interfere wireless features. If your foldable PC cannot establish wireless LAN communications, wireless WAN communications, or if your location cannot be pinpointed through the GPS function, detach the USB-C compatible devices from the USB-C connector.
If your computer runs on low battery, connect the Lenovo Powered USB-C Travel Hub to the ac power adapter so that ac power adapter supplies power to both the hub and your foldable PC. For more information, refer to the documentation of the hub. Connect to an external display Connect your foldable PC to a projector or a monitor to give presentations or expand your workspace. Connect to a wired display Your foldable PC comes with two USB-C connectors (USB 3.
Change display settings 1. Right-click a blank area on the desktop and select Display settings. 2. Select the display that you want to configure. 3. Change display settings of your preference. You can change the settings for both the computer display and the external display. For example, you can define which one is the main display and which one is the secondary display. You also can change the resolution and orientation.
USB-C to audio Connect speakers, headphones, or a headset to your foldable PC through a USB-C to audio cable. The foldable PC does not come with a USB-C to audio cable. To purchase one from Lenovo, go to https:// www.lenovo.com/accessories. Connect to the wired Ethernet To connect your foldable PC to a local network, a USB-C to Ethernet adapter is needed. The Lenovo USB-C to Ethernet Adapter is available as an option and shipped with some computer models. You can purchase one from Lenovo at https://www.
Chapter 3. Explore more Learn the basics of Windows 10 and start working with it right away. For more information about Windows 10, see the Windows help information. Lenovo Voice The preinstalled Lenovo Voice is a voice assistant which offers a number of voice-based features, such as respond upon voice command, translate voices into on-screen text in a supported foreign language, and convert voice into text.
Notes: • The available features and languages vary depending on the computer model and delivery of countries and regions. • Lenovo Voice makes periodic updates of the features to keep improving your experience. The description of features might be different from that on your actual user interface. Lenovo Display Refresh After your computer is used for more than one or two years, OLED displays may experience image retention if an image is continuously displayed for a long period of time.
Key features Lenovo Vantage enables you to: • Know the device status easily and customize device settings. • Download and install UEFI BIOS, firmware, and driver updates to keep your computer up-to-date. • Monitor your computer health, and secure your computer against outside threats. • Scan your computer hardware and diagnose hardware problems. • Look up warranty status (online). • Access User Guide and helpful articles. Notes: • The available features vary depending on the computer model.
Battery charging is also affected by the battery temperature. The recommended battery temperature range for charging the battery is between 10°C (50°F) and 35°C (95°F). To maximize the life of the battery, observe below tips: • Recharge the battery completely before using it. Once the battery is fully charged, it must discharge to 94% or lower before it will be allowed to recharge again. • Use the battery until the charge is depleted. The battery may optimize its full charge capacity based on your usage.
4. Tap F10 to save the changes and exit. Connect to a Bluetooth-enabled device You can connect all types of Bluetooth-enabled devices to your computer, such as a keyboard, a mouse, a smartphone, or speakers. To ensure the connection is successful, place the devices 10 meters (33 feet), at most, from the computer. 1. Turn on Bluetooth on the computer. • Click the action center icon in the Windows notification area. Enable the Bluetooth feature.
32 User Guide
Chapter 4. Configure advanced settings This chapter provides information about UEFI BIOS, recovery, operating system installation, and system management. Secure your computer and information Use passwords This section introduces types of passwords in UEFI (Unified Extensible Firmware Interface) BIOS (Basic Input/Output System) and how to set, change, and remove a password.
password and the power-on password, the system management password overrides the power-on password. Hard disk passwords The hard disk password prevents unauthorized access to the data on the storage drive. When a hard disk password is set, you are prompted to type a correct password each time you try to access the storage drive.
What to do if you forget your hard disk password If you forget your user hard disk password or both user and master hard disk passwords, Lenovo cannot reset your passwords or recover data from the storage drive. You can contact a Lenovo authorized service provider to have the storage drive replaced. A fee will be charged for parts and service. What to do if you forget your supervisor password If you forget your supervisor password, there is no service procedure to remove the password.
F1 Display the General Help screen. F9 Restore to the default settings. F10 Save your configuration and exit. F5 / – Change to a lower value. F6 / + Change to a higher value. ൹ൻ Locate an item. ൸ ൺ Select a tab. Esc Exit the submenu and return to the parent menu. Enter Enter the selected tab or submenu. Change the startup sequence 1. Enter the UEFI BIOS menu. See “Enter the UEFI BIOS menu” on page 35. 2. Select Startup ᇆ Boot. Then, tap Enter. The default device order list is displayed.
Recovery information This section introduces the recovery information of the Windows 10 operating system. Ensure that you read and follow the on-screen recovery instructions. The data on your computer might be deleted during the recovery process. To avoid data loss, make a backup copy of all the data that you want to keep. Restore system files and settings to an earlier point 1. Go to Control Panel and view by Large icons or Small icons. 2. Click Recovery ᇆ Open System Restore.
https://pcsupport.lenovo.com/supportphonelist Create a recovery USB drive Attention: The creation process deletes anything stored on the USB drive. To avoid data loss, make a backup copy of all the data that you want to keep. 1. Ensure that your computer is connected to ac power. 2. Prepare a USB drive with at least 16 GB of storage capacity. The actual USB capacity required depends on the size of the recovery image. 3. Connect the prepared USB drive to the computer. 4. Type UHFRYHU\ in the search box.
5. Select Startup ᇆ Boot to display the Boot Priority Order submenu. 6. Select the drive that contains the operating system installation program, for example, USB HDD. Then, press Esc. Attention: After you change the startup sequence, ensure that you select the correct device during a copy, a save, or a format operation. If you select the wrong device, the data on that device might be erased or overwritten. 7. Select Restart and ensure that OS Optimized Defaults is enabled.
40 User Guide
Chapter 5. Help and support Frequently asked questions How do I access Control Panel? • Open the Start menu and tap Windows System ᇆ Control Panel. • Use Windows Search. How do I turn off my computer? Open the Start menu and tap How do I partition my storage drive? https://support.lenovo.com/solutions/ht503851 Power. Then, tap Shut down. 1. Press and hold the power button until the computer turns off. Then, restart the computer. 2.
Error messages If you see a message that is not included in the following table, record the error message first, then shut down the computer and call Lenovo for help. See “Lenovo Customer Support Center” on page 45. Message Solution 0190: Critical low-battery error The computer turned off because the battery power is low. Connect the ac power adapter to the computer and charge the batteries. 0191: System Security - Invalid remote change requested The system configuration change has failed.
Self-help resources Use the following self-help resources to learn more about the computer and troubleshoot problems. Resources How to access? Use Lenovo Vantage to: • Configure device settings. • Download and install UEFI BIOS, drivers, and firmware updates. • Secure your computer from outside threats. • Open the Start menu and click Lenovo Vantage. • Use Windows Search. • Diagnose hardware problems. • Check the computer warranty status. • Access User Guide and helpful articles.
* for selected models 44 User Guide
Call Lenovo If you have tried to correct the problem yourself and still need help, you can call Lenovo Customer Support Center. Before you contact Lenovo Prepare the following before you contact Lenovo: 1. Record the problem symptoms and details: • What is the problem? Is it continuous or intermittent? • Any error message or error code? • What operating system are you using? Which version? • Which software applications were running at the time of the problem? • Can the problem be reproduced? If so, how? 2.
Note: Phone numbers are subject to change without notice. If the number for your country or region is not provided, contact your Lenovo reseller or Lenovo marketing representative. Services available during the warranty period • Problem determination - Trained personnel are available to assist you with determining if you have a hardware problem and deciding what action is necessary to fix the problem.
Appendix A. Accessibility and ergonomic information This chapter provides information about accessibility and ergonomics. Accessibility information Lenovo is committed to providing users who have hearing, vision, and mobility limitations with greater access to information and technology. This section provides information about the ways these users can get the most out of their computer experience. You also can get the most up-to-date accessibility information from the following Web site: https://www.
keyboard with all the standard keys. You can select keys using the mouse or another pointing device, or you can tap to select the keys if your computer supports multi-touch screen. • High Contrast High Contrast is a feature that heightens the color contrast of some text and images on your screen. As a result, those items are more distinct and easier to identify. • Personalized keyboard Adjust keyboard settings to make your keyboard easier to use.
– Change the size of all the items on your screen. 1. Right-click a blank area on the desktop and then click Display settings ᇆ Display. 2. Change the item size by following the on-screen instructions. For some applications, your configuration might not take effect until you sign out and then sign in again. – Change the size of the items on a Web page. Press and hold Ctrl, and then press the plus-sign key (+) to enlarge or the minus-sign key (–) to reduce the text size.
Display: Position the display to maintain a comfortable viewing distance of 510 mm to 760 mm (20 inches to 30 inches). Avoid glare or reflections on the display from overhead lighting or outside sources of light. Keep the display screen clean and set the brightness to levels that enable you to see the screen clearly. Press the brightness control keys to adjust display brightness. Head position: Keep your head and neck in a comfortable and neutral (vertical, or upright) position.
Appendix B. Compliance and TCO Certified information This chapter provides regulatory, environmental, RoHS, and ENERGY STAR information about Lenovo products. Certification-related information Product name • ThinkPad X1 Fold Gen 1 Compliance ID Machine types TP00122A 20RK and 20RL • ThinkPad X1 Fold Gen 1 5G The latest compliance information is available at: https://www.lenovo.com/compliance Locate the UltraConnect wireless antennas Your computer has an UltraConnectറ wireless antenna system.
Federal Communications Commission (FCC) Supplier’s Declaration of Conformity The following information refers to ThinkPad X1 Fold Gen 1, machine types: 20RK and 20RL. This equipment has been tested and found to comply with the limits for a Class B digital device, pursuant to Part 15 of the FCC Rules. These limits are designed to provide reasonable protection against harmful interference in a residential installation.
ꚭ 녚렍鱉 ꓩ ꭖꯍ겕韥 넺鱽鲙. ꚭ 녚렍鱉 霢뇑 閵넩麑ꄱ넭냱ꈑ 靁녚鷍鱉 놹볁 鬭띑꾅 鲵뼑 뇑뼑냹 뚽隱뼍덵 껿鵹ꈒ 陹鷍꽽걪鱽鲙. 녚렍 꼖ꫭꍡ ꗄ 뜑겕 ꜵ븽냹 ꩡ끞뼕 陲끥 SAR 闇넩 鲡ꄱ덽 ꯍ 넽 걪鱽鲙. SAR 闇냵 霢閵 ꚩ隕 ꗄ 묁걙뱭 끉霡 ꩡ뼢隱 髙뱭낁먡 鲵꾢꾅 黥ꄱ 鲙ꌱ ꯍ 넽걪鱽鲙. ꚭ 녚렍 鱉 ꩡꅁ넍 겕뙩꾅 20mm 넩ꩶ넍 阥ꍡ꾅 ꩡ끞뼕 ꯍ 넽걪鱽鲙.
54 User Guide
Appendix C. Notices and trademarks Notices Lenovo may not offer the products, services, or features discussed in this document in all countries. Consult your local Lenovo representative for information on the products and services currently available in your area. Any reference to a Lenovo product, program, or service is not intended to state or imply that only that Lenovo product, program, or service may be used.
Any performance data contained herein was determined in a controlled environment. Therefore, the result obtained in other operating environments may vary significantly. Some measurements may have been made on development-level systems and there is no guarantee that these measurements will be the same on generally available systems. Furthermore, some measurements may have been estimated through extrapolation. Actual results may vary.