X390 Yoga User Guide
Read this first Before using this documentation and the product it supports, ensure that you read and understand the following: • Appendix A “Important safety information” on page 65 • Safety and Warranty Guide • Setup Guide First Edition (April 2019) © Copyright Lenovo 2019. LIMITED AND RESTRICTED RIGHTS NOTICE: If data or software is delivered pursuant to a General Services Administration “GSA” contract, use, reproduction, or disclosure is subject to restrictions set forth in Contract No. GS35F-05925.
Contents About this documentation . . . . . . . . iii Chapter 1. Meet your computer . . . . . 1 Front . . . . . . . . . Base . . . . . . . . . Left . . . . . . . . . Right . . . . . . . . . Bottom . . . . . . . . Features and specifications . . . . . . . . . . . . . . . . . . . . . . . . . . . . . . . . . . . . . . . . . . . . . . . . . . . . . . . . . . . . . . . . . . 1 2 3 5 7 8 Chapter 2. Get started with your computer . . . . . . . . . . . . . . . . 11 Get started with Windows 10 . . . .
Chapter 8. Help and support . . . . . 59 Frequently asked questions . . . . . Error messages . . . . . . . . . . Beep errors . . . . . . . . . . . Self-help resources . . . . . . . . Call Lenovo . . . . . . . . . . . Before you contact Lenovo . . . Lenovo Customer Support Center . Purchase additional services. . . . . . . . . . . . . . . . . . . . . . . . . . . . . . . . . . . . . . . . . . . . . 59 60 61 62 63 63 63 64 Appendix A. Important safety information . . . . . . . . . . . . . . .
About this documentation • Illustrations in this documentation might look different from your product. • Depending on the model, some optional accessories, features, and software programs might not be available on your computer. • Depending on the version of operating systems, some user interface instructions might not be applicable to your computer. • Documentation content is subject to change without notice.
iv X390 Yoga User Guide
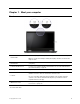
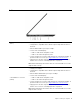
Chapter 1. Meet your computer Front Emit infrared (IR) light. Normally the infrared light is invisible to the naked eyes. 1. Infrared LED* Note: Do not block the IR light-emitting diode (LED). Otherwise, the IR function might not work. 2. ThinkShutter Slide ThinkShutter to cover or uncover the camera lens. It is designed to protect your privacy. 3. Camera with IR function* Log in to your computer with face authentication. See “Use face authentication (for selected models)” on page 42. 4.
Base 1. Fingerprint reader Log in to your computer with enrolled fingerprints. See “Use the fingerprint reader ” on page 41. 2. Trackpad Perform finger touch and all the functions of a traditional mouse. See “Use the trackpad” on page 19. 3. NFC mark* Your computer supports NFC (near field communication). You can share information with another NFC-enabled device. See “Set up a NFC connection (for selected models)” on page 31. 4.
Left 1. USB-C™ connector (USB 3.1 Gen 1) • Charge your computer. • Charge USB-C compatible devices with the output voltage and current of 5 V and 1.5 A. • Transfer data at USB 3.1 speed, up to 5 Gbps. • Connect to an external display: – USB-C to VGA: 1920 x 1200 pixels, 60 Hz – USB-C to DP: 3840 x 2160 pixels, 60 Hz • Connect to USB-C accessories to help expand your computer functionality. To purchase USB-C accessories, go to https://www.lenovo.com/accessories.
3. Ethernet extension connector Gen 2 Make your computer thinner than the ones with a standard Ethernet connector. Use a ThinkPad Ethernet Extension Adapter Gen 2 to connect your computer to a local area network (LAN) through this connector. The ThinkPad Ethernet Extension Adapter Gen 2 is available as an option and shipped with some computer models only. You can purchase a ThinkPad Ethernet Extension Adapter Gen 2 from Lenovo at: https://www.lenovo.com/accessories. 4.
Right 1. ThinkPad Pen Pro See “Use ThinkPad Pen Pro ” on page 26. Press to turn on the computer or put the computer to sleep mode. To turn off the computer, open the Start menu, click Shut down. Power, and then select The indicator in the power button shows the system status of your computer. 2. Power button • Blinking for three times: The computer is initially connected to power. • On: The computer is on. • Off: The computer is off or in hibernation mode.
6 X390 Yoga User Guide
Bottom 1. Docking-station hook holes Use the docking-station hook holes to secure a supported docking station. If the computer stops responding and you cannot turn it off by pressing the power button, reset your computer: 2. Emergency-reset hole 1. Disconnect your computer from ac power. 2. Insert a straightened paper clip into the hole to cut off power supply temporarily. 3. Connect your computer to ac power and then turn on your computer. 3. Speakers Enable you to experience high-quality sound.
Features and specifications • Width: 310.4 mm (12.22 inches) Dimensions • Depth: 219 mm (8.62 inches) • Thickness: 15.95 mm (0.63 inches) Maximum heat output (depending on the model) • 45 W (154 Btu/hr) Power source (ac power adapter) • Sine-wave input at 50 Hz to 60 Hz • 65 W (222 Btu/hr) • Input rating of the ac power adapter: 100 V to 240 V ac, 50 Hz to 60 Hz Microprocessor To view the microprocessor information of your computer, right-click the Start button and then click System.
• Bluetooth Wireless features • Global Positioning System (GPS) satellite receiver (available on models with wireless WAN)* • Wireless LAN • Wireless WAN* • Near field communication (NFC)* Others • Camera • Microphones * for selected models Chapter 1.
10 X390 Yoga User Guide
Chapter 2. Get started with your computer Get started with Windows 10 Learn the basics of Windows 10 and start working with it right away. For more information about Windows 10, see the Windows help information. Windows account To use the Windows operating system, a user account is required. It can either be a Windows user account or a Microsoft account. Windows user account When you start Windows for the first time, you are prompted to create a Windows user account.
Windows user interface 1. Account Change account settings, lock the computer, or sign out from the current account. 2. Settings Launch Settings. 3. Power Shut down, restart, or put the computer into sleep. 4. Start button Open the Start menu. 5. Windows Search Type what you are looking for in the search box and get search results from your computer and the Web. 6. Task View Display all opened apps and switch among them. 7.
Launch an app • Open the Start menu and select the app you want to launch. • Use Windows Search. Windows label Your computer might have a Windows 10 Genuine Microsoft label affixed to its cover depending on the following factors: • Your geographic location • Edition of Windows 10 that is preinstalled Go to https://www.microsoft.com/en-us/howtotell/Hardware.aspx for illustrations of the various types of Genuine Microsoft labels.
Note: The cellular service is provided by authorized mobile service carriers in some countries or regions. You must have a cellular plan from a service carrier to connect to the cellular network. To establish cellular connection: 1. Locate the nano-SIM card slot. 2. Insert a straightened paper clip into the hole in the tray. The tray ejects. Install a new nano-SIM card into the tray with the metal contacts facing upward. Insert the tray into the nano-SIM-card slot until you hear a click.
– Camera – Computer display – Keyboard – Microphone – Speakers – Trackpad – TrackPoint • Health & Support Monitor your computer health and get personalized support of your computer. You can: – Scan the computer hardware and diagnose hardware problems. – Look up computer warranty status (online). – Access User Guide. – Read tips and tricks articles customized for your computer. • Lenovo Wi-Fi Security Protect your computer from malicious Wi-Fi networks.
Use the keyboard shortcuts The special keys on the keyboard help you work more easily and effectively. Open the Start menu. 1. Windows logo key For information about using this key with other keys, see the Windows help information. Switch the letter case between the upper case and lower case. 2. Caps Lock key When the key indicator is on, you can type uppercase letters. Invoke the special function printed as an icon on each key or standard function.
Mute or unmute the microphones. When the key indicator is on, the microphones are muted. Darken the computer display. Brighten the computer display. Manage external displays. Enable or disable the built-in wireless features. Open the Settings window. Enable or disable the built-in Bluetooth features. Open a keyboard setting page. Invoke the function defined by yourself: 1. Open the Start menu and click Lenovo Vantage. 2. Click Hardware Settings and then click Input. 3.
Use the TrackPoint pointing device 1. Pointing stick Use your index finger or middle finger to apply pressure to the pointing-stick nonslip cap in any direction parallel to the keyboard. The pointer on the screen moves accordingly but the pointing stick itself does not move. The higher the pressure applied, the faster the pointer moves. 2. Left-click button Press to select or open an item. 3. Right-click button Press to display a shortcut menu. 4.
Replace the pointing-stick nonslip cap Note: Ensure that the new cap has grooves a . Use the trackpad The entire trackpad surface is sensitive to finger touch and movement. You can use the trackpad to perform all the pointing, clicking, and scrolling functions of a traditional mouse. Use the trackpad 1. Left-click zone Press to select or open an item. You also can tap anywhere on the surface of the trackpad with one finger to perform the left-click action. 2.
Use the touch gestures Tap Two-finger tap Tap anywhere on the trackpad with one finger to select or open an item. Tap anywhere on the trackpad with two fingers to display a shortcut menu. Two-finger scroll Two-finger zoom out Put two fingers on the trackpad and move them in the vertical or horizontal direction. This action enables you to scroll through the document, Web site, or apps. Put two fingers on the trackpad and move them closer together to zoom out.
Tap once Tap twice quickly • From the Start menu: Open an app or item. Open an app or item from the desktop. • From the desktop: Select an app or item. • In an open app: Perform an action such as Copy, Save, and Delete, depending on the app. Tap and hold Slide Open a shortcut menu. Scroll through items, such as lists, pages, and photos. Drag an item to the location you want Move two fingers closer together Move an object. Zoom out.
• The multi-touch screen is a glass panel covered with surface coating. Do not apply pressure or place any metallic object on the screen, which might damage the touch panel or cause it to malfunction. • Do not use fingernails, gloved fingers, or inanimate objects for input on the screen. • Regularly calibrate the accuracy of the finger input to avoid a discrepancy.
Connect to an external display Connect your computer to a projector or a monitor to give presentations or expand your workspace. Connect to a wired display 1. Connect the external display to an appropriate video connector on your computer, such as the HDMI connector, USB-C connector (USB 3.1 Gen 1), or Thunderbolt 3 connector (USB-C). 2. Connect the external display to an electrical outlet. 3. Turn on the external display.
• PC screen only: Displays the video output only on your computer screen. Note: Depending on the situation, you might see Disconnect, PC screen only, Computer only, or Disconnect projector. • Duplicate: Displays the same video output on both your computer screen and an external display. • Extend: Extends the video output from your computer display to an external display. You can drag and move items between the two displays. • Second screen only: Displays the video output only on an external display.
Attention: Do not rotate the computer display with too much force, or apply too much force to the upperright or upper-left corner of the computer display. Otherwise the computer display or hinges might get damaged. Your computer features the following four YOGA modes. You can switch among different modes according to your preference. Note: The keyboard and the pointing devices are automatically disabled in the stand mode, tent mode, and tablet mode. Use the touch screen to control your computer instead.
Notebook mode Stand mode Tent mode Tablet mode Use ThinkPad Pen Pro The ThinkPad Pen Pro is an electronic pen stored in the pen slot. To use the pen, slide it out of the slot.
Notes: • The ThinkPad Pen Pro is not waterproof. Keep the pen away from water and excessive moisture. • To purchase the ThinkPad Pen Pro, go to https://www.lenovo.com/accessories. Use the ThinkPad Pen Pro 1 Eraser button 2 Click button You can perform the following operations with the ThinkPad Pen Pro: • To click or make a selection, tap the display once. • To double-click, tap twice without pausing. • To right-click, tap the display and hold the pen there for one second.
28 X390 Yoga User Guide
Chapter 3. Explore your computer Manage power Use the information in this section to achieve the best balance between performance and power efficiency. Check the battery status The battery status icon or is in the Windows notification area. You can check the battery status, view the current power plan, and access battery settings quickly. Click the battery status icon to display the percentage of battery power remaining and change the power mode. A warning message is displayed when the battery is low.
Check the battery temperature 1. Open the Start menu and click Lenovo Vantage. 2. Click Hardware Settings ➙ Power. 3. Locate the Power Status section and then click Show Details to view the battery temperature. Maximize the battery life • Lower the brightness of the computer display. • Turn off the wireless features when not in use. • Use the battery until the charge is depleted. • Recharge the battery completely before using it.
• Open the Start menu, and then click Settings ➙ Devices ➙ Bluetooth & other devices. Turn on the Bluetooth switch. 2. Click Add Bluetooth or other device ➙ Bluetooth. 3. Select a Bluetooth device, and then follow the on-screen instructions. Your Bluetooth-enabled device and computer will automatically connect the next time if the two devices are in range of each other with Bluetooth turned on. You can use Bluetooth for data transfer or remote control and communication.
Attention: Smart cards with slits are not supported. Do not insert such a smart card into the smart-card reader of your computer. Otherwise the reader might get damaged. Install the card 1. Locate the card slot. See “Left” on page 3. 2. Insert the card firmly into the card slot until it is secured in place. Notes: • For the microSD card, ensure that the metal contacts are facing down and pointing toward the card slot.
Chapter 4. Accessories This chapter provides instructions on how to use hardware accessories to expand your computer capabilities. Purchase options Lenovo has a number of hardware accessories and upgrades to help expand the capabilities of your computer. Options include memory modules, storage devices, network cards, port replicators or docking stations, batteries, power adapters, keyboards, mice, and more. To shop at Lenovo, go to https://www.lenovo.com/accessories.
Front view Note: The following illustration is based on ThinkPad Basic Docking Station. The ThinkPad Pro Docking Station and ThinkPad Ultra Docking Station might look slightly different. Use the system lock in the following ways: • Locked position computer. 1. System lock : The latch is locked, and you cannot attach or detach your • Unlocked position your computer. : The latch is unlocked, and you can attach or detach • Removal position slot.
Rear view Figure 1. ThinkPad Basic Docking Station Figure 2. ThinkPad Pro Docking Station Figure 3. ThinkPad Ultra Docking Station Connectors ThinkPad Basic Docking Station ThinkPad Pro Docking Station ThinkPad Ultra Docking Station 1. Audio connector √ √ √ 2. ac power connector √ √ √ 3. DisplayPort® connector √ √ √ 4. VGA connector √ 5. USB 2.0 connector √ √ 6. Always On USB 3.1 connector Gen 1 √ √ 7. USB 3.1 connector Gen 1 √ √ 8. Ethernet connector √ √ √ 9.
Attach a docking station Notes: • The ThinkPad Basic Docking Station does not ship with a system lock installed. If you do not purchase and install a system lock, skip step 4 and step 7 in the following instruction. • If you do not connect the docking station to ac power, the computer attached runs on battery power. 1. Connect the docking station to ac power. 2. Disconnect the cables and devices from the left side of the computer. 3. Turn the system lock key to the unlocked position ( ). 4.
Note: If the indicator is off, your computer is not attached to the docking station successfully. To solve the problem, detach and reattach the computer. 6. Turn the system lock key to the locked position ( ). Attention: When the computer is attached to a docking station, always hold the whole assembly when you need to move your computer. Otherwise the docking station might drop down. Detach a docking station Note: The ThinkPad Basic Docking Station does not ship with a system lock installed.
2. Slide the latch in the direction as shown 1 to release the computer, and then grasp both sides of the computer to remove it 2 . Connect multiple external displays You can connect multiple external displays to a supported docking station. To ensure that the multiple displays work correctly, observe the following guidelines and connect the external displays to the appropriate connectors.
Chapter 5. Secure your computer and information Lock the computer Lock your computer to a desk, table, or other fixtures through a compatible security cable lock. Note: You are responsible for evaluating, selecting, and implementing the locking device and security feature. Lenovo makes no comments, judgments, or warranties about the function, quality, or performance of the locking device and security feature. Cable locks for your product are available from Lenovo at https:// www.lenovoquickpick.com.
Supervisor password The supervisor password protects the system information stored in UEFI BIOS. When entering the UEFI BIOS menu, enter the correct supervisor password when you are prompted by the icon . You also can press Enter to skip the password prompt. However, you cannot change most of the system configuration options in UEFI BIOS. If you have set both the supervisor password and power-on password, you can use the supervisor password to access your computer when you turn it on.
canceled. However, if you forget the hard disk password, Lenovo cannot reset your passwords or recover data from the storage drive. Use Power Loss Protection function (for selected models) For models shipped with an NVMe (Non-Volatile Memory express) M.2 solid-state drive, the M.2 solid-state drive features the Lenovo-unique PLP (Power Loss Protection) function to avoid data loss or damage.
• If you forget your power-on password, take your computer to a Lenovo-authorized servicer or a marketing representative to have the password canceled. • If you forget your hard disk password, Lenovo cannot reset your password or recover data from the storage drive. Take your computer to a Lenovo-authorized servicer or a marketing representative to have the storage drive replaced. Proof of purchase is required, and a fee will be charged for parts and service.
Chapter 6. Configure advanced settings This chapter provides information about UEFI BIOS, RAID, recovery, operating system installation, and system management. UEFI BIOS This section introduces what is UEFI BIOS and the operations you can perform in UEFI BIOS. What is UEFI BIOS UEFI BIOS is the first program that the computer runs when the computer is turned on. UEFI BIOS initializes the hardware components and loads the operating system and other programs.
4. Press F10 to save the changes and exit. To change the startup sequence temporarily: 1. Restart the computer. When the logo screen is displayed, press F12. 2. Select the device that you want the computer to start from and press Enter. Set the system date and time 1. Restart the computer. When the logo screen is displayed, press F1. 2. Select Date/Time and set the system date and time as desired. 3. Press F10 to save changes and exit.
Note: The items in the graphical user interface (GUI) might change without notice. 1. Open the Start menu, and then click Settings ➙ Update & Security ➙ Recovery. 2. In the Reset this PC section, click Get started. 3. Follow the on-screen instructions to reset your computer. Use advanced options Note: The items in the graphical user interface (GUI) might change without notice. 1. Open the Start menu, and then click Settings ➙ Update & security ➙ Recovery. 2.
5. Click Yes in the User Account Control window to allow the Recovery Media Creator program to start. 6. In the Recovery Drive window, follow the on-screen instructions to create a recovery USB drive. Use the recovery USB drive 1. Ensure that your computer is connected to ac power. 2. Connect the recovery USB drive to the computer. 3. Turn on or restart the computer. When the logo screen is displayed, press F12. The Boot Menu window opens. 4. Select the recovery USB drive as the boot device. 5.
9. Follow the on-screen instructions to install the device drivers and necessary programs. 10. After installing the device drivers, apply Windows Update to get the latest updates, for example the security patches. 11. Go to Microsoft Store to download and install the latest version of Lenovo Vantage. Note: After installing the operating system, do not change the initial UEFI/Legacy Boot setting in the UEFI BIOS menu. Otherwise, the operating system will not start correctly.
48 X390 Yoga User Guide
Chapter 7. CRU replacement What are CRUs Customer Replaceable Units (CRUs) are parts that can be upgraded or replaced by the customer. The computers contain the following types of CRUs: • Self-service CRUs: Refer to parts that can be installed or replaced easily by customer themselves or by trained service technicians at an additional cost. • Optional-service CRUs: Refer to parts that can be installed or replaced by customers with a greater skill level.
1. Go to Control Panel and view by Large icons or Small icons. 2. Click Power Options, and then click Choose what the power buttons do on the left pane. 3. Click Change settings that are currently unavailable at the top. 4. If prompted by User Account Control (UAC), click Yes. 5. Clear the Turn on fast startup check box, and then click Save changes. To disable the built-in battery: 1. Restart your computer. When the logo screen is displayed, immediately press F1 to enter the UEFI BIOS menu. 2.
4. Loosen the screws that secure the base cover assembly. 5. Pry up the latches and remove the base cover assembly. Chapter 7.
6. Install the new base cover assembly in place. Ensure that the latches of the base cover assembly are secured under the base cover assembly. 7. Tighten the screws to secure the base cover assembly. 8. Turn the computer over. Connect the ac power adapter and all disconnected cables to the computer. 9. Install the pen back into the pen slot. Troubleshooting If the computer does not start up after you reinstall the base cover assembly, disconnect the ac power adapter and then reconnect it to the computer.