® Intel Express 410T Standalone Switch English Français Italiano Deutsch Español *740604-001* 740604-001 410T-QS-GD cover-1.
Year 2000 Capable An Intel product, when used in accordance with its associated documentation, is “Year 2000 Capable” when, upon installation, it accurately stores, displays, processes, provides, and/or receives date data from, into, and between the twentieth and twenty-first centuries, including leap year calculations, provided that all other technology used in combination with said product properly exchanges date data with it. Copyright © 1999, Intel Corporation. All rights reserved.
Contents Quick Starts 2 English ........................................................................................... 2 Chinese .......................................................................................... 4 Korean ........................................................................................... 6 French ............................................................................................ 8 Italian ........................................................................
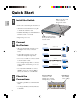
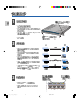
Quick Start English 1 Rack: Use the three small screws to attach the brackets to the switch. Install the Switch • Remove the switch and parts from the box. • Attach the enclosed brackets if you plan to mount the switch in a rack. Intel® Expres s 410T Standal one Switch MDI/ MDI-X 1 2 3 4 5 6 7 8 9 10 11 12 13 • Install the Intel® Express 410T Standalone Switch in a rack or on a shelf. • Plug in the power cord.
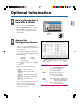
4 How to Change Port 1 from MDI-X to MDI English Optional Information ® Intel Express 410T Standalo MDI • All ports on the switch are MDI-X. Press the MDI/MDI-X button to change Port 1 to MDI so you can connect to another switch or hub using a straightthrough cable. 1 2 3 4 MDI-X MDI/MDI-X button MDI MDI-X 5 Access the Configuration Screen • Connect your PC to the Management module’s serial port using the null-modem cable (included).
1 ( Rack ) ( switch ) • • Intel® Express 410T Standal one Switch MDI/ MDI-X 1 2 3 4 5 6 7 8 9 10 11 12 13 Intel® Express 410T • 14 15 16 Left Link = Solid Green Activity = Collision Blinking Green = Blinking Orange Status Right 10Mbps = 100Mbps Solid Orange = Off Standalone Switch ( Shelf ) • ( switch ) 2 • PC/ ( Switch ) • PC • ( Switch ) • 1 10/100 MDI ( Switch ) • CAT 5 UTP 10 Mbps CAT 3 4 5 UTP 3 ( Hub or Switch ) 100 Mbps 1 10/100 MDI ( Switch ) ( Hub or S
4 1 MDI-X MDI ® Intel Express 410T Standalo MDI 1 2 3 4 MDI-X • MDI-X 1 MDI/MDI-X MDI MDI/MDI-X MDI MDI-X 5 • • PC VT100 * - 9600 - -8 -1 <> z E • (Auto) = (Speed) T Switch ) 100 = 10 = B z (Half) = (Full) = (Duplex) c+S –= c+R • < 100 Mbps 10 Mbps (Enable) = (Flow Control) > (Disable) = –= 5 Sch_410TQS_Emb.
1 Intel® Expres MDI/ MDI-X 1 2 s 410T Standal 3 4 one Switch 5 6 7 ® 8 9 10 11 12 13 14 15 16 Left Link = Solid Green Activity = Collision Blinking Green = Blinking Orange Status Right 10Mbps = 100Mbps Solid Orange = Off 2 10/100 10/100 3 Module A ackable Hub 4 5 6 6 Kr_410TQS.Emb.
4 ® Intel Express 410T Standalone S MDI 1 2 3 4 5 MDI-X MDI MDI-X 5 E z T B z c+S c+R 7 Kr_410TQS.Emb.
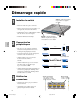
Démarrage rapide 1 Armoire : utilisez trois petites vis pour fixer les supports au switch. Installez le switch • Retirez le switch et les pièces de la boîte. • Fixez les supports livrés avec l’appareil si vous envisagez de le monter dans une armoire. Intel® Expres s 410T Standal one Switch MDI/ MDI-X 1 2 3 4 5 6 7 8 9 ® • Installez Intel Express 410T Standalone Switch dans une armoire ou sur une étagère. • Branchez l’alimentation électrique.
Informations facultatives 4 Comment changer le port 1 de MDI-X en MDI ? ® Intel Express 410T Standalone S MDI • Tous les ports du switch sont de type MDI-X. Pour changer le port 1 en MDI, appuyez sur le bouton MDI/MDI-X. Vous pourrez ainsi vous connecter à un autre switch ou à un hub à l’aide d’un câble direct.
Introduzione rapida 1 A rack: usare le tre piccole viti per fissare i supporti allo switch. Installazione dello switch • Rimuovere lo switch e le altre parti dalla confezione. • Se si intende montare lo switch a rack, fissare i supporti allegati.
Informazioni opzionali 4 Come modificare la Porta 1 da MDI-X a MDI Intel® Express 410T Standalone S MDI 1 2 3 4 5 MDI-X • Tutte le porte dello switch sono MDI-X. Premere il pulsante MDI/MDI-X per cambiare la Porta 1 in MDI così che sia possibile connettere un altro switch o hub utilizzando un cavo diretto. Pulsante MDI/MDI-X MDI MDI-X 5 Accesso alla schermata di configurazione Italiano • Connettere il PC alla porta seriale del Modulo di gestione utilizzando un cavo null-modem (incluso).
Schnellstart 1 Gestell: befestigen Sie die Klammern mit den drei kleinen Schrauben am Switch. Installieren des Switches • Entnehmen Sie den Switch und die Bauteile aus der Schachtel. • Befestigen Sie die enthaltenen Klammern, wenn Sie den Switch in einem Gestell montieren wollen.
Optionale Informationen 4 So stellen Sie Anschluß 1 von MDI-X auf MDI um ® Intel Express 410T Standalone S MDI • Alle Anschlüsse am Switch sind auf MDI-X eingestellt. Drücken Sie die Taste MDI/MDI-X, um Anschluß 1 auf MDI umzustellen, so daß Sie den Switch mit einem anderen Switch oder Hub über ein Direktkabel verbinden können.
Inicio rápido 1 Bastidor: utilice los tres tornillos pequeños para colocar las abrazaderas en el Switch. Instalar el Switch • Extraiga el Switch y las piezas de la caja. • Coloque las abrazaderas que se incorporan si piensa montar el Switch en un bastidor. Intel® Express 410T Standal one Switch MDI/ MDI-X 1 2 3 4 5 6 7 ® • Conecte el cable de alimentación. 2 Conectar los dispositivos 8 9 • Instale el Intel Express 410T Standalone Switch en un bastidor o en una estantería.
h 4 Cómo cambiar el puerto 1 de MDI-X a MDI Intel® Express 410T Standalone S MDI • Todos los puertos del Switch son MDI-X. Pulse el botón MDI/MDI-X para cambiar el Puerto 1 a MDI, de manera que pueda conectarse con otro Switch o Hub mediante un cable plano. 1 2 Botón MDI/ MDI-X 5 3 4 5 MDI-X MDI MDI-X Obtener acceso a la pantalla de configuración • Conecte su PC al puerto serie del módulo de gestión mediante el cable de null-modem (incorporado).
16 410T Guide.
User Guide - Overview Features This guide covers both the 16- and 24-port versions of the Intel® Express 410T Standalone Switch.
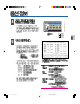
Understanding 410T Switches Port LEDs The LEDs above each port indicate port status, individual port speed, and port activity. Left LED Port Activity (Green/Orange) 5 6 7 Right LED Port Speed (Orange) 8 LED Status Meaning Left Solid green Device linked. Blinking green Receiving activity on that port. Blinking orange A collision was detected on this segment. Off No link detected. Solid orange Device connected at 10Mbps. Off Device connected at 100Mbps.
Local Management Overview The Express 410T switch sets speed and duplex automatically according to the device attached. If you need to change port settings, Local Management provides a way to configure the switch manually. Refer to the Quick Start section of this guide for instructions on connecting to Local Management. Navigation Screen legend Angle brackets indicate a toggle field. Use z to toggle selections within the field. SAVE SETTINGS Any word in all CAPS is a button.
Functions Help text at the bottom of the screen provides information on the selected item. Description Port: Displays the ports of the switch. Speed: Press the z to toggle the field’s options and change the speed of the port. You can toggle three settings: Auto = speed and duplex are negotiated automatically 100 = port is forced to 100Mbps 10 = port is forced to 10Mbps Duplex: Press the z to toggle the duplex setting of the port.
Connecting to Devices Connection Guidelines General • The Express 410T switch is capable of autonegotiating port speed and can operate at 10Mbps or 100Mbps per port. The switch matches the highest possible speed of an attached device. • The Express 410T switch is capable of autonegotiating port duplex and can operate at half- or full-duplex. • Configure the network so devices that talk to each other primarily are on the same segment. Each port is a single segment.
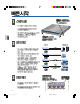
Workgroup Example MDI / MDI-X Express 410T Standalone Switch Intel® Express 410T Standalone Switch Status Module A Module A Module B Module B 10Mbps 100Mbps Stack of Express 330T Stackable Hubs connected to the switch using a crossover cable. Intel® Express 330T Stackable Hub Intel Express 330T Stackable Hub ® In this example a Express 410T switch serves as the backbone for a small network.
Cabling Devices Media Requirements Incorrect cabling is often the cause of network performance problems. Read the next two pages if you’re unsure of the requirements. 100Base-TX The 100Base-TX Fast Ethernet specification requires that you use CAT 5 UTP cabling to operate at 100Mbps. You’re limited to 100 meters between any two devices. If you use lower grade cabling (CAT 3 or CAT 4), you may get a connection, but will soon experience data loss or slow performance.
Testing a cable A quick way to check a cable’s link integrity is to plug one end into port 1 and the other end into port 2. Make sure the MDI/MDI-X button is out. Check the Activity LEDs for ports 1 and 2. If the LEDs are on, you have a functioning crossover cable. If the LEDs are off, push the MDI/MDI-X button in. If the Activity LEDs for ports 1 and 2 turn on, you have a functioning straight-through cable. However, if the LEDs remain off, you probably have a defective cable.
FAQs/Troubleshooting How can I set the speed or duplex on individual ports? Normally the switch handles all connections automatically but if you need to force speed or duplex, (for example, to accomdate older devices that don’t support autonegotiation) use the Local Management. I’ve connected the cable but the left port LED (link) is off. Why? • Remove the cable and plug it in again. Wait up to six seconds for a link.
Regulatory Information and Warnings Federal Communications Commission (FCC) Statement This equipment has been tested and found to comply with the limits for a Class A digital device, pursuant to Part 15 of the FCC Rules. These limits are designed to provide reasonable protection against harmful interference when the equipment is operated in a commercial environment.
AVERTISSEMENT AVVERTENZA Le système a été conçu pour fonctionner dans un cadre de travail normal. L’emplacement choisi doit être: Il sistema è progettato per funzionare in un ambiente di lavoro tipico. Scegliere una postazione che sia: · Propre et dépourvu de poussière en suspension (sauf la poussière normale). · Pulita e libera da particelle in sospensione (a parte la normale polvere presente nell’ambiente). · Bien aéré et loin des sources de chaleur, y compris du soleil direct.
Wichtige Sicherheitshinweise 1. Bitte lesen Sie sich diese Hinweise sorgfältig durch. 2. Heben Sie diese Anleitung für den spätern Gebrauch auf. 3. Vor jedem Reinigen ist das Gerät vom Stromnetz zu trennen. Vervenden Sie keine Flüssig- oder Aerosolreiniger. Am besten dient ein angefeuchtetes Tuch zur Reinigung. 4. Um eine Beschädigung des Gerätes zu vermeiden sollten Sie nur Zubehörteile verwenden, die vom Hersteller zugelassen sind. 5. Das Gerät is vor Feuchtigkeit zu schützen. 6.
Limited Hardware Warranty Limited Hardware Warranty Intel warrants to the original owner that the hardware product delivered in this package will be free from defects in material and workmanship for three (3) years following the latter of: (i) the date of purchase only if you register by returning the registration card as indicated thereon with proof of purchase; or (ii) the date of manufacture; or (iii) the registration date if by electronic means provided such registration occurs within thirty (30) days f
Limited Hardware Warranty (Europe only) Intel warrants to the original owner that the hardware product delivered in this package will be free from defects in material and workmanship for three (3) years following the latter of: (i) the date of purchase only if you register by returning the registration card as indicated thereon with proof of purchase; or (ii) the date of manufacture; or (iii) the registration date if by electronic means provided such registration occurs within thirty (30) days from purchase
Limitation de garantie du matériel (Europe) Intel garantit au propriétaire original que le produit matériel livré dans le présent coffret est exempt de défaut matériel ou de fabrication pour une période de trois (3) ans à compter de la plus récente des dates suivantes : (i) la date d’achat uniquement si vous vous êtes inscrit en renvoyant la carte d’inscription de la façon indiquée, avec une preuve d’achat ; (ii) la date de fabrication ou (iii) la date d’inscription électronique à condition qu’elle ait lieu
Garanzia limitata sull’hardware (valida solo in Europa) Intel garantisce al proprietario originale che il prodotto hardware incluso in questo pacchetto è privo di difetti in materiale e in lavorazione per un periodo di tre (3) anni a partire dall’ultima data tra: (i) la data di acquisto, solo nel caso in cui l’utente effettua la registrazione tramite la scheda di registrazione, come indicato, accompagnata dalla prova di acquisto; oppure (ii) la data di fabbricazione; oppure (iii) la data di registrazione, s
Beschränkte Hardwaregarantie (Nur für Europa) Intel garantiert dem ursprünglichen Eigentümer, daß die in diesem Paket enthaltene Hardware keine Material- oder Herstellungsfehler aufweist.
Garantía limitada de hardware (sólo para Europa) Intel garantiza al propietario original que el producto de hardware entregado en este paquete no tendrá defectos de materiales ni fabricación durante tres (3) años contados a partir de la fecha que resulte más reciente de entre las opciones siguientes: (i) la fecha de compra, sólo si devuelve la tarjeta de registro con prueba de compra de la forma indicada al respecto para registrarse; o bien (ii) la fecha de fabricación; o (iii) la fecha de registro, si éste
35 410T Guide.
36 410T Guide.
Intel Customer Support Automated Support You can reach Intel’s automated support services 24 hours a day, every day at no charge. The services contain the most up-to-date information about Intel products. You can access installation instructions, troubleshooting information, and general product information. World Wide Web & Internet FTP Access Intel’s World Wide Web page or download information using anonymous FTP. How to Access: WWW Customer Support: http://support.intel.com News: news://cs.intel.
® Intel Express 410T Standalone Switch English Français Italiano Deutsch Español *740604-001* 740604-001 410T-QS-GD cover-1.