Intel NetStructure® Host Media Processing Release 2.
INFORMATION IN THIS DOCUMENT IS PROVIDED IN CONNECTION WITH INTEL® PRODUCTS. NO LICENSE, EXPRESS OR IMPLIED, BY ESTOPPEL OR OTHERWISE, TO ANY INTELLECTUAL PROPERTY RIGHTS IS GRANTED BY THIS DOCUMENT.
Contents Revision History . . . . . . . . . . . . . . . . . . . . . . . . . . . . . . . . . . . . . . . . . . . . . . . . . . . . . . . . . . . . . . 6 About This Publication . . . . . . . . . . . . . . . . . . . . . . . . . . . . . . . . . . . . . . . . . . . . . . . . . . . . . . . . Purpose . . . . . . . . . . . . . . . . . . . . . . . . . . . . . . . . . . . . . . . . . . . . . . . . . . . . . . . . . . . . . . . . Intended Audience. . . . . . . . . . . . . . . . . . . . . . . . . . . . . . . . . . . .
Contents Figures 1 2 3 4 5 6 7 8 9 10 11 4 TCP/IP Filtering . . . . . . . . . . . . . . . . . . . . . . . . . . . . . . . . . . . . . . . . . . . . . . . . . . . . . . . . . . . . . 17 HMP Software Navigation Screen . . . . . . . . . . . . . . . . . . . . . . . . . . . . . . . . . . . . . . . . . . . . . . . 21 Example of IP Media Server Demo . . . . . . . . . . . . . . . . . . . . . . . . . . . . . . . . . . . . . . . . . . . . . . 31 Adding or Removing Features Using Change in Add/Remove Programs . . .
Contents Tables 1 2 3 Installation Scenarios. . . . . . . . . . . . . . . . . . . . . . . . . . . . . . . . . . . . . . . . . . . . . . . . . . . . . . . . . . 9 License Types . . . . . . . . . . . . . . . . . . . . . . . . . . . . . . . . . . . . . . . . . . . . . . . . . . . . . . . . . . . . . . 11 Additional Switches . . . . . . . . . . . . . . . . . . . . . . . . . . . . . . . . . . . . . . . . . . . . . . . . . . . . . . . . . . 29 HMP Release 2.
Revision History This revision history summarizes the changes made in each published version of this document. Document No. Publication Date Description of Revisions 05-2478-001 December 2005 Choosing the Appropriate Installation Procedure: Updated to include update install. Installing the Software: Added references to the Update Install throughout chapter. Determining Which Features to Install: Updated the names of the features under “Circuit Connectivity Runtime Package.” Revised Demos description.
About This Publication The following topics provide information about this software installation guide: • Purpose • Intended Audience • How to Use This Publication • Related Information Purpose This guide explains how to do the following: • Install and uninstall Intel NetStructure® Host Media Processing (HMP) Software Release 2.0 for Windows • Update an existing version of the software • “Silently” install the software • Verify the installation by running a demo.
About This Publication • Chapter 3, “Uninstalling the Software” describes how to uninstall the software. • Chapter 4, “Troubleshooting” provides information about error messages and the log file for the install, and describes how to repair an installation by re-installing it.
1 Installation Overview 1. This chapter provides the following information about installing Intel NetStructure® Host Media Processing (HMP) Software Release 2.0 for Windows. • Choosing the Appropriate Installation Procedure . . . . . . . . . . . . . . . . . . . . . . . . . . . . . 9 • Major Installation Steps. . . . . . . . . . . . . . . . . . . . . . . . . . . . . . . . . . . . . . . . . . . . . . . . . 10 • HMP Licenses . . . . . . . . . . . . . . . . . . . . . . . . . . . . . . . . . . . . . . . . . .
Installation Overview 1.2 Major Installation Steps Following are the major installation steps: 1. Before installing the HMP Software, make sure that the system meets the hardware and software “System Requirements” as described in the HMP Software Release Guide. 2. To install the software, you must have local administrative privileges. Contact your network administrator to set up administrative privileges as required. 3. If you have an earlier version of HMP Release 2.0, HMP Release 1.3 or HMP Release 1.
Installation Overview the license will be associated with one of the boards. This is discussed in the HMP Administration Guide. Note: You cannot use old licenses from a previous HMP release. You must obtain a new license for the current release. After you install the HMP Software and (optionally) one or more of the supported Intel NetStructure DNI or DSI boards, you must activate the license on the target system using a license management tool (LMTOOLS*1) and the configuration manager (DCM).
Installation Overview 12 HMP Release 2.
Installing the Software 2. 2 This chapter gives detailed procedures for installing Intel NetStructure® Host Media Processing (HMP) Software Release 2.0 for Windows: • Prerequisites for Software Installation. . . . . . . . . . . . . . . . . . . . . . . . . . . . . . . . . . . . . . 13 • Order of Procedures. . . . . . . . . . . . . . . . . . . . . . . . . . . . . . . . . . . . . . . . . . . . . . . . . . . . 20 • Performing a Full Install of the Software . . . . . . . . . . . . . . . . . . . . . . . . . . .
Installing the Software • It is recommended that you back up the drive on which you intend to install the software. • If you have a previous version of HMP Release 2.0 on your system, you do not have to uninstall it. Install the new version of the software using the procedure in Section 2.4, “Performing an Update Install”, on page 23. • If you have HMP Release 1.3 on your system, you must uninstall it as described in Section 2.1.1, “Uninstalling a Previous Release”, on page 14.
Installing the Software 2.1.2 Installing and Configuring Windows SNMP Service If you intend to use the SNMP agent software (for a description, see Section 2.1.4, “Determining Which Features to Install”, on page 17) and Windows SNMP Service has not already been installed, you must install and configure the Windows SNMP Service on both the managed node and the network management station before installing the HMP Software release and SNMP agent software.
Installing the Software 7. Choose the Traps tab. 8. Enter Community Name: public. Note: In the interest of enhanced security, administrators may want to choose a less commonly used community string. 9. Click Add to List. 10. Under Trap Destinations, click Add and enter the IP address for each management node to receive trap notifications from this managed node. 11. Choose the Security tab. 12. Highlight the community name you set in Step 8 and click Edit. Change Community Rights to READ CREATE. 13.
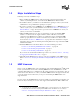
Installing the Software 6. The TCP/IP Filtering window appears (see Figure 1). This window tells you which ports the system uses. Figure 1. TCP/IP Filtering 7. If the Enable TCP/IP Filtering checkbox is not checked, there is no filtering and all ports are valid. If the box is checked, make sure TCP ports 1719, 1720, 5060,12002, 12003, 12004, 20000, and 20001 are available. 2.1.
Installing the Software compile and execute applications you must also select the Development Package (SDK) option. Note: In most cases, if you select the Core Runtime Package, you should also select the License Package. The only exception is for advanced users who already have a FLEXnet licensing server and want to use it for licensing HMP as well as other software applications. For more information, see the description of the next item: License Package.
Installing the Software for such applications as voicemail, auto-attendant, unified messaging, interactive voice response (IVR), speech recognition, and fax. If you select the Circuit Connectivity Runtime Package, both the DNI and DSI board options will be automatically selected, but if you are only using boards from one group, you can deselect the other. • Demos – Select this option to install all the HMP demo applications.
Installing the Software 2.2 Order of Procedures The order of procedures for installing HMP Release 2.0 is as follows: 1. Make sure all relevant prerequisites described in Section 2.1, “Prerequisites for Software Installation”, on page 13 are met. 2. Refer to Section 1.1, “Choosing the Appropriate Installation Procedure”, on page 9. Then install the software using one of the following procedures: • Section 2.3, “Performing a Full Install of the Software”, on page 20. • Section 2.
Installing the Software 2. Insert the HMP Release 2.0 CD-ROM in your system or download the software from the website (http://www.intel.com/design/network/products/telecom/software/index.htm). If the installation process does not start automatically when you insert the CD-ROM, locate the autorun.exe program on the CD-ROM and double-click on the filename. If you download the software from the website, you can double-click on autorun.
Installing the Software Note: The \Intel\HMP path sequence will be appended to the destination folder you select. 6. The Select Features screen appears. When you click on an item in the list, a brief description of it appears on the right side of the screen. Descriptions of these features are also provided in the install’s online help (press F1 to access it) and in Section 2.1.4, “Determining Which Features to Install”, on page 17. Select the features you want by clicking boxes to put check marks in them.
Installing the Software Note: The Setup Status screen will indicate that all files are being installed. This is not actually the case. Files that have changed will be updated based on version/timestamp. The InstallShield engine processes each file that was previously installed and compares the version/timestamp on the system to that in the build. If the file in the build has a higher version number or later timestamp, then the file will be installed.
Installing the Software “Uninstalling a Previous Release”, on page 14) and then use the procedure in Section 2.3, “Performing a Full Install of the Software”, on page 20. The update install gives you the latest software for the features that you selected when you did the full install of the system release that is currently on your system. If you want an additional feature that wasn’t previously installed (for example, Demos), first perform the update install and then perform the procedure in Section 2.
Installing the Software 7. The Update Complete window displays after all the files are copied onto your hard drive. This window will indicate whether a reboot is required. If a reboot is required, you must choose whether you want to reboot now or later. (If you choose to reboot later you must manually reboot the system before the install will be complete.) If you installed the software from a CD, remove it from the drive. Click Finish to complete the installation process.
Installing the Software release since installs can vary, so you must create your own response file. The procedures in this section describe how to create and use a response file that is specific to your particular needs. Note: 2.5.2 A Security Alert - Driver Installation message may appear during installation. Therefore, if you want to perform a silent install, you must disable the Windows Driver Signing check. Refer to Section 4.5, “Disabling the Windows Driver Signing Check”, on page 41.
Installing the Software that silently installs the HMP Software (described in the next section). However, in this case you must not change the name of the response file. You must keep the default name: setup.iss. Note: You won’t be able to move setup.iss to the root of the build media if you are using a CD with the HMP Software on it. If you are using a CD, you will have to specify the location of setup.iss in the next procedure (Using the InstallShield Response File).
Installing the Software • the InstallShield log file you created (named setup.log by default) in the previous step using the /f2 option • the installation log file located in %TEMP%\DlgcInstall.log For more information, refer to Section 4.3, “Installation Log Files”, on page 40. To verify that the install is complete, look for a success/failure value under the following registry key: HKEY_LOCAL_MACHINE\SOFTWARE\DIALOGIC\SystemInformation The two possible values are DlgcInstallSuccess or DlgcInstallError
Installing the Software • Using the /s switch will cause the script to run without any screen output. Without the /s switch, the script will still not prompt the user for any information but will display installation progress graphically. • When using the /s option, a log file is created in the same folder as the response file (setup.iss). The log file has the default name setup.log if the /f2 switch is not provided along with /f1.
Installing the Software 2.5.5 Defining the Destination Directory The DIR keyword lets you specify a destination directory for the installation other than the default of C:\Program Files\Intel\HMP. The specified directory will be created if it doesn’t exist. If it does exist, any existing files with the same names as the files being installed will be overwritten. The usage is as follows: SETUP DIR()DIR /s /f2 where identifies an absolute path to
Installing the Software confirm that you have properly installed the HMP Software. No input is required from you until you are prompted to quit the demo by entering q. If the demo does not run, check to make sure you have started the HMP system. The main DCM window should have a status message of “Running” at the bottom. If the demo still does not run in a manner similar to Figure 3, the HMP Software may not be installed properly.
Installing the Software Notes: 1. It is recommended that you back up the drive on which the software is installed before you proceed. 2. A log file captures what happens during this process. For more information, refer to Section 4.3, “Installation Log Files”, on page 40. 2.7.1 Using Add/Remove Programs To add and/or remove programs using Add/Remove Programs, follow this procedure: 1.
Installing the Software (If you choose to reboot later you must manually reboot the system before the install will be complete.) If you inserted a CD to add features, remove it from the drive. Click Finish to proceed. 7. Start the system. The HMP system is started using the configuration manager (DCM). From the DCM main window, click the Start System option from the System pull-down menu or click the Start All Enabled Devices icon. 2.7.
Installing the Software Figure 5. Modify Option on InstallShield Wizard Screen Select Modify and click Next. Note: A procedure for using the Repair option is given in Section 4.7, “Repairing an Installation”, on page 43. A procedure for removing the software is given in Chapter 3, “Uninstalling the Software”. 4. The Select Features screen will appear. The items that are already installed will be checked. Select additional items or de-select (un-check) items.
Uninstalling the Software 3. 3 This chapter describes how to uninstall Intel NetStructure® Host Media Processing (HMP) Software Release 2.0 for Windows. Notes: 1. It is recommended that you back up the drive on which the software is installed before you proceed. 2. Be sure to back up all configuration files you wish to save from the Intel\HMP directory because this whole directory structure will be removed by the uninstall. 3. A log file captures what happens during the uninstall.
Uninstalling the Software 5. The Maintenance Complete window appears. This window will indicate whether a reboot is required. If a reboot is required, you must choose whether you want to reboot now or later. (If you choose to reboot later you must manually reboot the system before the uninstall will be complete.) Click Finish to proceed. 6. If the Maintenance Complete window did not say you had to reboot, you are finished with the uninstall.
Troubleshooting 4. 4 This chapter provides the following troubleshooting information: • General Guidelines . . . . . . . . . . . . . . . . . . . . . . . . . . . . . . . . . . . . . . . . . . . . . . . . . . . . 37 • Error Messages . . . . . . . . . . . . . . . . . . . . . . . . . . . . . . . . . . . . . . . . . . . . . . . . . . . . . . . 37 • Installation Log Files . . . . . . . . . . . . . . . . . . . . . . . . . . . . . . . . . . . . . . . . . . . . . . . . . . . 40 • APIC Timer Incompatible . . . . .
Troubleshooting Conditions Preventing Installation The following error messages describe conditions you must change to allow installation to proceed. The error message is in bold type and an explanation follows it. You must have administrative rights to install this software. Setup will now exit. To install the system software, you must have local administrative privileges on your computer system. Contact your network administrator to set up administrative privileges as required.
Troubleshooting APIC Timer The error message is in bold type and an explanation follows it. The local APIC timer is incompatible with this release. The setup program will now disable the Intel NetStructure HMP APIC driver. When the APIC driver is disabled, HMP falls back to the software-based timer and HMP operation may be erratic or impossible if more than a few channels are used. Refer to Section 4.4, “APIC Timer Incompatible”, on page 41 for more information.
Troubleshooting Open Application Detected If you do not close DCM before you perform a maintenance action (change or repair what is installed or uninstall the software), you will get an error message that tells you an application is open (Figure 8). When you click OK, the setup program will exit. At this point, you can close DCM and proceed with performing the maintenance action. Figure 8.
Troubleshooting However, the cleanup utility does remove the DlgcInstall.log file (for more information about the cleanup utility, refer to Section 4.8, “Uninstall Cleanup Utility”, on page 44). The installation log (DlgcInstall.log) is created in the directory pointed to by the value of the environment variable %TEMP%. (To find out what the %TEMP% directory is, type echo %TEMP% on a command prompt and note down the path displayed.) The default value of this variable is C:\Documents and Settings\\L
Troubleshooting 2. Select System. The System Properties window opens. 3. On the System Properties window, select the Hardware tab. 4. On the Hardware tab, click the Driver Signing button. The Driver Signing Options window opens. 5. On the Driver Signing Options window, note what the current setting is (Warn, Block, or Ignore). 6. If the setting is Warn or Block, change the setting to Ignore (see Figure 10). Figure 10. Driver Signing Options Window 7. Click OK and close the Control Panel. 8.
Troubleshooting this case, all you have to do is set the “Found New Hardware Wizard” to search for and load the drivers automatically, and click Next and then Finish. However, if the “Found New Hardware Wizard” does not appear and/or the board is not shown on the DCM main screen, you must perform the following: 1. Right click on the My Computer icon on your desktop. 2. Select Properties from the menu that appears. 3. Select the Hardware tab. 4. Click the Device Manager button. 5.
Troubleshooting 3. An InstallShield Wizard screen appears (Figure 11). Figure 11. Repair Option on InstallShield Wizard Screen Select Repair and click Next. Note: A procedure for using the Modify option is given in Section 2.7, “Adding or Removing Installed Features”, on page 31. A procedure for removing the software is given in Chapter 3, “Uninstalling the Software”. 4. You will see a progress bar which shows the progress of the re-installation.
Troubleshooting This cleanup utility is needed because the uninstall does not delete files or registry keys created after the install has completed. These remaining files result in the HMP directory structure not being deleted by the uninstall. The cleanup utility deletes the entire HMP directory hierarchy and known log files which may be located in other directories. In addition, registry keys created after completion of the install (for example, detection or runtime) are removed.
Troubleshooting 46 HMP Release 2.
Index A I adding or removing installed features 31 administrative privileges 10, 38 installation log file 40 installation prerequisites 13 InstallShield documentation 39 InstallShield problem - silent install 39 InstallShield response file 26, 27 Intel NetStructure DNI Boards 18 Intel NetStructure DSI boards 18 B Board ID 11 C Circuit Connectivity Runtime Package 18 components 17 Core Runtime Package 17 D Demos 19 Development Package 17 disabling the Windows Driver Signing check 41 DlgcInstall.
SNMP service configuring 15 installing 15 T TCP ports 16 Telecom Support Resources 37 third party software 22 trial license 11 U uninstall the software 35 update install 9, 23 V verification license 11 W Windows SNMP Service 15 48 HMP Release 2.