
User Manual


Intel® Wireless Gateway User's Guide
11
Chapter 3. Installing the Intel® Wireless Gateway through a Wireless
Connection
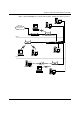
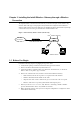
The implementation of an Intel® Wireless Gateway as shown in the figure below includes only
wireless clients. This type of setup requires that you install and configure the Intel® Wireless
Gateway with a wireless client. For instructions on installing the Intel® Wireless Gateway through
a wired connection, refer to the Quick Install Guide included with the unit.
Figure 5. LAN with only Wireless Clients (WLAN only)
Intel
®
Wireless Gateway
Wireless Clients
ISP and
the Internet
Cable Modem/DSL Box
3.1 Before You Begin
Perform the following steps before plugging in any power cables:
1. Verify that the package contains the items listed in the Quick Install Guide.
2. Remove the Intel® Wireless Gateway unit from the box:
3. Apply the regulatory compliance labels to its under side. For instructions, see the Intel®
Wireless Gateway Regulatory Approval Guide.
4. Remove the cradle from the box, and slide it onto the Intel® Wireless Gateway.
• With one hand, hold onto the top of the access point, between the antennae.
• With the other hand, hold the handle on the cradle.
• Align the rails on the cradle to slide into the grooves on the back of the access point.
• Slide the cradle and access point together until the rails snap into place.
5. Fill out your Internet Service Provider (ISP) Worksheet. Generally, your ISP or installer
provides this information. If not, call your ISP for assistance.
6. Make sure that the wireless client you use for setup and configuration is configured to obtain
an IP address automatically: