User Manual www.samsung.
r This user manual describes procedures for using both the mouse and the touchpad. About this manual r Images and screenshots are those of the representative model of the series and may differ in appearance from the actual product. r This user manual is specially designed to detail the computer’s functions and features. r The user manual supplied with the computer may vary depending on the model. r Content may differ from the final product and is subject to change without prior notice.
About this manual Instructional icons and expressions Copyright © 2013 Samsung Electronics Co., Ltd. This manual is protected under international copyright laws.
About this manual HDMI, the HDMI logo, and the term High Definition Multimedia Interface are trademarks or registered trademarks of HDMI Licensing LLC. Trademarks r Samsung and the Samsung logo are trademarks or registered trademarks of Samsung Electronics. r Intel and Core are trademarks or registered trademarks of the Intel Corporation. As an ENERGY STAR® Partner, Samsung has determined that this product meets the ENERGY STAR® guidelines for energy efficiency.
About this manual Caution for the data Product capacity representation Samsung Electronics shall not be liable for any data loss. Please take care to avoid losing any important data and back up your data to prevent any such data loss. Storage capacity representation The capacity of the storage device (HDD, SSD) of the manufacturer is calculated assuming that 1KB=1,000 Bytes.
Table of contents Getting started Basics 7 13 16 28 35 37 41 42 44 Layout Charging the battery Turning the computer on and off Windows 8 18 20 21 23 25 27 About Windows 8 Start screen Desktop The Charms App tiles Microsoft account Touch screen Keyboard Touchpad LCD brightness Volume Setup utility (BIOS) Network & Internet 49 52 Applications Troubleshooting 55 58 59 60 61 62 64 65 66 66 67 67 68 88 95 Using applications Store Settings Software Update Support Center S Camera+ S PhotoStudio TotalM
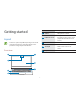
Getting started Number/Name Description 1 Camera r Takes photos or videos. r Displays the user interface. Layout 2 LCD/Touch screen 3 Power button r Features or options may differ depending on the model. r Optional parts referred to in the manual may not be provided or changed by the manufacturer. r Recognizes touches on the screen. (Only for models with the touch screen.) r Press to turn the computer on. r Move the cursor and click options.
Getting started Number/Name 6 Illumination sensor Operating indicator light Description r This sensor detects the ambient illumination of the PC. If the ambient illumination becomes dark, the LCD becomes dimmer and the keyboard backlight is lit. On the contrary, if the ambient illumination becomes brighter, the LCD becomes brighter and the keyboard backlight is turned off. 1 2 r Do not cover the sensor. 7 Camera operating light r Indicates the camera status.
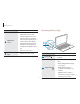
Getting started 15 inch models Right view 13.3 inch models Number/Name 1 Number/Name 1 2 3 4 Monitor port Headset/Ear-set jack Chargeable USB 3.0 port (optional) Security slot 2 3 1 4 Description r Connect external display devices that support a 15-pin analog connector. r Connect a headset or ear-set. r Connect and charge a USB device. r Secure the computer by connecting an optional lock and cable to it. 9 Memory card slot 2 Monitor port 3 Chargeable USB 3.
Getting started Left view Number/Name 13.3 inch models 4 5 1 2 3 Number/Name 1 DC jack 2 Chargeable USB 3.0 port (optional) 3 Micro HDMI port 4 5 Description r Connect the AC adapter to supply the power to the computer. r Connect and charge a USB device. r Connect external display devices that support HDMI. 10 Wired LAN port Memory card slot Description r Connect the computer to a wired LAN with a LAN adapter and an ethernet cable. r Insert a memory card into the slot.
Getting started 15 inch models Number/Name 1 2 3 4 DC jack Chargeable USB 2.0 port Headset/Ear-set jack Micro HDMI port Number/Name Description r Connect the AC adapter to supply the power to the computer. 5 Wired LAN port 6 Microphone Description r Connect the computer to a wired LAN with a LAN adapter and an ethernet cable. r Allows using voice or sound input features. About USB 3.0 r USB 3.0 devices are compatible with USB 2.0 ports, but will perform at reduced speeds.
Getting started About the chargeable USB port Bottom view r A USB device is charged when the computer is turned both on or off. 13.3 inch models r It may take longer to charge the battery when charging a USB device. r The battery power level may be reduced when charging a USB device while the computer is powered by the battery. r The charging status of the USB device is not displayed on the computer. r Use a USB 3.
Getting started Number/Name 1 2 3 Battery emergency hole Internal battery Speaker Charging the battery Description r Cut the power supply to the battery. The location of the battery emergency hole may differ depending on the model. r Provides power to the computer when not connected to an AC adapter. Charge the battery before using it for the first time. Use the AC adapter to charge the battery. r Use only Samsung-approved AC adapters, batteries, and cables.
Getting started 3 4 5 Plug the power cable into an electric socket. 3 Unplug it from the electric socket. During heavy rains, flooding, or electrical storms, disconnect the AC adapter and then insert the end of a paper clip into the emergency hole at the bottom of the computer to cut the battery power to the computer. 2 1 2 When charging is complete, the charge status turns green. Charge LED After charging, disconnect the AC adapter from the computer.
Getting started Battery status Battery usage time Move the cursor over the battery icon on the taskbar to view the current battery charge when disconnecting the AC adapter from the computer. Batteries are replacement items and over time the battery’s capacity to hold a charge and its power level is reduced. If a battery can only hold its charge for half of the time that it could when new, it is recommended to purchase a new, replacement battery.
Getting started 3 Turning the computer on and off Press the Power button. The Power LED turns on. Turning on 1 2 Before turning on the computer, charge the battery. Open the LCD panel. 4 Activate Windows by following the on-screen instructions. The Windows activation screen appears only when turning on the computer for the first time. r To adjust the brightness of the screen, see LCD brightness. r To adjust the sound, see Volume.
Getting started Turning off Turning off on the lock screen 1 1 2 Move the cursor to the upper- or lower-right edge of the screen to open the Charms. To unlock the lock screen, do one of the following: r Mouse: Click the lock screen. r Keyboard: Press any key. Select the Settings charm Power Shut down. r Touchpad: Tap the touchpad. r Touch screen: Swipe the lock screen upward. r Save all the data before turning off the computer.
Windows 8 Basic help About Windows 8 On the desktop, press the F1 key. Microsoft Windows 8 is an operating system that is used to control a computer. For optimal use of the computer, learn how to use the operating system properly. It is best to learn how to use Windows by using the Windows Help and Support feature. Alternatively, move the cursor to the upper- or lower-right edge of the desktop to open the Charms, and then select the Settings charm Help.
Windows 8 Screens in Windows 8 Windows 8 provides the Start screen and the desktop of the existing operating system.
Windows 8 Start screen Number/Name There is no Start button in Windows 8. Instead, launch applications on the Start screen. When the computer is turned on, the Start screen is displayed first. 1 Open the Charms 2 User account 3 The Charms 4 Desktop 5 App tiles 6 Start screen 20 Description r Opens the Charms that is hidden at the right of the screen. r Refers to the currently-used user account.
Windows 8 Desktop Number/Name The desktop provides a layout that is similar to earlier versions of Windows. 1 Open the Charms 2 The Charms 3 Switch to the Start screen On the Start screen, select Desktop from the tiles. 21 Description r Opens the Charms that is hidden at the right of the screen. r Refers to the menu that allows you to search, share, connect to devices, configure settings or switch to the Start screen. r Switches to the Start screen from the desktop.
Windows 8 Switching to the Start screen Documents and files Move the cursor to the lower-left corner of the screen, and then click the pop-up image. To search for documents and files, select File Explorer ( taskbar. Alternatively, press the Windows key ( ) on the keyboard.
Windows 8 The Charms r Keyboard: Press the Windows key ( ) and the C key simultaneously. The Charms let you search, share links and photos, connect devices, and change settings. The Charms functions available may differ between the Start screen and applications. + Opening the Charms r Touchpad: Swipe inward from the right edge of the touchpad. To open the Charms, do one of the following: r Mouse: Move the cursor to the upper- or lower-right edge of the screen.
Windows 8 r Touch screen: Swipe inward from the right edge of the touch screen. Learning about the Charms Use the following Charms to control the computer: Charm Search Share Start Devices Settings 24 Description r Search for applications, files, or websites by entering keywords. r Share files with others. r Return to the Start screen or open the most recent application. r Connect devices, such as printers or displays or sync files with a mobile device.
Windows 8 Settings charm App tiles To configure the computer, open the Charms and then select the Settings charm an option. Option Network Volume Description r Connect the computer to a network to use the Internet or share files with other devices. r Adjust the volume level. Keyboard r Set the brightness of the screen. r Set the interval at which an application sends notices. r Turn off the computer or select power options. r Set a language to enter text.
Windows 8 Grouping tiles 2 Right-click a group and select Name group. 3 Enter a name and select Name group. To group tiles, select and hold a tile and drag it to an open space. Then, drag other tiles to the new group. Naming a group Editing tiles 1 Right-click a tile and select an option: On the Start screen, pinch fingers on the touchpad to zoom out. r Unpin from Start: Delete the tile from the Start screen. r Uninstall: Uninstall the application from the computer.
Windows 8 Microsoft account Some Microsoft services, such as the Store, require a Microsoft account. Create a Microsoft account to get the most from the computer. 1 Open the Charms and select the Settings charm Change PC settings. 2 Select Users Switch to a Microsoft account and then follow the on-screen instructions to complete the account setup. r If you already have an account, sign in with the Microsoft account. r The registered Microsoft account on the computer cannot be removed.
r To open the most-recently used application, swipe from the left edge of the touch screen to the middle. Basics Touch screen Use only fingers to use the touch screen. Touch screen gestures r To bring up the app commands, swipe downwards from the top edge of the touch screen. Swiping r To open the Charms, swipe from the right edge of the touch screen to the middle.
Basics r To scroll up, down, left or right, swipe with two fingers on the touch screen. Double-tapping To zoom in a part or double-click an item, double-tap on the touch screen. or Tapping Tapping and holding To open an application, select a menu item, press an on-screen button, or enter a character using the on-screen keyboard, tap it with a finger on the touch screen. To perform the right-clicking function, tap and hold an item on the touch screen.
Basics Dragging Pinching To move an icon, app tile, or preview to a new location, touch and hold it, and then drag it to the target position on the touch screen. To zoom in, spread two fingers apart on a website, map, or image. Pinch to zoom out.
Basics r Do not apply a severe impact to the touch screen or press it with a sharp object. Doing so may damage the touch screen. r Leaving the touch screen idle for extended periods may result in afterimages (screen burn-in) or ghosting. Turn off the touch screen when you do not use the computer. r Do not allow the touch screen to come into contact with other electrical devices. Electrostatic discharges can cause the touch screen to malfunction. r Touch the touch screen with clean and dry hands.
Basics Calibrating the screen Calibrate the touch settings to make the screen sense accurately when using a finger. This feature may differ or may not be available depending on the operating system. 1 On the desktop, open the Charms and then select the Settings charm Control Panel Hardware and Sound Tablet PC Settings Calibrate.
Basics 2 3 Select Yes when a pop-up appears. Entering text Touch Use the virtual Qwerty keyboard to enter text. on the calibration screen. r Text entry is not supported in some languages. To enter text, change the input language to one of the supported languages. r Enter text with the keyboard when using the computer for a long time. Changing the keyboard layout To change the keyboard layout, touch following: r appears sequentially from the upper-left to the lowerright on the screen.
Basics Entering uppercase Touch before entering a character. For all caps, touch it twice. Changing language keyboards 8 Add keyboards to enter text in other languages. Open the Charms and then select the Settings charm Change PC settings General Language preferences Add a language a language Add. Number 1 2 3 4 5 6 7 8 Description r Delete a preceding character. r Break to the next line. r Enter uppercase. r Change the keyboard layout. r Move the cursor. r Enter a space.
Basics Keyboard Enter text or access computer functions with the keyboard. r Images and available features may differ depending on the model and operating system. r The keyboard layout may differ depending on the contury. r Press the Fn Lock key. When the Fn Lock key LED turns on, press a hot key. Using hot keys To use keyboard hot keys, do one of the following: r Press the Fn key and a hot key simultaneously. → + When the Fn Lock key is on, hot keys are activated without pressing the Fn key.
Basics Hot key functions Key/Icon Description F1 r Settings: Launch the Settings application. F2 r Screen brightness control: Adjust the brightness level. F3 F4 F5 F6 F7 F8 r LCD/External monitor: Switch between the LCD and an external display device when an external display device is connected to the computer. r Touchpad: Turn on or off the touchpad function. r Mute: Mute or unmute the audio.
Basics Windows hot keys Touchpad Use hot keys to access functions conveniently in Windows 8. Use the touchpad to move the cursor or select an item. The left and right buttons of the touchpad act the same as the left and right buttons those of a mouse. Press the Windows key ( ) or the Alt key, and a hot key simultaneously. Key Windows key ( )+D Description r Switch to the Start screen or the most recent application. r Switch to the desktop. Windows key ( )+C r Open the Charms.
Basics Clicking Right-clicking To select an item, tap the touchpad or press the left touchpad button. To right-click an item, press the right touchpad button. Tap or Click Click Dragging Double-clicking To move an icon, app tile, or preview to a new location, press and hold it and then drag it to the target position with the left touchpad button pressed. To double-click an item, double-tap the touchpad or press the left touchpad button twice.
Basics r To bring up the app commands, swipe downwards from the top edge of the touchpad. Gesture functions Swiping r To open the Charms, swipe from the right edge of the touchpad to the middle. r To scroll up, down, left or right, swipe with two fingers on the touchpad. or r To open the most-recently used application, swipe from the left edge of the touchpad to the middle.
Basics Pinching Configuring touchpad gestures To zoom in, spread two fingers apart on a website, map, or image. Pinch to zoom out. Configure touchpad gestures to use the touchpad more efficiently. On the desktop, open the Charms and then select the Settings charm Control Panel Hardware and Sound Touchpad desired options. To cancel touchpad gestures, deselect check boxes for the corresponding options in the Touchpad window.
Basics Touchpad lock LCD brightness To turn on or off the touchpad, press the Fn key and the F5 key simultaneously. Adjust the LCD brightness to reduce eye strain and save power. To adjust the LCD brightness, do one of the following: + r To dim the LCD screen, press the Fn key and the F2 key simultaneously. + Turning the touchpad off automatically When a USB mouse is connected to the computer, the computer can turn the touchpad off automatically.
Basics r Open the Charms, select the Settings charm the slider. Volume , and drag Adjust the system volume or sound volume when playing music or video. To adjust the volume, do one of the following: r To turn down the volume, press the Fn key and the F7 key simultaneously. + The LCD screen is set to the brightest level automatically when the AC adapter is connected. The LCD screen gets dimmer automatically when the AC adapter is disconnected to preserve battery power.
Basics r Open the Charms, select the Settings charm the slider. SoundAlive , and drag Use SoundAlive to optimize your audio experience. This feature enhances sound elements by analyzing and adjusting sound levels automatically. This feature may not be available depending on the model and operating system. 1 On the desktop, right-click Playback devices.
Basics Learning the BIOS screen Setup utility (BIOS) The BIOS setup screen appears as shown below. Define a boot password, change the boot priority, or configure the installed chipsets. r Incorrect settings may cause the system to malfunction or crash. Boot Device Priority > Secure Boot OS Mode Selection r The BIOS setup screens, menus, and items may appear differently depending on the model and BIOS version. Off UEFI OS Smart Battery Calibration > r BIOS setup functions are subject to upgrades.
Basics Menu SysInfo Advanced Security Boot Boot to Device BIOS setup keys Description r View the basic specifications of the computer. r Configure the chipsets and additional functions. r Configure security functions. Key r Configure peripherals and boot-related settings. r Boot to an external device. / r Change values. / r Move to another menu. Enter r Select an item or enter a sub-menu. Space F1 r Change the slide button. r Return to a higher level menu or to the Exit menu.
Basics Boot password Setting a boot password Setting a password with the BIOS enhances protection against viruses and hacking attacks. 1 2 Setting passwords There are three password settings available; Supervisor Password, User Password, and HDD Password. 3 4 r Supervisor Password (low security level): This password is required when turning on the computer or attempt to enter the BIOS setup. If you forget this password, visit a Samsung Service Center and pay a fee to have it reset.
Basics 6 7 Enter the password again to confirm it and press the Enter key. Removing a password 1 2 Press the F10 key and select Yes. r To enable the Password on boot option, set a Supervisor Password and enter the password when starting up the computer. 3 4 r To change the HDD Password after setting it, restart the computer. r For some models, when the password entered message appears in the Setup Notice window, press the Enter key to complete the setup.
Basics 6 7 8 Boot priority Change the boot priority from the BIOS setup. 1 2 3 4 5 Turn on the computer. When the Samsung logo appears, press the F2 key several times. Press or to locate a drive. Press the Enter key to set to prioritize the selected item. Press the F10 key and select Yes to save and exit. Press the Esc key and select Yes to exit without saving the changes.
Wired LAN Network & Internet 1 2 3 Wired LAN To access the Internet at home, set up an account with an Internet service provider (ISP). To purchase Internet service and a modem, contact a local ISP. Connect a LAN adapter to the wired LAN port of the computer. Connect the LAN cable provided by an ISP to the LAN adapter. On the desktop, open the Charms and select the Settings charm Control Panel Network and Internet Network and Sharing Center Change adapter settings.
Network & Internet 5 6 Select Internet Protocol Version 4 (TCP/IPv4) from the list of network settings Properties. Configure the IP settings. When using DHCP, select Obtain an IP address automatically. The Network Component name may differ depending on the operating system Installed. When not using DHCP, contact the network administrator for the IP address. To use a static IP address, select Use the following IP address and set the IP address manually.
Network & Internet r When connected to a 100Mbps/1Gbps wired LAN , a message appears informing the user of connection to a 10Mbps/100Mbps wired LAN when the computer wakes from sleep mode. This happens because restoring the network takes about 3 seconds. When the network is restored, the computer will be connected to the 100Mbps/1Gbps LAN. Wake on LAN (WOL) feature Activate the system from sleep mode when a signal, such as a ping or magic packet command, is received via a wired LAN.
Network & Internet Wireless LAN Wi-Fi networks Connect the computer to a wireless network to use the Internet. 1 The descriptions below are for computer models with a Wireless LAN card or device. A Wireless LAN device is optional. The pictures in this manual may differ from the actual product depending on the wireless LAN device model. Open the Charms and then select Settings charm Available.
Network & Internet 2 Select a network from the list of detected wireless networks Connect automatically Connect. Airplane mode Airplane mode disables all wireless functions on the computer. Only non-network services are available in Airplane mode. Networks To turn on Airplane mode, press the Fn key and the F12 key simultaneously. Airplane mode Off r This computer uses a non-harmonized frequency and is intended for use in all European countries.
Network & Internet If there are no available network service providers listed under Mobile broadband, turn off the computer, and insert the SIM card correctly, and then turn on the computer. Mobile broadband (Wireless WAN, optional) A wireless wide area network (WWAN) is a mobile broadband network that is available in mobile phone service areas. r The descriptions below are for computer models with mobile broadband devices. A mobile broadband device is optional.
r Some applications are available only in Windows desktop mode. Applications r Images and features may differ depending on the model and the application version. r Third-party software related services For descriptions about and service requests for third-party applications, please contact the relevant manufacturer. Some troubleshooting actions in response to service requests may not work depending on the application manufacturer.
Applications Closing an application Opening recent applications Running multiple applications at the same time can slow down the performance of some applications or consume the battery power fast. Close applications not in use to save battery power and maintain performance. 1 1 2 On the Start screen, place the cursor in the upper-left corner of the screen until a small application image appears.
Applications Viewing two applications Pinning an application View two applications on the screen at once. Pin an application on the Start screen as a tile or unpin an application from the Start screen. While using an application, open the list of active applications, drag an application to the right, and then drop it when the partition appears. 1 2 Drag the partition to adjust the size of each application panel. To return to single view, drag the partition to the left or right edge of the screen.
Applications Store Purchase and download applications for the computer. Create a Microsoft account to use this feature. See Microsoft account. On the Start screen, select Store. r This feature may not be available depending on the operating system. r Samsung cannot resolve problems with applications installed from the Store. Contact customer support for the application.
Applications Settings Settings, a Samsung integrated settings application, offers various settings functions. Images and features may differ depending on the model and the application version. 1 2 3 On the Start screen, right-click any area and select All apps. Select Settings. Select an option to configure the corresponding function. 59 Menu Description General r Set general settings Power Management r Set power related settings. Network r Set network functions and settings.
Applications Software Update 3 Install and update Samsung applications and drivers on the computer easily and conveniently. This application enables the user to search for or download the BIOS, drivers, and applications over the Internet. Keep the computer performing better and more stably with SW Update. 4 Select Install & Update. 5 Select items to update OK. Read and agree to the User Agreement. This step appears only when the application runs for the first time.
Applications 2 Support Center Select Support Center. r The Support Center application launches and starts diagnosing the computer. Diagnose the performance, security, and status of the computer and fix any problems it may have. Additionally, access the FAQ and search features to find solutions for the problems. r When the diagnosis is complete, a list of current problems appears. r The Support Center application may not be provided or may be a different version depending on the model.
Applications Camera etiquette S Camera+ r Do not take photos or videos of other people without their permission. Take photos or videos with various effects and view them with the application. r Do not take photos or videos where prohibited. r Images and features may differ depending on the model and the application version. r Do not take photos or videos in places where doing so may violate other people’s privacy.
Applications 1 2 On the Start screen, select S Camera+. Number 1 2 3 4 5 6 To take a picture, slide the camera mode bar into the Photo position. To record a video, slide the camera mode bar to the Video position. 3 When the subject is in focus, select to take a photo. 4 63 Description r Switch between still and video modes. r Take a photo or video. r Open the image viewer to display photos. r Change the camera settings. r Change shooting modes. r Apply frame or filter effects.
Applications S PhotoStudio 9 Edit photos that are saved on the computer with various editing options, such as brightness adjustment or filter effects. Use the Collage function to merge multiple photos into one image. 8 r Images and features may differ depending on the model and the application version. r Third-party software related services For descriptions about and service requests for third-party applications, please contact the relevant manufacturer.
Applications 1 2 3 TotalMedia Theatre TotalMedia Theatre is a high-definition universal video player for audio and video entertainment at home. Play videos and music in various file formats. Search for, view, and download videos online. r Images and features may differ depending on the model and the application version. On the Start screen, right-click any area and select All apps. Select TotalMedia Theatre. In the upper-left corner of the screen, select Open Open File... a video.
Applications S Player+ Samsung Kies Play videos and music in various file formats. Search for and view videos online. Samsung Kies is an application to transfer music, contacts, and photos, or sync files between a Samsung mobile device and a Samsung computer. This application also enables the user to update the firmware of the connected mobile device to keep it up-to-date. On the Start screen, select S Player+. r Images and features may differ depending on the model and the application version.
Applications HomeSync SideSync HomeSync enables the user to use the computer as cloud storage and access it via a Samsung mobile device. Set folders to share, and view and manage the shared folders anywhere anytime. SideSync allows the user to control a Samsung mobile device from a Samsung computer or share files between them. Select an option below: On the Start screen, select HomeSync. r Keyboard/Mouse Sharing: Use a computer’s keyboard or mouse from a mobile device.
Applications Configuring the security solution TPM security solution To use the TPM security solution, initialize the TPM chip in the BIOS Setup, initialize the TPM solution, and then register a user. To use the TPM function, complete the following steps. Protect the user’s personal information by saving user authentication data on a Trusted Platform Module (TPM) chip installed in the computer.
Applications 4 5 6 9 Select TPM Configuration. Set TPM Device to Enabled. Before the Samsung logo appears, press the F2 key several times. 10 Access the Security menu. 11 Select TPM Configuration. 12 Set TPM State to Enable and Activate. 13 Select Save. Set TPM State to Clear. The computer restarts. 14 When the system reboots, press the corresponding keys by following the on-screen instructions. 7 15 Select Save. Select Save. The computer restarts. The computer restarts.
Applications Step 2: Installing the solution Step 3: Registering a user Install the TPM solution according to the procedures below. Register a user according to the procedures below. 1 2 3 This solution is provided only for models with Recovery and the TPM solution. 1 2 3 Run Recovery and select System Software. Select System Software Installation. Select TPM Host SW Install Now. Select Manage Security Platform User Settings.
Applications 4 5 6 When the Security Platform screen appears, select Next. Select a security platform feature and set a user password. Follow the on-screen instructions to complete the registration. To use the virtual drive feature, select Security Platform Features and then select Personal Secure Drive (PSD).
Applications 2 Encrypting folders and files Select a security type OK. Encrypt folders and files with the Encrypt Files System (EFS). EFS is available for the following operating systems: r Windows 7 Professional / Windows 7 Enterprise / Windows 7 Ultimate r Windows 8 Pro / Windows 8 Enterprise 1 Right-click a folder or file and then select Encrypt. If the current operating system is Windows 8/7/Vista, the user account control window appears. In this case, click Continue.
Applications 3 The color of the encrypted folder or name of the encrypted file changes to green. Opening encrypted folders and files 1 2 73 Double-click an encrypted folder or a file. Enter the basic user password on the user account control window.
Applications Decrypting folders and files 1 2 3 Using the virtual drive (Personal Secure Drive) Right-click an encrypted folder or file and then select Decrypt. The virtual drive is a space to save and manage confidential data. In the created virtual drive (PSD), it is possible to create files and folders as with a normal drive and to use confidential data saved on another drive by copying the data to the virtual drive (PSD). When the User Account Control window appears, select Continue.
Applications 2 Enter a password and click OK. When the virtual drive (PSD) does not appear The virtual drive (Personal Secure Drive) is created. The virtual drive (PSD) is available only when the Personal Secure Drive (PSD) option is selected during the program registration. Complete the following steps to select the Personal Secure Device option from the user settings. Note that when copying confidential data to the Personal Security Drive, the original data files are not encrypted.
Applications Step 1: Deleting a virtual drive Registering a new user to the security solution If a virtual drive has been created, delete the virtual drive before deleting the existing authentication information saved on the TPM chip. To register a user again, delete the existing authentication information saved on the TPM chip, and then clear the TPM chip. 1 Register the user in the following order. 2 3 4 5 6 On the taskbar, right-click and select Personal Secure Drive Create/Manage....
Applications 7 Step 2: Deleting authentication information To delete the existing authentication information, uninstall the security solution and delete the solution data. 1 2 3 4 5 6 8 On the desktop, open the Charms and select the Settings charm. 9 Select Control Panel Programs Uninstall a program. Select View Options Change folder and search options View Hidden files and folders. Select the Show hidden files, folders, and drives option and select OK.
Applications Step 3: Configuring the security solution (TPM) To use the TPM security solution, see Configuring the security solution.
Inserting and ejecting a CD or DVD External devices 1 Press the Eject button to open the tray. External CD/DVD drive This computer supports external CD/DVD drives with USB interfaces (sold separately). Connecting the drive Number Connect the drive to the USB port of the computer. 1 2 3 2 3 Description r Emergency hole r Eject button r Status indicator light Insert a CD or DVD. Push the tray inward until it clicks. The status indicator turns on.
External devices r Do not insert warped, cracked, or heavily scratched disks. Doing so can damage the drive. r Do not eject disks while the status indicator light is on. r Your external drive may differ from the images used in this manual. r If the drive will not open when the power is off, insert ) into the emergency hole the end of a paper clip ( to open the tray manually. r When cleaning a CD or DVD, wipe it with a soft cloth from the inside edge towards the outside edge.
External devices Memory card Use a memory card to transfer data to other devices, such as a digital cameras or MP3 players. Memory cards are sold separately. Purchase a memory card with the necessary capacity for the requirement.
External devices 3 Inserting a memory card 1 2 Select the pop-up message to open the memory card folder. If a dummy card is inserted in the memory card slot, remove it. Insert a memory card into the memory card slot in the indicated direction. If a pop-up message appears, click the corresponding window Continue without scanning. 4 5 Select Open folder to view files. Save, move, or delete data on the memory card. The memory card folder opens only on the desktop.
External devices r To use a memory card to exchange data with a digital device, such as a digital camera, formatting the data with the digital device is recommended. Formatting a memory card Format the memory card to remove all data or before using it for the first time. r When trying to use a formatted memory card in another digital device, format the memory card again in the device. Formatting a memory card deletes all data saved on the card.
External devices Connecting to a display External display Use a VGA adapter to connect a VGA cable (15-pin) to the computer (sold separately). Connecting the computer to an external display device can be useful for presentations or when watching a movie. The cables required to connect an external display are sold separately. The computer supports either VGA or micro HDMI cables. 1 Connect the VGA cable or micro HDMI cable to the corresponding port of the computer.
External devices 2 3 4 Connect the other end of the cable to the D-SUB port or HDMI port of the external display. If the display has several HDMI ports, connect the cable to the DVI IN port. Monitor port 5 D-SUB port 6 Connect the power cord to the external display. Turn on the display and change its display mode to one that supports an external input. On the computer, open the Charms and select the Devices charm Second screen. Select a mode.
External devices Connecting to multiple displays 1 Connect and use multiple displays when using both the monitor port and the micro HDMI port. 2 Connect the displays to the monitor and micro HDMI ports of the computer. On the desktop, right-click and select Graphics Properties Display Display Multiple Displays. When selecting Graphics Properties for the first time, select an application mode (Basic Mode, Advanced Mode, or Wizard mode). 3 r This function is supported for computers with 13.
External devices Slim security slot The security slot is designed for Samsung Security Locks only, which are sold separately. Other security locks will not fit in the slot. Loop the Samsung Security Lock around a secure object and connect it to the security slot on the computer.
r The Recovery application may not be provided in models with less than 64 GB of memory. For models with less than 64 GB of memory, recover the computer to the factory default settings by reinstalling Windows. Troubleshooting r Some functions may differ or may be unavailable, depending on the version. The instructions provided here are based on Recovery 6.0. Refer to the application’s help for more information.
Troubleshooting 3 Recovering to factory default Select the first point Recover. Recover the computer to factory default settings. If necessary, back up important data to an external storage device before restoring the system. See Backing up the current system. 1 When the computer starts Windows: On the Start screen, right-click any area and select All apps Recovery.
Troubleshooting 4 Backing up the current system r When backing up to an external storage device, connect the device to the computer and then select the external drive. Back up important data to an alternate internal drive or an external storage device regularly to prevent data loss. 1 2 3 Select a drive under Stored drive Backup. When backing up to an external storage device, connect the device to the computer. r CD/DVD drive cannot be selected.
Troubleshooting Recovering after a backup Select a backup point saved on an alternate internal drive or an external storage device to recover the computer to the point. 1 2 3 4 Backup point When backing up to an external storage device, connect the device to the computer. On the Start screen, right-click any area and select All apps Recovery. Select Recover. Select a point to recover Recover. 5 r Select one of your backup points.
Troubleshooting Reinstalling Windows Copying the hard drive (making a disk image) If the Recovery application is not supported by the computer, recover system to factory default settings by reinstalling Windows. To replace the hard drive, move the data to the new drive by making a disk image. The new drive must be large enough to hold the data from the current drive. Reinstalling Windows will erase all data saved on the computer.
Troubleshooting 4 5 Select a Disk recovery point Disk copy. After the data is saved to another drive, open the cover at the bottom of the computer and replace the existing drive with the new one. If the cover is difficult to open, contact the Samsung Service Center to request assistance. You will be charged for this service. The data on the current hard disk is copied to the new hard disk.
Troubleshooting 6 Making a disk image of factory default settings To recover the computer to the factory default settings with the factory image, connect the external storage device. Start the Recovery application and select the upper-left Recover factory default point the lower-right Recover. Create a factory disk image to simplify the restoring process. 1 2 3 4 5 Disconnect the external storage device and store it in a safe place. Connect an external storage device.
Troubleshooting Can I use the Windows 7 desktop? Q&A Currently, there is no way to set the desktop to appear by default. Press the Windows key ( ) and the D key simultaneously to reveal the desktop when the Start screen appears. This is currently the only workaround. When experiencing problems with the computer, try these solutions. Windows 8 How can I install a printer driver? Where is the Start button on the desktop? Run the driver installation file and follow the on-screen instructions.
Troubleshooting How can I uninstall an application? Why I cannot run Active X in Internet Explorer when I launch it on the Start screen? On the desktop, open the Charms and select the Settings charm Control Panel Programs and Features an application Uninstall. The version of Internet Explorer that appears on the Start screen complies with HTML5 web standards, so it does not support Active X. Launch Internet Explorer on the desktop to view websites that require Active X.
Troubleshooting Touch screen Recovery Text on the screen overlaps. What is a Recovery Area? If the font size is set too large, text may not fit on the screen. The computer has an additional partition for restoring data or saving backup files (only for models with the Recovery application). This partition is called a Recovery Area and it includes a recovery image comprised of the operating system and applications.
Troubleshooting For models with the Recovery application, the HDD capacity representation in Windows may be smaller than the actual capacity because the Recovery application uses a hidden area of 5-20 GB of the HDD to save the recovery image, and that hidden area is not counted towards the total size available to Windows. The size of the Recovery application varies by model.
r Optional components may not be provided or different components may be provided depending on the model. Appendix r The system specifications are subject to change without notice. Product specifications r The Storage device capacity of a computer in which Recovery is installed, is represented as smaller than the product specification. The system specifications may differ depending on the derived models. For detailed system specifications, refer to the product catalogue.
Appendix r Default applications that come with the computer are subject to updates and may no longer be supported without prior notice. When having questions about an application provided with the computer, contact a Samsung Service Center. For user-installed applications, contact service providers. Cautions when using the computer r Available features and additional services may vary by computer or operating system.
Appendix Battery disposal Cautions for replacement parts and accessories Do not put rechargeable batteries or products powered by non-removable rechargeable batteries in the garbage. Use only replacement parts and accessories recommended by manufacturer. Contact the Samsung Service Center for information on how to dispose of batteries that you cannot use or recharge any longer. Follow all local regulations when disposing of old batteries. To reduce the risk of fire, use only No.
Appendix Laser safety Power cord requirements All systems equipped with CD or DVD drives comply with the appropriate safety standards, including IEC 60825-1. The laser devices in these components are classified as “Class 1 Laser Products” under a US Department of Health and Human Services (DHHS) Radiation Performance Standard. Should the unit ever need servicing, contact an authorized service location.
Appendix r Use an adjustable chair with firm, comfortable support. Ergonomic tips r Adjust the height of your chair so that thighs are horizontal to the floor and feet are flat on the floor. Maintaining a proper posture during computer use is very important to prevent physical injury. Improper or prolonged keyboard use may result in repetitive strain injury. Viewing the monitor screen for extended periods of time may result in eye strain.
Appendix r When using the keyboard and touchpad, the shoulders should be relaxed. The upper arm and forearm should form an angle that is slightly greater than a right angle, with the wrist and hand in almost a straight line. Arms and hands r Use a light touch when typing or using the touchpad and keep the hands and fingers relaxed. Avoid rolling the thumbs under your palms or supporting the wrists on the desk while typing. r Use an external keyboard and mouse when using the computer for long periods.
Appendix Eye position and display illumination Hearing and volume control cm 50 VOLUME Check your volume! r Ensure that volume is not too loud before using headphones. r Position the screen at least 50 cm away from your eyes. r Avoid using headphones for long periods of time. r Adjust the height of the screen so that its top edge is equal to or just below the level of your eyes. r Default audio settings can be changed by software and driver updates without your knowledge.
Appendix Operating conditions Battery r Take at least a 10 minute break every hour. r Avoid using the computer in dark locations. Use the computer with as much ambient light as you would when reading a book. Charging the battery on an airplane Power outlets may vary by airplane. Choose the connection method that fits your circumstances. r Indirect illumination is recommended. Use a curtain to prevent reflections and glare on the screen.
Appendix Using an AC power plug Using an auto adapter Insert the the power plug pins into the center of the power outlet. When a 12VDC power supply is available a cigarette lighter socket will be provided. Use the optional auto adapter to use the 12VDC power supply. r If the pins are not inserted into the centers of the holes, they will not be fully connected. In this case, reconnect the power plug. 1 r You must insert the power plug when the power indicator light (LED) is lit green.
Appendix Using an airplane charging converter Safety information Depending on the type of airplane you are travelling on, use the auto adapter and charging converter. Insert the airplane power input jack into the airplane’s power outlet. 1 2 3 This safety information relates to computer use. Some of the content may be not applicable to your computer. To prevent injury or damage to your computer, read the safety information before using it. Connect the auto adapter’s DC plug to the computer.
Appendix The power plug and wall outlet figures may differ depending on the country specifications and the product model. To avoid danger of suffocation, keep the plastic bag away from infants and children. Putting a plastic bag over the head may result in suffocation. Handle the power cord with care. r Do not touch with wet hands. Keep the computer at least 15 cm away from any object. 15cm r Do not use a damaged or loose power cord. Failure to do so may result in computer malfunction or injury.
Appendix Use only properly earthed electric sockets or extension cords. Do not bend or damage the power cable or the AC adapter with a heavy or sharp-edged object. Connecting to unearthed electric sockets or extension cords does not protect users from earth faults. Unearthed electric sockets or extension cords may cause electric shock or fire. A damaged cable or cord may result in electric shock or fire. Keep the battery, AC adapter, and the power cord away from infants and pets.
Appendix Do not use the computer on heated floors or electric pads, or on beds, blankets, or cushions that block the ventilation of the computer. Never heat the product or put the product into a fire. Do not put or use the product in a hot location such as a sauna, inside a vehicle exposed to heat, and so on. In these environments, be careful not to block the vent of the computer, which is normally at the side or bottom of the computer.
Appendix Before cleaning the computer, disconnect all the cables that are connected to the computer. For notebook computers that are provided with an external removable battery, separate the battery also. Do not touch the computer vents or the AC adapter for extended periods while the computer is on. Contact with the vent or the AC adapter for extended periods may result in burns. Failure to do so may result in electric shock or fire. Do not attempt to upgrade the computer, unless you are qualified.
Appendix Do not disassemble the power supply unit, the AC adapter, or the battery under any circumstances. When using wireless communication (LAN, Bluetooth, etc) always follow applicable instructions. For example, airlines and hospitals have strict requirements. Failure to do so may result in electric shock, fire, or an explosion. Avoid exposing a drive to magnetic fields. Security devices with magnetic fields include airport walk-through devices and security wands.
Appendix When carrying the notebook computer with other items, such as the adapter, mouse, books etc, take care not to press anything against the notebook computer. Caution Failure to follow instructions marked with this symbol may cause slight injury or damage to the product. If a heavy object is pressed against the notebook computer, a white spot or stain may appear on the LCD. Therefore, take care not to apply any pressure to the notebook.
Appendix Do not place a heavy object over the product. Use only a battery authorized by Samsung. This may cause a problem with the computer. In addition, the object may fall and cause injury, or damage the computer. Failure to do so may cause an explosion. Avoid contact with metal objects such as car keys or clips when keeping or carrying a battery. Connect the power cord to a nearer consent when installing the computer.
Appendix In case of lightning, immediately turn the system off, disconnect the power cord from the wall outlet and phone line from modem. Do not use a modem or phone. Usage related Use the pen for its intended purpose only. Using the pen improperly may cause physical injury. There is a danger of electric shock or fire. Do not place a candle, light cigar, etc. over or on the product. Connect only permitted devices to the connectors or ports of the computer. There is a danger of fire.
Appendix Do not drop, hit, or apply excessive force to the computer. Do not insert the fingers into the PC Card Slot. Failure to do so may result in physical injury or data loss. There is a danger of injury or electric shock. Do not touch the antenna with electricity facility such as the power outlet. Use recommended computer cleansing solution when cleaning the product and only use the computer when it is completely dried. There is a danger of electric shock.
Appendix Make sure to close the computer cover before connecting the power after a reassembly. Keep the product away from magnetic fields. r Magnetic materials may cause the product malfunction or cause the battery to discharge. There is a danger of electric shock if your body touches an internal part. r The magnetism in the computer may damage the information in the magnetic stripe cards such as credit cards. Use parts authorized by Samsung only.
Appendix Security and movement related Cautions on preventing data loss (Hard disk management) Properly shut down, disconnect and secure the computer cables before moving it. Take care not to damage the data on a hard disk drive. Failure to do so may damage the computer or cause someone to trip over a loose cable. r A hard disk drive is so sensitive to external impact that an external impact may cause loss of data on the surface of the disk.
Appendix Causes that may damage the data of a hard disk drive and the hard disk drive itself. LCD bad pixels principle of the computer Samsung observes strict specifications regarding the quality and reliability of the LCD. However, there is a small chance that a few pixels may be bad. A large number of bad pixels can cause problems with the display, but a small number of bad pixels does not generally affect computer performance.
Appendix r Ensure that the electrical outlet to power the equipment is easily accessible in case of fire or short circuit. Safety instructions The system is designed and tested to meet the latest standards for safety of information technology equipment. However, to ensure safe use of this product, it is important that the safety instructions marked on the product and in the documentation are followed.
Appendix r Unplug the system from the wall outlet and refer servicing to qualified personnel if: Care during use r Do not walk on the power cord or allow anything to rest on it. – The power cord or plug is damaged. r Do not spill anything on the system. The best way to avoid spills is to not eat or drink near the system. – Liquid has been spilled into the system. – The system does not operate properly when the operating instructions are followed.
Appendix The instruction on safety operation of the notebook computer 1 2 3 4 5 Regulatory compliance statements When installing and operating devices please refer to safety requirements in the user guide. Wireless guidance Devices can be used only with the equipment specified in the technical specifications of the devices. (If fitted with 2.4G band or 5G band) Low power, Radio LAN type devices (radio frequency (RF) wireless communication devices), operating in the 2.
Appendix r Radio frequency wireless communication can interfere with equipment on commercial aircraft. Current aviation regulations require wireless devices to be turned off while traveling in an airplane. The RF field strength of the wireless device or devices that may be embedded in the notebook are well below all international RF exposure limits as known at this time.
Appendix r If the system came equipped with an internal embedded wireless device, do not operate the wireless device unless all covers and shields are in place and the system is fully assembled. Other wireless devices Safety notices for other devices in the wireless network: r Wireless devices are not user serviceable. Do not modify them in any way. Modification to a wireless device will void the authorization to use it. Please contact the manufacturer for service.
Appendix United States of America Explosive Device Proximity Warning USA and Canada Safety Requirements and Notices Do not operate a portable transmitter (such as a wireless network device) near unshielded blasting caps or in an explosive environment unless the device has been modified to be qualified for such use. Do not touch or move antenna while the unit is transmitting or receiving.
Appendix This equipment has been tested and found to comply with the limits for a Class B digital device pursuant to Part 15 of the FCC Rules. These limits are designed to provide reasonable protection against harmful interference in a residential installation. This equipment generates, uses, and can radiate radio frequency energy. If not installed and used in accordance with the instructions, it may cause harmful interference.
Appendix Intentional emitter per FCC Part 15 Operation of this device is subject to the following two conditions: (If fitted with 2.4 G band or 5 G band) (1) This device may not cause harmful interference, and (2) this device must accept any interference received, including interference that may cause undesired operation of the device. Low power, Radio LAN type devices (radio frequency (RF) wireless communication devices), operating in the 2.
Appendix The exposure limit set by the FCC for wireless devices employs a unit of measurement known as the Specific Absorption Rate (SAR). The SAR is a measure of the rate of absorption of RF energy by the human body expressed in unites of watts per kilogram (W/kg). The FCC requires wireless devices to comply with a safety limit of 1.6 watts per kilogram (1.6 W/kg).
Appendix Before a new model is available for sale to the public, it must be tested and certified to the FCC that it does not exceed the exposure limit established by the FCC. Tests for each model are performed in positions and locations (for example, at the bottom on the body) as required by the FCC. FCC Part 68 (If fitted with a modem device) This equipment complies with part of the FCC rules.
Appendix The Telephone Consumer Protection Act of 1991 makes it unlawful for any person to use a computer or other electronic device, including fax machines, to send any message unless such message clearly contains in a margin at the top or bottom of each transmitted page or on the first page of the transmission, the date and time it is sent and an identification of the business or other entity, or other individual sending the message and the telephone number of the sending machine or such business, other
Appendix L‘ utilisation de ce dispositif est autorisée seulement aux conditions suivantes : (1) il ne doit pas produire de brouillage et (2) l’ utilisateur du dispositif doit étre prêt à accepter tout brouillage radioélectrique reçu, même si ce brouillage est susceptible de compromettre le fonctionnement du dispositif.
Appendix When using IEEE 802.11a wireless LAN, this product is restricted to indoor use due to its operation in the 5.15- to 5.25-GHz frequency range. Industry Canada requires this product to be used indoors for the frequency range of 5.15 GHz to 5.25 GHz to reduce the potential for harmful interference to co-channel mobile satellite systems. High power radar is allocated as the primary user of the 5.25- to 5.35-GHz and 5.65 to 5.85-GHz bands.
Appendix (Si l’appareil est équipé d’une bande 2,4 G ou 5 G) The power output of the wireless device (or devices), which may be embedded in your notebook, is well below the RF exposure limits as set by Industry Canada. Des dispositifs de basse puissance, de type radio LAN (périphériques de communication sans fil par radiofréquence RF) fonctionnant sur une bande de 2.4GHz/5GHz sont peutêtre intégrés dans votre appareil. Cette section est applicable uniquement si ces dispositifs sont présents.
Appendix Son utilisation est soumise aux deux conditions suivantes : 1) ce dispositif ne peut pas provoquer d’interférences nuisibles et 2 2) ce dispositif doit accepter toute interférence reçue, y compris les interférences qui peuvent provoquer des anomalies dans le système. Le gain d’antenne maximum autorisé avec ce périphérique est de 6 dBi afin de respecter la limite de P.I.R.E. pour une plage des fréquences de 5,25 à 5,35 GHz et de 5,725 à 5,85 GHz dans un fonctionnement point à point.
Appendix Repairs to certified equipment should be made by an authorized Canadian maintenance facility designated by the supplier. Any repairs or alterations made by the user to this equipment, or equipment malfunctions, may give the telecommunications company cause to request the user to disconnect the equipment. Telecommunications per DOC notice (for products fitted with an IC-compliant modem) The Industry Canada label identifies certified equipment.
Appendix Les réparations de l’équipement homologué doivent être effectuées dans les installations de maintenance canadiennes autorisées par le fournisseur. Les réparations ou modifications effectuées par l’utilisateur sur cet équipement, ou anomalies de l’équipement, peuvent faire que la compagnie de télécommunication demande la déconnexion de l’équipement.
Appendix Le Numéro d’équivalence d’appel (REN) attribué à chaque dispositif terminal fourni une indication du nombre maximum de terminales qui peuvent être connectées à une interface téléphonique. Le bout d’une interface peut contenir n’importe quelle combinaison de dispositifs sujets uniquement à la condition que le total des numéros d’équivalence d’appel de tous les dispositifs ne dépasse pas 5.
Appendix European radio approval information (for products fitted with EU-approved radio devices) Manufacturer information Samsung Electronics Co., Ltd. This Product is a Notebook computer; low power, Radio LAN type devices (radio frequency (RF) wireless communication devices), operating in the 2.4GHz/5GHz band, may be present (embedded) in your notebook system which is intended for home or office use. This section is only applicable if these devices are present.
Appendix EU R&TTE compliance statements Nation Česky[Czech] Dansk[Danish] Deutsch[German] Nation Description Samsung tímto prohlašuje, že tento Notebook PC je ve shodě se základními požadavky a dalšími příslušnými ustanoveními směrnice 1999/5/ ES. Undertegnede Samsung erklærer herved, at følgende udstyr Notebook PC overholder de væsentlige krav og øvrige relevante krav i direktiv 1999/5/ EF.
Appendix Nation Ελληνική[Greek] Français[French] Italiano[Italian] Description Nation ΜΕ ΤΗΝ ΠΑΡΟΥΣΑ Samsung ΔΗΛΩΝΕΙ ΟΤΙ Notebook PC ΣΥΜΜΟΡΦΩΝΕΤΑΙ ΠΡΟΣ ΤΙΣ ΟΥΣΙΩΔΕΙΣ ΑΠΑΙΤΗΣΕΙΣ ΚΑΙ ΤΙΣ ΛΟΙΠΕΣ ΣΧΕΤΙΚΕΣ ΔΙΑΤΑΞΕΙΣ ΤΗΣ ΟΔΗΓΙΑΣ 1999/5/ΕΚ. Par la présente Samsung déclare que l’appareil Notebook PC est conforme aux exigences essentielles et aux autres dispositions pertinentes de la directive 1999/5/CE.
Appendix Nation Magyar[Hungarian] Polski[Polish] Português[Portuguese] Slovensko[Slovenian] Description Nation Alulírott, Samsung nyilatkozom, hogy a Notebook PC megfelel a vonatkozó alapvetõ követelményeknek és az 1999/5/EC irányelv egyéb elõírásainak. Niniejszym Samsung oświadcza, Ŝe Notebook PC jest zgodny z zasadniczymi wymogami oraz pozostałymi stosownymi postanowieniami Dyrektywy 1999/5/EC.
Appendix Nation Íslenska[Icelandic] Norsk[Norwegian] Türkiye[Türkçe] To view the EU Declaration of Conformity for this product (in English only), go to: Description Hér með lýsir Samsung yfir því að Notebook PC er í samræmi við grunnkröfur og aðrar kröfur, sem gerðar eru í tilskipun 1999/5/EC. Samsung erklærer herved at utstyret Notebook PC er i samsvar med de grunnleggende krav og øvrige relevante krav i direktiv 1999/5/ EF.
Due to the fact that the frequencies used by 802.11b/802.11g wireless LAN devices may not yet be harmonized in all countries, 802.11b/802.11g products are designed for use only in specific countries or regions, and are not allowed to be operated in countries or regions other than those of designated use. The European variant is intended for use throughout the European Economic Area.
Belgium France The product may be used outdoors, but for outdoor transmissions over a distance of 300m or more, a license from the BIPT is required. For Metropolitan departments: 2.400 - 2.4835 GHz for indoor use. 2.400 - 2.454 GHz (channels 1 to 7) for outdoor use.
This equipment has been approved to Council Decision 98/482/ EEC - “CTR 21” for Pan-European single terminal connection to the Public Switched Telephone Network (PSTN). European telecommunication information (for products fitted with EU-approved modems) Marking by the symbol indicates compliance of this equipment to the Radio and Telecom Terminal Equipment Directive 1999/5/EC.
Correct disposal of batteries in this product WEEE symbol information (Applicable in countries with separate collection systems) Correct disposal of this product (Waste Electrical & Electronical Equipment) Pb This marking on the battery, manual or packaging indicates that the batteries in this product should not be disposed of with other household waste at the end of their working life.
In partnering with select recyclers, Samsung offers packaging take-back at no cost to you. India only For more information on safe disposal and recycling visit our website www.samsung.com/in or contact our Helpline numbers 18002668282, 180030008282. Simply call the following number for the locations nearest you. CRT Processing, LLC (877) 278-0799 USA only Kathy Severson – Logistics contact Dispose unwanted electronics through an approved recycler.
Usability – Designed for You TCO certified r Good visual ergonomics and image quality, ensuring top performance and reduced risk of eye strain. Several requirements within the area of luminance, contrast, resolution and color Congratulations! This product is TCO certified for usability and the environment.
Environment– Designed for the Planet Samsung package Take-Back program r Brand demonstrates corporate social responsibility and has a certified environmental management system (EMAS or ISO 14001) In partnering with select recyclers, Samsung offers packaging take-back at no cost to you. r Very low energy consumption both in idle- and standby mode, reducing climate impact CRT Processing, LLC Simply call the following number for the locations nearest you.
Some content may differ from the computer depending on the region, service provider, or software version, computer model, and is subject to change without prior notice. www.samsung.com English. 05/2013. Rev. 1.