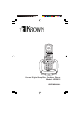
Krown Digital Amplifier Cordless Phone Model: KR2812 USER MANUAL 1
CONTENTS Contents ........................................................................................................... 2 Important Safety Instructions ........................................................................ 4 Safety and Care ................................................................................................ 6 Safety Precautions .......................................................................................... 6 Caring for Your Product ............................
Calling a Stored Phonebook Entry ................................................................... 18 Emergency and Direct number memory .................................................... 19 Edit Speed Dial Buttons .................................................................................. 20 Caller ID Display .............................................................................................. 20 Viewing Caller ID Records .................................................................
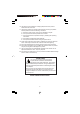
IMPORTANT SAFETY INSTRUCTIONS When using Conference Phone equipment, basic safety precautions should always be followed to reduce the risk of fire, electric shock and injury, including the following: 1. Read and understand all instructions. 2. Follow all warnings and instructions marked on the product. 3. Unplug this product from the wall outlet before cleaning. Do not use liquid cleaners or aerosol cleaners. Use a damp cloth for cleaning. 4.
16. Use caution when installing or modifying telephone lines to prevent electrical shock and/or fire. 17. Unplug this product from the wall outlet and refer servicing to qualified service personnel under the following conditions: A. When the power supply cord or plug is damaged or frayed. B. If the product has been exposed to rain or water. C. If the product does not operate normally by following the operating instructions. D. If the product’s cabinet has been damaged. E.
SAFETY AND CARE Observe the following safety precautions and warnings when setting up and using this product. SAFETY PRECAUTIONS • LCD panel – The LCD panel is made of glass, and may break if the unit is dropped. Place the unit securely on a stable surface. • Heat sources – Keep the product away from heat sources, such as radiators, stoves, heaters, and other heat-generating products. • Water and moisture – Do not use the product in or near water or in high moisture areas, such as a bathroom.
• Use only the power source marked on the adapter. Contact your local dealer to obtain a correct adaptor for your area. Do not place any object on the power cord. • Never use this unit near a gas leak area. It can cause an explosion. • Occasional loss of synchronization between the handset and base unit is normal if there is significant interference from the surrounding environment. • Disconnect the telephone line from the wall-outlet before replacing battery.
PACKAGE CONTENTS Base unit Wall Mount hanger AC/DC Adaptor for base unit Handset Phone line for base unit User Manual 8 Belt clip for handset Rechargeable handset battery
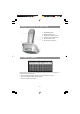
PRODUCT OVERVIEW HANDSET AND BASE UNIT - FRONT VIEW 1. Large visual ring indicator 2. Handset Receiver 3. Emergency keys Fire / 4. 5. 6. 7. 8. 9. 10. 11. 12. 13. 14. 15. 16. 17. 18. 19. 20. 21. 22.
HANDSET AND BASE UNIT - BACK VIEW 1. 2. 3. 4. 5. 6. Detachable belt clip Battery compartment Telephone and auxiliary jacks Handset ringer On/Off switch Rotary volume control 9V DC power supply jack LCD DISPLAY SYMBOLS Large visual font LCD with bright LED backlight displays time and dial number (1/3 inch) and three rows caller ID. • Top row: displays date/time, call-log and phone book index number. • Second row: displays caller phone number. • Third row: displays caller name.
SELECTING THE LOCATION Select a location in a place where: • Nearby a telephone jack • Nearby a electric outlet • Ring indicator is easily visible Your telephone base will connect direct to a telephone line jack. If your telephone wiring did not come with a standard rectangle wall mount plate, contact local telephone company to install for you. You can mount your telephone on a wall plate, directly on a wall or place it on a shelf, desk, or table.
INSTALLING HANDSET BATTERIES The handset uses a rechargeable 600mAh, 3.6V, Ni-Cd (Nickel Cadmium) battery pack. To install the handset batteries: 1. Slide the battery compartment cover off. 2. Insert the battery pack into the compartment. Plug the battery connector into the socket. 3. Replace the battery cover. CHARGING HANDSET Place the handset in the handset cradle of the base unit. Allow the handset to charge up to 14 hours or overnight before use.
MANUFACTURER DEFAULT SETTINGS The phone can be reset to manufacturer default settings at any time by using SET DEFAULT.
BASIC HANDSET FUNCTIONS MAKING CALLS 1. Pick up the handset and press Talk. You will hear the dial tone. 2. Enter a number to dial. If connection is made, “TALK” will be shown on the LCD and calling time will be started from 00:00. Volume level is shown on the bottom right corner. RECEIVING / ENDING CALLS Ring flasher of both base unit, and the handset lights up whenever the phone ring to provide a visual alert, and sounds to provide an audible alert.
USING MUTE During a conversation, press Mute to toggle the microphone, to mute or unmute status. The status of the microphone will be display on the bottom left corner. USING PRE-DIAL The pre-dial function allows you to enter the number, check, and edit the number before you press Talk to make the call. The numbers are displayed in large fonts for easier reading. 1. In standby mode, enter a number by using numeric keypad. If you make a mistake, press DEL to erase. 2. Press Talk to start dialing. 3.
CALL WAITING If you subscribe to Call Waiting service with your local telephone company and there is an incoming call when the phone is off-hook, they will send you a call waiting alert tone in the handset receiver. Press Flash to answer the second call. A “FLASH” message will appear on the LCD. Press Flash again to toggle between two phone calls. Press Talk once to hand up one call, or twice to hand up both calls. USING THE PHONEBOOK The phonebook can store up to 99 names and phone numbers.
1. Select the sub-menu item “ADD RECORD” to add a phonebook entry. If the phonebook is full, a “PHONEBOOK FULL” message will be displayed. 2. If there is available storage space in the phonebook, the message “ENTER NAME” will appear on the LCD. Using table 1.1 to enter a phonebook name or press MENU again to bypass. Table 1.1 Key 1 2 3 4 5 6 7 8 9 0 * # 1 space A(a) D(d) G(g) J(j) M(m) P(p) T(t) W(w) 0 * Key press 2 3 4 5 1 , .
4. Press MENU to save the number and return to the phonebook list. Note: You can enter a number without a name. Each Pause “P” will add one second delay to the dial string. EDITING A PHONEBOOK ENTRY 1. Press PHBK to list phone book entries. 2. Press / to search and select the entry you wish to edit. Press MENU and select“EDITRECORD”. 3. Edit name and number by using numeric keypad and press MENU to save the entry. DELETING A PHONEBOOK ENTRY 1. Press PHBK to list the entries.
EMERGENCY AND DIRECT NUMBER MEMORY There are six speed dial buttons for your convenience. Three buttons are for emergency purpose, and three are for frequently used numbers. 1. To use these buttons, press any one of the following keys: KEYPRESS STORED NUMBER TO DIAL Emergency Memory Fire Police Ambulance Direct Memory M1 Phone number 1 M2 Phone number 2 M3 Phone number 3 The stored number will be shown for that button. Press Talk to dial the number.
EDIT SPEED DIAL BUTTONS Select and press the button you want to edit. Press MENU to enter the speed dial menu. Use / to select one of the options and press MENU to enter: Edit Record, Delete Record, or Delete All. EDITRECORD: 1. Use keypad 0…9, *, # and Pause to enter a number at prompt. 2. Press MENU to save the number and return. DELETERECORD: Press MENU when the handset displays the message “delete?” to delete the number. Press any key or DEL key to cancel and return.
Out of area number (“O”): Private number (“P”): Private name (“P”): Out of area name (“O”): If both name and number is blocked: Private name and number (“P”) Out of area name and number (“O”): The name or phone number of the caller ID will be display with call timer and volume level.
For calls with a blocked name or unknown name, the Caller ID is shown as: OR VIEWING CALLER ID RECORDS 1.Press CID on the handset to access the call log records. If the call log is empty , a message “NO CALLS” will be displayed. Otherwise, the total number and new number of call logs will be shown. 2. Press / log one. 3. Use / to browse the call records. The oldest record will be name as call to see the call log entries. 4. Press DEL to exit the caller ID list and return to standby mode.
SAVING CALLER ID RECORDS IN THE PHONEBOOK 1. When reviewing the caller ID, press MENU and select “ADD RECORD”. Press MENU again to choose. The handset will ask “ENTER NAME”. The name, from the Caller ID list, is displayed. Otherwise, the name is blank. You will enter a new name or press MENU again to bypass. 2. Use table 1.1 and numeric keypad to edit a name and press # to toggle between uppercase and lowercase characters. 3. Press MENU to save the name entry. 4.
EDIT THE CALL LOG NUMBER BEFORE DIALING You can edit the caller ID number before press Talk to dial. When reviewing the call log, press Menu to enter the call log menu and select “EDIT FOR CALL”. Using numeric keypad or press DEL to erase a number. The editing process will be ended if all number is erased. Press Talk to dial the number. ERASING A CALLER ID RECORD 1. Press CID to list the record. 2. Using / to choose the record. 3. Press MENU and select “DELETE RECORD”. Press MENU. 4.
4. Pressing INT will toggle the between internal and external calls. The message “INTERCOM HOLD” will be displayed to indicate that the status of the internal call. TRANSFERRING CALLS An incoming call on one handset can be transferred to another handset: 1. On the first handset, press INT (the external call will be put on hold). 2. Select a handset from the menu and press Talk, or press the handset number from the keypad. 3.
OTHER SETTINGS HANDSET MENUS KEY Menu DEL FUNCTION Press to scroll up Press to scroll down Press to confirm the selection Press to exit to previous menu and / or exit and return to standby mode Standby Language Ring Setting Set Time Phone Setup Security Setting Set Default 1. In standby mode, press MENU to enter the handset menu. 2. Use / to select the option. The cursor will be used to indicate the option being selected. Press MENU again to choose the option 3.
RING TONE AND VOLUME You can adjust the ring tone and volume for external or internal calls by using this option. You can choose from five volume levels and three different ring tones for either call. Number 5 is loudest level. Ring Setting Ring Volume External Call Internal Call 1-5 1-5 External Call Internal Call Ring Tone 1-3 Ring Tone 1-3 Ring Tone To adjust ring volume: There are 5 different ring volume levels. The current ring tone will be played once to at the new volume level.
DATE AND TIME In standby mode, the handset will display real-time clock in 12-hour or 24-hour format. Press MENU and select SET TIME. Press MENU again to choose. Press / to move the cursor to the number. Use numeric keypad to enter new number. Press MENU to save. Set Time Clock Setting Alarm (E.g. 12:00AM) Off On (E.g. 12:00AM) 12 Hr 24 Hr MM/DD DD/MM Set Format To adjust clock: 1. On the numeric keypad, press 0...9 to enter the new clock time. Using / to move cursor from hour to minute. 2.
To adjust the time display format: 1. Press MENU and select SET TIME. / to toggle between Standard 12-hour or military 24-hour formats. 2. Use Press MENU to save the selection. 3. Enter the date format. The current Month-Date format is displayed. 4. Use / to toggle Month-Date formats. Press MENU to save the formats. PHONE SETUP Phone Setup Set Area Code Key Tone (E.g.
To set the area code: When the area code of the incoming call match with the saved area code in memory, the Caller ID number will not display the area code. To set the key tone: Each key press will generate a key tone. Use / to toggle key tone On / Off. Press MENU to save the setting. To set auto answer In auto answer mode On, the handset will automatically go off hook from an incoming call when you pick up the handset. Use / to toggle auto answer On / Off. Press MENU to save.
To set pre-fixed dialing number: The pre-fixed dialing number will be dialed automatically before dial a number. Use / to toggle pre-fixed dialing On / Off. If pre-fixed dialing is turned off, the display returns to the previous menu. If pre-fixed dialing is turned on, you will be prompted to enter the pre-fixed number set. Press MENU to save and exit. To set dial mode: There are 2 dial modes: TONE and PULSE dials. Select PULSE dial if your area does not support TONE dial.
SECURITY SETTING The handset is pre-registered with the base. When you purchase an additional handset, you must register it to the base unit in order to make and receive a call. You can register up to three more handsets with one base unit. Security Setting Registration On Off (1 to 4) On Off (1 to 4) De-registration Clear Msg Wait No Yes Select Base 1-4 Show ID To register the handset: / to select base number for 1. Use registration. 2. Press MENU to confirm the selected base number.
To de-register the handset: Follow the same steps of registering handsets to de-register handsets. To manually clear message waiting: If you have a message service, or voice mail service from your local phone company, and you have a message waiting, the base unit LED will flash. The LED only stops flashing once all messages have been checked and deleted. In CLEAR MESSAGE WAITING, use / to select “Yes” or “No”. Press MENU to confirm. If you choose “No”, the display returns to the previous menu.
TROUBLESHOOTING The KR2812 is designed for indoor use only. Do not set the handset in direct sun light, it will damage the LCD display which will not cover under warranty. First, check these steps, it may save you to go through a repair process: • The base unit is connected to the power supply and phone line. • The main power is switched on at the socket. • The handset battery is installed and fully charged. DO NOT open the handset or the base since it will null your warranty.
I can’t make an internal call • Only one handset can connect to the telephone line. Make sure that no one is using the telephone line SPECIFICATIONS TYPE Handset dimensions DESCRIPTION 41.5 mm (W) x 184.7 mm (L) x 54.2 mm (D) Handset weight Base unit dimensions 0.171 kg (without battery) 126.6 mm (W) x 122 mm (L) x 73 mm (D) Base unit weight Standard Communication range 0.186 kg 2.4Ghz ISM FHSS Worldwide Digital Cordless Telecommunications(WDCT) Up to 300 meters (approx.
FCC STATEMENT This device complies with Part 15 of the FCC Rules. Operation is subject to the following two conditions: (1) This device may not cause harmful interference, and (2) This device must accept any interference received, including interference that may cause undesired operation. Privacy of communications may not be ensured when using the phone.
DECLARATION OF CONFORMITY The information below is not to be used as contact for support or sales. Please call our customer service number (listed on our website at www.krownmfg.com, or on the warranty card for this product) for all inquiries instead. We Name: Krown Manufacturing, Inc. Address: 3408 Indale Road, Fort Worth, TX 76116 declare that the product Product No.: KR2812 ProductName: Krown Digital Amplifier Cordless Phone is in conformity with Part 15 of the FCC Rules.
LIGHTNING Your telephone has built-in lightning protection to reduce the risk of damage from surges in telephone line and power line current. This lightning protection meets or exceeds FCC requirements. However, lightning striking the telephone or power lines can damage your telephone. Lightning damage is not common. Nevertheless, if you live in an area that has severe electrical storms, we suggest that you unplug your phone when storms approach to reduce the possibility of damage.
If this equipment causes harm to the telephone network, the telephone company will notify you in advance that temporary discontinuance of service may be required. But if advance notice isn’t practical, the telephone company will notify the customer as soon as possible. Also, you will be advised of your right to file a complaint with the FCC if you believe it is necessary.
WARRANTY Krown Manufacturing, Inc. warrants that the Digital Amplifier Cordless Phone KR2812 sold by Krown Manufacturing, Inc. is free from defects in materials and workmanship under normal use and service for one year. This warranty is applicable only to the original purchaser of the cordless phone when accompanied by a sale receipt stating the date of purchase and the name of the company from which purchased.