
User's Manual


5 PRINTER OPERATION
42
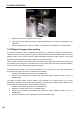
Figure 5. 9 Replacement of nozzle
5. Replace new nozzle, and tighten it with wrench.
6. Long press the "E↓" button until there is material ejected from the nozzle. The replacement is so
completed.
7. After the replacement of nozzle, the leveling, XY calibration and Z calibration is required again.
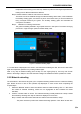
5.3.2 Material change before printing
If it needs to change the type of material before printing, it is required to change the material in the
"Material" interface, and also replace the printing nozzle selectively. Different materials shall be printed by
different nozzle. To use a same nozzle for different materials, the printing nozzle must be in very close
temperature with suggested temperature difference no greater than 50℃.
Note: A nozzle, which has been used to print any material in high melting point, shall not be used to print
any material in low melting point. For example, the use of a nozzle which has been used to print PEEK in
PLA printing will cause nozzle blocking and printing failure.
No replacement of nozzle is required if two materials are in same type or the nozzle temperatures
required by their printing are close. The procedure is as follows:
1. Unload the old material. Refer to 5.2.2 for detailed steps;
2. Select the new material to be loaded, and execute the loading operation. Refer to 5.2.1 for
detailed steps;
The steps to replace nozzle shall be added if two materials are in different types or the nozzle
temperatures required by their printing are very different. Accordingly, the leveling, Z axis calibration and
XY calibration are required again. The procedure is as follows:
1. Unload the old material. Refer to 5.2.2 for detailed steps;
2. Replace the nozzle. Refer to 5.3.1 for detailed steps;
3. Select the new material to be loaded, and execute the loading operation. Refer to 5.2.1 for
detailed steps;
4. Perform the leveling, Z axis calibration and XY axis calibration steps.