
User's Manual


5 PRINTER OPERATION
41
2. Click each input box respectively to pop up the input keyboard, and then modify the material name
and the parameters.
3. After the modification, click "Change", and click the save icon.
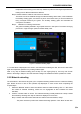
5.2.3.2 Material appending, inserting, removal and change
Following operations can made on each type of material:
Load: Give up the current change, and load the material database content saved last;
Append: Append the material in current editing area to the end of material database;
Insert: Insert the material in current editing area before the material currently selected;
Remove: Remove the material currently selected;
Change: Change the content in current editing area to the material selected currently.
The operating steps are as below:
1. Click the material to be copied. At this time, such material line will be highlighted.
2. Click "Load", "Append", "Insert", "Remove" and "Change" to operate loading, appending, inserting,
removal and change respectively.
3. After the operation, click the save icon.
5.3 Replacement of Nozzle or Material
5.3.1 Replacement of nozzle
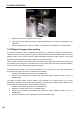
The left and right nozzle of the printer are in different structures, of which the automatic leveling is realized
by the left nozzle. The left nozzle is movable, while the right nozzle is fixed.
Figure 5. 8 Appearance of left and right nozzle
Steps to replace nozzles are as below:
1. Click the "Material" button to turn to the material interface.
2. Click "Set Temp(℃)" button, and wait for the nozzle for heating.
3. When the temperature reaches the set value and the material in nozzle has melted, long press
"E↑" button for over 3s to retract the material out of the nozzle range.
4. Anticlockwise rotate and take off the old nozzle with M13 (left) / M12 (right) socket wrench. Be
careful to avoid scald due to the high temperature of the nozzle.
Left nozzle
Right nozzle