
User's Manual


5 PRINTER OPERATION
39
temperature before turning to the next step. Please be patient as the target temperature and
heating time of different material are different.
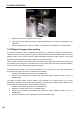
Step 3: Please install the material. And insert it into extruder.
Thread the end of the material through the starved feeding alarm switch, insert it between
the auxiliary feeding gears, and insert it in place. Click "Next" when you find the material is
being conveyed forward by the gears. The auxiliary feeding gears will accelerate the
conveyance of material.
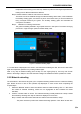
Step 4: Material is on loading. Please wait…
The gears will feeding material in high speed and then in low speed. The whole conveying
process is in "high-low-high" speed, and takes totally 120s.
Figure 5. 6 Material loading steps
7. If "Load Failed" is displayed on the screen, user shall close the dialog box first, then click "Load" button
again and repeat the operation to try loading material again.
Note: In any step of material loading (such as Step 3 or the ongoing Step 4), user may click "Finish"
button in the dialog in Step 4 to end and finish the loading if the material has been ejected from nozzle.
5.2.2 Material unloading
The information in this section will guide you to complete unloading material from the nozzle and feeding
pipe. Please be sure to refer to the operation tips displayed on touch screen when completing the
required steps.
1. Select the “Material” button to enter the interface similar to material loading. Click “L”/ “R”to select
the nozzle for material unloading, where the icon highlighted as blue indicates the nozzle
activated;
2. Click the “Unload” button on screen. The material unloading is totally divided into 4 steps. Unload
the material by following each step of instruction displayed on the screen.
Step 1: Please note that machine will heat the nozzle and unload material, ready?
The printer is about to perform the material unloading operation. Click "Next" to start such