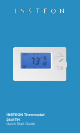
INSTEON Thermostat 2441TH Quick Start Guide
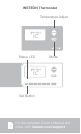
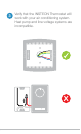
INSTEON Thermostat Temperature Adjust Status LED Mode 72 SET Set Button For the complete Owner’s Manual and more, visit: insteon.
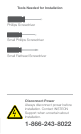
Tools Needed for Installation Phillips Screwdriver Small Phillips Screwdriver Small Flathead Screwdriver Disconnect Power Always disconnect power before installation. Contact INSTEON Support when uncertain about installation.
1 Installation Turn off power to your air conditioning system at the electrical service panel.
2 Remove your old thermostat. Some are secured with screws, others tilt upwards.
3 Verify that the INSTEON Thermostat will work with your air conditioning system. Heat pump and line voltage systems are incompatible.
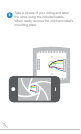
4 Take a picture of your wiring and label the wires using the included labels. When ready, remove the old thermostat’s mounting plate.
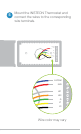
24COM 5 24R Mount the INSTEON Thermostat and connect the wires to the corresponding W1 wire terminals.
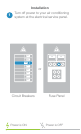
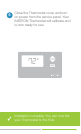
6 Close the Thermostat cover and turn on power from the service panel. Your INSTEON Thermostat will calibrate and is now ready for use. Installation complete. You can now link your Thermostat to the Hub.
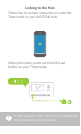
Linking to the Hub Follow the on-screen instructions to add the Thermostat to your INSTEON Hub. + When prompted, press and hold the set button on your Thermostat. SET ! If not using the Hub, refer to the instructions that came with your product.
Use ºF or ºC With the Hub, follow the instructions below to change the temperature mode of your thermostat. Thermostat Name Icon Room Memberships Humidity Units ºF ºF ºC Linking complete. You can now control your Thermostat from the App.
Use ºF or ºC Without the Hub, follow the instructions below to change the temperature mode of your thermostat. 72 PROGRAM PROGRAM F 3x MODE PROGRAM C ºC ºF PROGRAM 22 PROGRAM PROGRAM Protected under U.S. and foreign patents (see www.insteon.com/patents) ©2014 INSTEON RAW-1301 Rev 03.13.