
Quick-Start Guide

Page 1 of 1
Rev. 05-01-2009
Use Freezer Sensor to Control an INSTEON Device
1) Plug your I/O Linc into an un-switched outlet near your freezer
I/O Linc’s Status LED will turn on
2) Remove the pre-stripped plastic insulation from one end of the Sensor Wire
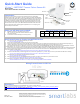
3) Connect one of the two wires from the newly-exposed end of the Sensor Wire to I/O Linc’s GND terminal and the other to I/O Linc’s Sense terminal (see Figure 1)
4) Locate the ideal location inside freezer to mount freeze sensor. Keep in mind Sensor Wire will need to connect Freeze Sensor to I/O Linc
5) Using either double-sided tape or 2 #6 screws, mount the sensor inside freezer. Note: If using screws, check with the manufacturer of freezer/refrigerator to ensure
safe drilling location. Then, be sure to 1) drill pilot holes, using screw holes as a template, and 2) loosely install #6 screws to hold sensor in place
6) Connect sensor wire to freeze sensor’s screw terminals using a standard or Phillips screwdriver. Tip: Close freezer and check that no cold air is escaping around where
the sensor wire passes through freezer gasket. Most gaskets will conform to maintain the seal around the wire. If using screws to mount freezer sensor, 1) install sensor
cover, then 2) tighten mounting screws
I/O Linc’s Sensor Status LED will be lit if freezer sensor is above 39
o
F. LED will be off if below 39
o
F
7) Put sensor in the state which you want to trigger I/O Linc to send an On command (i.e. If you want > 39
o
F to send On, open freezer until LED is lit for this step)
I/O Linc’s Sensor Status LED will be lit if freezer sensor is above 39
o
F. LED will be off if below 39
o
F
8) Press & Hold I/O Linc’s Set button until it beeps (about 3 seconds)
I/O Linc’s Status LED will begin blinking
9) Press & Hold the Set button on your INSTEON responder
(the device you wish to control with I/O Linc) for at least 3 seconds
I/O Linc will beep and its Status LED will return to steady On to confirm linking
10) Either open or close freezer to test. Note: Freeze sensor can 5-10 minutes to freeze/thaw
Remote INSTEON device should turn On or Off (as sensor state changes between frozen and thawed)
Introduction
Don't lose an entire freezer full of food in the unfortunate event of a freezer failure.
Whether it's the freezer in your kitchen or the one you have in the garage, the INSTEON
I/O Linc Freezer Failure Sensor Kit can send an INSTEON signal to your home network to
notify you of the concern as soon as the temperature in your icebox reaches above 39° F.
In addition to wasted food, a failing freezer can have ice buildup inside that can quickly
turn to water when the temperature inside rises, possibly causing damage to your floor if
the water were to leak. As part of your INSTEON home automation network, this kit will
act as an early alert system, triggering lights or appliances to turn on or notifying you in
the event that your freezer fails.
Quick-Start Guide
I/O Linc
TM
– INSTEON
TM
Freezer Failure Sensor Kit
Model: 24950A5
Freezer Failure Notification via INSTEON
SmartLabs Limited Warranty – SmartLabs warrants to original consumer of this product for a
period of 2 years from date of purchase, this product will be free from defects in material &
workmanship & will perform in substantial conformity with its owner's manual. Warranty shall
not apply to defects caused by misuse or neglect.
U.S. Patent No. 7,345,998, International patents pending ©Copyright 2009
SmartLabs, 16542 Millikan Ave., Irvine, CA 92606, 1-800-SMARTHOME (800-762-7846)
Sensor Wire
Status LED
Freeze
Sensor
I/O Linc Screw
Terminals
Freeze
Sensor Screw
Terminals
Questions?
Click: For Advanced Features and X10 compatibility, refer to I/O Linc’s Owner’s Manual:
http://wiki.smarthome.com/index.php?title=I/O_Linc_-_INSTEON_Low_Voltage_/_Contact_Closure_Interface_Owner%27s_Manual
Call: Friendly tech support @ 1-800-SMARTHOME (800-762-7846)
I/O Linc’s Screw Terminals
5V GND Sense N/C N/O Common
5
Volts
Ground
Sensor
Input
Normally
Closed
Normally
Open
Switches
between N/O
and N/C
Items you will Need (not included)
1) Standard screwdriver (for the Freeze sensor screws)
Note - The I/O Linc comes with a small screwdriver for the I/O
Linc Screw Terminals
2) 2 x #6 screws or double-sided tape (for mounting sensor)
Figure 1
Wiring Freezer Sensor to I/O Linc
Sensor
Wire
Sensor Screw
Terminals
Sensor Cover
GND / Sense
Terminals
Set Button
Sensor Status
LED