
User Manual


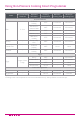

Table Of Contents
- IMPORTANT SAFEGUARDS
- Special Lead Set Instructions
- Initial Setup
- Product, Parts and Accessories
- Control Panel
- Smart Programme Settings
- Adjust and Save Pressure Cooking Temperature
- Adjust and Save Pressure Cooking Time
- Adjust and Save Non-Pressure Cooking Temperatures
- Adjust and Save Non-Pressure Cooking Time
- Cancel and Standby Mode
- Turn Sound On/Off
- Adjust Temperature Scale: Fahrenheit and Celsius
- Set a Delay Start Timer
- Automatically Keep Food Warm After Cooking
- Reheat Food or Keep Warm for Long Periods
- Reset Smart me to Factory Default Settings
- Status Messages
- Cleaning Before First Use
- Overview of Pressure Control Features
- Cooking with the Duo Plus
- Depressurizing the Cooker (Venting Methods)
- Initial Test Run (Water Test)
- Using Pressure Cooking Smart Programmes
- Pressure Cooking Timetable
- Grain-to-Water Ratios
- Using Non-Pressure Cooking Smart Programmes
- Care and Cleaning
- Troubleshooting
- Warranty
- Contact

41
Using Non-Pressure Cooking Smart Programmes
Slow Cook
Slow Cook is a non-pressure cooking programme that is compatible for use with
any standard slow cooker recipe.
1. Remove the inner pot from the cooker base.
2. Add food and liquid ingredients to the inner pot.
3. Insert the inner pot into the cooker base.
4. Secure the power lead to the base power socket at the back of the cooker base.
Ensure the connection is tight.
Connect the power lead to a 220-240V power source.
The cooker goes to Standby mode and the display indicates OFF.
5. Place and close the lid as described in Pressure Control Features—Pressure
Locking Lid, or use a glass lid with a venting hole.
6. Press the quick release button down until it clicks and locks into the
Vent position.
7. Press Slow Cook to select the Slow Cook Smart Programme.
8. Press Slow Cook again to cycle through the Less, Normal and More
temperature options.
9.
Use the − / + buttons to adjust the cooking time.
Note: Cooking time and temperature level adjustments are saved to the Smart
Programme when cooking begins.
10. Press Keep Warm to toggle the automatic Keep Warm setting off and on.
11. After 10 seconds, cooking begins and the display timer counts down.
12. When cooking completes, the display indicates End if Keep Warm is turned
off. If not, the timer begins counting from 00:00 up to 10 hours.
Note: The oat valve should not rise during Slow Cook. The lid is removable
throughout the cooking process for easy access. If the oat valve rises, ensure the
quick release button is set to the Vent position. Refer to
Depressurising Your Cooker
(Venting Methods)
.
Setting Suggested Use Notes
Less
Low setting on standard
slow cookers
Follow recipe directions for
slow cooking.
Less is commonly used for low and
slow, all-day cooking, and should
be set for a minimum of 10 hours
for best results.
Normal
Medium setting on standard
slow cookers
More
High setting on standard
slow cookers