VORTEX MINI TM 2 Litre Air Fryer Getting Started Guide 2 Important Safeguards 6 Product, Parts & Accessories 7 Getting Started 9 Control Panel 12 Cooking 13 Care, Cleaning & Storage 14 Warranty 16 Contact Information Full Manual, How-to Videos and Recipes available online at instantpot.com.au Register your product today at instantpot.com.
IMPORTANT SAFEGUARDS At Instant Brands™ your safety always comes first. The Instant™ Vortex™ family was designed with your safety in mind, and we mean business. Visit instantpot.com.au to learn about this appliance’s safety mechanisms. When using electrical appliances, basic safety precautions should always be followed: 1. 2. 3. 4. 5. 6. 7. 8. 9. READ ALL INSTRUCTIONS, SAFEGUARDS, AND WAR NINGS BEFORE OPERATING THE APPLIANCE.
IMPORTANT SAFEGUARDS 10. DO NOT use any accessories or attachments not authorised by Instant Brands™ Inc. The use of attachments not recommended by the manufacturer, may cause a risk of injury, fire or electric shock. 11. For household countertop use only. Do not use outdoors. Not for commercial use. Not for use in staff kitchen areas in shops, offices and other working environments, farm houses, nor by clients in hotels, motels and other residential type environments such as bed and breakfasts. 12.
IMPORTANT SAFEGUARDS 22. NEVER pour oil into the cooking chamber. This could result in fire and/or personal injury. 23. While cooking, the internal temperature of the appliance reaches several hundred degrees. To avoid personal injury, NEVER place unprotected hands inside the appliance until it has cooled to room temperature. 24. When cooking, DO NOT place the appliance against a wall or against other appliances. Leave at least 13 cm of free space on the back, sides, and above the appliance.
IMPORTANT SAFEGUARDS WARNING To avoid injury, read and understand instruction manual before using this appliance. WARNING Electrical shock hazard. Use grounded socket only. • DO NOT remove ground. • DO NOT use an adapter. • DO NOT use an extension lead. Failure to follow these instructions may result in electric shock and/or serious injury.
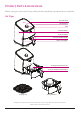
Product, Parts & Accessories Before using your cute new air fryer, make sure that everything is present and accounted for. Air Fryer Air Intake Vent Control Panel Dial Air Vents (Rear) Air Fryer Basket Air Fryer Basket Handle Power Cord (Rear) Cooking Chamber (Interior) Air Fryer with Removable Basket Cooking Tray Air Fryer Basket Illustrations in this document are for reference only and may differ from the actual product. Always refer to the actual product.
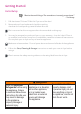
Getting Started Initial Setup "Notice the small things. The rewards are inversely proportional." – Liz Vassey 1. Pull that Instant™ Vortex™ Mini Air Fryer out of the box! 2. Remove the air fryer basket and check the cooking chamber for loose packing material before first use. Don't remove the silicone supports from the removable cooking tray. 3.
Getting Started Initial Test Run Do you have to do the test run? No — but getting to know the ins and outs of your Instant™ Vortex™ Mini Air Fryer prepares you for success in the kitchen! Take a few minutes to get to know how this little baby works. Stage 1: Setting up the air fryer for cooking Stage 2: "Cooking" (...but not really, this is just a test!) 1. 1. Connect the power cord to a 220-240V power source. The air fryer is in standby mode and the display shows OFF. 2.
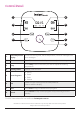
Control Panel 1 4 5 5 2 3 8 7 6 1 Time/Temperature Display Shows the cooking time, the set temperature, reminder messages and error messages. 2 Time Touch Time and turn the dial if you want to adjust the cooking time. 3 Temp Touch Temp and turn the dial if you want to adjust the cooking temperature. 4 Cooking Status Preheat, Cook and Turn. 5 Smart Programs • • • • 6 Dial 7 Start Touch Start to begin a selected smart program.
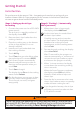
Settings To do this... Do this! Wake the air fryer Touch the display, press the dial, or remove and re-insert the air fryer basket to wake the air fryer. The display shows OFF to let you know that it's in standby mode and ready for action. Turn sounds on and off In standby mode, touch and hold both the Time and Temp for 3 seconds. The display shows S On when the sound is on, and SOFF when the sound is off. Error alerts cannot be silenced.
Cooking Status The air fryer is heating up to the perfect temperature to cook your meal. Not applicable to Reheat. Cooking is in progress. Food is ready to be flipped or tossed, as required by your recipe. Not applicable to Bake or Reheat. Status Messages The air fryer is in standby mode. A smart program is in the Preheat stage. Not applicable to Reheat.
Cooking Cooking in the Instant™ Vortex™ Mini Air Fryer is quick and easy — food goes in, crispy deliciousness comes out! Find full instructions for use and cooking time tables online at instantpot.com.au or download the free Instant Pot app for fun, easy to follow recipes.
Care, Cleaning & Storage Clean your air fryer and accessories after each use. Always unplug the air fryer and let it cool to room temperature before cleaning. Never use harsh chemical detergents, scouring pads, or powders on any of the parts or components. Let all surfaces dry thoroughly before use, and before storage. Part or Accessory Air Fryer Basket Cleaning Method and Notes • Clean the air fryer basket with a sponge or cloth and warm water and dish soap, then rinse well.
Warranty Limited Warranty This Limited Warranty is issued by Corelle Brands (Australia) Pty Ltd (Corelle Brands Australia) and is effective for one year from the date of original consumer purchase. Proof of original purchase date and return of your appliance is required to obtain service under this Limited. Return of your appliance to us will be done in accordance with our instructions only.
THIS PAGE HAS BEEN INTENTIONALLY LEFT BLANK.
©2021 Corelle Brands (Australia) Pty Ltd. Distributed by Corelle Brands (Australia) Pty Ltd. 9c Commercial Road, Kingsgrove, NSW, 2208, Australia Register your product today at: instantpot.com.au/support/register Contact Customer Care: Ph 1800 251 643 or 02 9317 1000 support@instantpot.com.au instantpot.com.au © 2021 Corelle Brands (Australia) Pty Ltd.