
User Manual
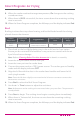
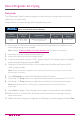
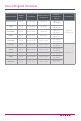
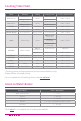
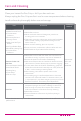
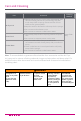
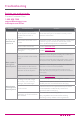
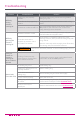
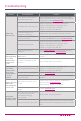
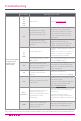
Table Of Contents
- IMPORTANT SAFEGUARDS
- Special Cord Set Instructions
- Initial Setup
- Product, Parts and Accessories
- Control Panel
- Smart Program Settings
- Reset Smart Programs to Factory Default Settings
- Adjust and Save Custom Temperatures
- Reheat Food or Keep Warm for Long Periods
- Status Messages
- Cleaning Before First Use
- Overview of Pressure Control Features
- Steam Release Valve
- Anti-Block Shield
- Sealing Ring
- Float Valve
- Condensation Collector
- Depressurizing the Cooker (Venting Methods)
- 10-Minute NR
- Initial Test Run (Water Test)
- Smart Programs: Non Air Frying
- Sauté
- Slow Cook
- Sous Vide
- Sous Vide Cooking Guidelines
- Smart Programs: Air Frying
- Bake
- Roast
- Broil
- Dehydrate
- Smart Program Overview
- Cooking Time Chart
- Care and Cleaning
- Troubleshooting
- Warranty

51
Smart Programs: Air Frying
8. When the cooker reaches the target temperature, On changes to the cooking
countdown timer.
9. When there is 00:01 minute left, the timer counts down the remaining cooking
time in seconds.
10. When the Smart Program completes, the lid beeps, and the display indicates End.
Broil
Broiling involves direct top-down heating, and broiled foods benet from being
placed close to the element.
Default
Temperature
Temperature
Range
Suggested Use
Default Cooking
Time
Cooking Time
Range
400°F
204°C
Not Adjustable
Melt cheese on French
onion soup or nachos
00:08 00:01–00:40
1. Place food on the broil/dehydrating tray in the multi-level air fryer basket.
Ensure you do not overll the basket as it may come into contact with the air
fryer lid and cause damage.
Note: Refer to Cleaning Before First Use—Accessories for details on assembly.
2. Insert the air fryer basket into the inner pot.
3. Insert the inner pot into the cooker base.
4. Connect the power cord to a 120 V power source. The cooker goes to Standby
mode and the display indicates OFF.
5. Align the lid ns with the slots in the cooker base handles and lower the lid
until a jingle sounds.
Note: Press the lid down slightly to ensure that the lid sensor connector contacts the
base sensor connector.
6. Press Broil to select the Broil Smart Program.
7. Use the + / − Time buttons to adjust the cook time.
Note: Adjustments to the cooking time are saved when you press Start. Temperature is
not adjustable.
8. Press Start to begin. The cooking timer begins counting down immediately.
9. When there is 1 minute left, the timer counts down the remaining cooking
time in seconds.
10. When the Smart Program completes, the lid beeps, and the display indicates End.