
User Manual
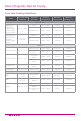
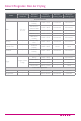

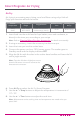
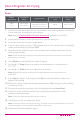
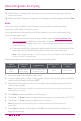
Table Of Contents
- IMPORTANT SAFEGUARDS
- Special Cord Set Instructions
- Initial Setup
- Product, Parts and Accessories
- Control Panel
- Smart Program Settings
- Reset Smart Programs to Factory Default Settings
- Adjust and Save Custom Temperatures
- Reheat Food or Keep Warm for Long Periods
- Status Messages
- Cleaning Before First Use
- Overview of Pressure Control Features
- Steam Release Valve
- Anti-Block Shield
- Sealing Ring
- Float Valve
- Condensation Collector
- Depressurizing the Cooker (Venting Methods)
- 10-Minute NR
- Initial Test Run (Water Test)
- Smart Programs: Non Air Frying
- Sauté
- Slow Cook
- Sous Vide
- Sous Vide Cooking Guidelines
- Smart Programs: Air Frying
- Bake
- Roast
- Broil
- Dehydrate
- Smart Program Overview
- Cooking Time Chart
- Care and Cleaning
- Troubleshooting
- Warranty

50
Smart Programs: Air Frying
15. When there is 1 minute left, the timer counts down the remaining cooking
time in seconds.
16. When the Smart Program completes, the lid beeps, and the display indicates End.
Bake
Like a tiny oven, the Bake Smart Program can be used to create decadent
brownies, puffy cakes, and much more.
You may bake with the multi-level air fryer basket or any oven-safe baking dish,
such as a springform pan.
• If baking in the multi-level air fryer basket, refer to
Cleaning Before First
Use—Accessories
for details on assembly. Line the interior with aluminum
foil or parchment paper and pour in loose batter. Place the air fry basket
in the inner pot.
• If using a baking dish, place the multifunctional rack on the bottom of the
inner pot, then place the baking dish on the rack in the inner pot.
Note: Leave approximately 1”/ 2.5 cm of space around all sides of the baking dish
to allow heat to circulate evenly.
Unless specied in your recipe, do not cover the baking dish.
Default
Temperature
Temperature
Range
Suggested Use
Default Cooking
Time
Cooking Time
Range
365°F
185°C
180°F–400°F
82°C–204°C
Light and uffy cakes,
pastries and buns
00:30 00:01–01:00
1. Insert the inner pot into the cooker base.
2. Connect the power cord to a 120 V power source. The cooker goes to Standby
mode and the display indicates OFF.
3. Align the lid ns with the slots in the cooker base handles and lower the lid
until a jingle sounds.
Note: Press the lid down slightly to ensure that the lid sensor connector contacts the
base sensor connector.
4. Press Bake to select the Bake Smart Program.
5. Use the + / − Temp buttons to adjust the temperature in increments of 1°C / 5°F.
6. Use the + / − Time buttons to adjust the cook time.
Note: Adjustments to the cooking time and temperature are saved when you
press Start.
7. Press Start to begin. The display reads On to indicate that the cooker has
begun Pre-heating.