
User Manual
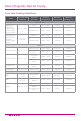
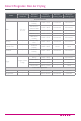

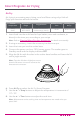
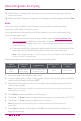
Table Of Contents
- IMPORTANT SAFEGUARDS
- Special Cord Set Instructions
- Initial Setup
- Product, Parts and Accessories
- Control Panel
- Smart Program Settings
- Reset Smart Programs to Factory Default Settings
- Adjust and Save Custom Temperatures
- Reheat Food or Keep Warm for Long Periods
- Status Messages
- Cleaning Before First Use
- Overview of Pressure Control Features
- Steam Release Valve
- Anti-Block Shield
- Sealing Ring
- Float Valve
- Condensation Collector
- Depressurizing the Cooker (Venting Methods)
- 10-Minute NR
- Initial Test Run (Water Test)
- Smart Programs: Non Air Frying
- Sauté
- Slow Cook
- Sous Vide
- Sous Vide Cooking Guidelines
- Smart Programs: Air Frying
- Bake
- Roast
- Broil
- Dehydrate
- Smart Program Overview
- Cooking Time Chart
- Care and Cleaning
- Troubleshooting
- Warranty

49
Smart Programs: Air Frying
Roast
Default
Temperature
Temperature
Range
Suggested Use
Default Cooking
Time
Cooking Time
Range
380°F
193°C
180°F–400°F
82°C–204°C
Beef, lamb, pork, poultry,
vegetables, scalloped
potatoes and more
00:40 00:01–01:00
1. Insert food into the multi-level air fryer basket, oven-safe cookware, or directly
in the inner pot, according to your recipe.
Note: Refer to Cleaning Before First Use—Accessories for details on assembly.
2. If using an accessory, insert the accessory into the inner pot.
3. Insert the inner pot into the cooker base.
4. Connect the power cord to a 120 V power source. The cooker goes to Standby
mode and the display indicates OFF.
5. Align the lid ns with the slots in the cooker base handles and lower the lid
until a jingle sounds.
Note: Press the lid down slightly to ensure that the lid sensor connector contacts the
base sensor connector.
6. Press Roast to select the Roast Smart Program.
7. Use the + / − Temp buttons to adjust the temperature in increments of
1°C / 5°F.
8. Use the + / − Time buttons to adjust the cook time.
Note: Adjustments to the cooking time and temperature are saved when you
press Start.
9. Press Start to begin. The display reads On to indicate that the cooker has
begun Pre-heating.
10. When the cooker reaches the target temperature, On changes to the cooking
countdown timer.
11. Part way through the cooking cycle, the display indicates turn Food.
12. Lift the air fryer lid off the Instant Pot cooker base and place it on the
protective pad provided.
Note: Lifting the lid automatically pauses cooking.
13. Carefully turn, ip, or rotate your food.
Note: Some food does not require turning. If the lid is not removed after the turn Food
indicator appears, cooking will proceed after 10 seconds.
14. Close the lid as described in step 5.