
User Manual

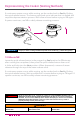

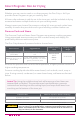


Table Of Contents
- IMPORTANT SAFEGUARDS
- Special Cord Set Instructions
- Initial Setup
- Product, Parts and Accessories
- Control Panel
- Smart Program Settings
- Reset Smart Programs to Factory Default Settings
- Adjust and Save Custom Temperatures
- Reheat Food or Keep Warm for Long Periods
- Status Messages
- Cleaning Before First Use
- Overview of Pressure Control Features
- Steam Release Valve
- Anti-Block Shield
- Sealing Ring
- Float Valve
- Condensation Collector
- Depressurizing the Cooker (Venting Methods)
- 10-Minute NR
- Initial Test Run (Water Test)
- Smart Programs: Non Air Frying
- Sauté
- Slow Cook
- Sous Vide
- Sous Vide Cooking Guidelines
- Smart Programs: Air Frying
- Bake
- Roast
- Broil
- Dehydrate
- Smart Program Overview
- Cooking Time Chart
- Care and Cleaning
- Troubleshooting
- Warranty

35
Initial Test Run (Water Test)
Follow these steps to start familiarizing yourself with your Instant Pot
Duo Crisp + Air Fryer.
Note: Always ensure you are using the stainless steel inner pot when pressure cooking or air
frying. NEVER place food or liquid into the cooker base.
Total test time: Approximately 20 minutes.
1. Remove the inner pot from the cooker base.
2. Add 3 cups (24 oz / 750 mL) of water to the inner pot.
3. Insert the inner pot into the cooker base.
4. Connect the power cord to a 120 V power source. The display indicates OFF.
5. Place and close the lid as described in Pressure Control Features—Pressure
Cooking Lid.
Note: The lid automatically seals for pressure cooking.
6. Press Pressure Cook to select the Pressure Cook Smart Program.
7. Use the + / − Time buttons to adjust the cooking time to 5 minutes.
Note: Cooking time adjustments are saved to the Smart Program when cooking begins.
8. Press Keep Warm to deactivate the automatic Keep Warm setting.
9. Press Start to begin. The display reads On to indicate that the cooker has
begun Pre-heating.
Note: To understand how pressure cooking works, read Introduction to Pressure
Cooking while the cooker heats.
10. The oat valve rises when the cooker has pressurized. After a few minutes the
cooker reaches the target pressure level and Cooking begins. The display
changes from On to the cook time countdown.
11. When the Smart Program is complete, the display indicates End.
12. Press the quick release button down until it clicks into the Vent position.
Pressurized steam releases through the top of the steam release valve.
13. The oat valve drops when the pressure has been fully released.
14. Open and remove the lid as described in Pressure Control Features—Pressure
Cooking Lid.
15. Carefully remove the inner pot from the cooker base, discard the water and
thoroughly dry the inner pot.
You’re ready to start cooking!
CAUTION
The inner pot will be hot after cooking. Always use appropriate heat protection when
handling a hot inner pot.