
User Manual

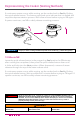


Table Of Contents
- IMPORTANT SAFEGUARDS
- Special Cord Set Instructions
- Initial Setup
- Product, Parts and Accessories
- Control Panel
- Smart Program Settings
- Reset Smart Programs to Factory Default Settings
- Adjust and Save Custom Temperatures
- Reheat Food or Keep Warm for Long Periods
- Status Messages
- Cleaning Before First Use
- Overview of Pressure Control Features
- Steam Release Valve
- Anti-Block Shield
- Sealing Ring
- Float Valve
- Condensation Collector
- Depressurizing the Cooker (Venting Methods)
- 10-Minute NR
- Initial Test Run (Water Test)
- Smart Programs: Non Air Frying
- Sauté
- Slow Cook
- Sous Vide
- Sous Vide Cooking Guidelines
- Smart Programs: Air Frying
- Bake
- Roast
- Broil
- Dehydrate
- Smart Program Overview
- Cooking Time Chart
- Care and Cleaning
- Troubleshooting
- Warranty

31
Introduction to Pressure Cooking
Pressure cooking uses steam pressure to raise the boiling point of water above
100ºC / 212ºF. This energy-efcient cooking method is the fastest way to
thoroughly cook a variety of your favorite meals.
Pressure cookers go through 3 stages when pressure cooking:
1. Pre-Heating and Pressurization
After you have nished inputting your selections press Start to begin. The display
reads On to indicate it has begun pre-heating. While the cooker pre-heats, it
vaporizes liquid in the inner pot to create steam. Once enough steam has built up
inside the inner pot, the oat valve pops up and locks the lid of the cooker in place
for safe pressure cooking.
When the oat valve pops up, the silicone cap attached to the bottom of the oat
valve (on the underside of the lid) seals the steam inside the cooking chamber (the
inner pot) and allows the pressure to rise even higher. A higher pressure means a
higher cooking temperature.
While it is normal to see some steam escaping through the oat valve during
Pre-Heating, if you see steam escaping from around the sides of the lid, press
Cancel and refer to Troubleshooting.
Note: The time it takes your cooker to pressurize is determined by a variety of factors,
including food and liquid volume.
2. Cooking
After the oat valve pops up, the cooker needs a few minutes to nish building
pressure. When the required pressure level is reached, cooking begins. The
display switches from On to the cooking countdown timer, displayed in HH:MM
(hours : minutes) format.
Smart Program settings (e.g., cooking time, temperature and/or pressure level,
and whether Keep Warm will come on automatically or not) can be adjusted at any
time during cooking. Refer to Smart Program Settings for details.