
User Manual
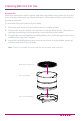
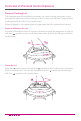
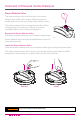
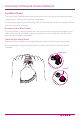
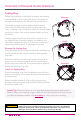
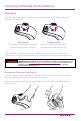
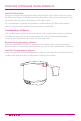
Table Of Contents
- IMPORTANT SAFEGUARDS
- Special Cord Set Instructions
- Initial Setup
- Product, Parts and Accessories
- Control Panel
- Smart Program Settings
- Reset Smart Programs to Factory Default Settings
- Adjust and Save Custom Temperatures
- Reheat Food or Keep Warm for Long Periods
- Status Messages
- Cleaning Before First Use
- Overview of Pressure Control Features
- Steam Release Valve
- Anti-Block Shield
- Sealing Ring
- Float Valve
- Condensation Collector
- Depressurizing the Cooker (Venting Methods)
- 10-Minute NR
- Initial Test Run (Water Test)
- Smart Programs: Non Air Frying
- Sauté
- Slow Cook
- Sous Vide
- Sous Vide Cooking Guidelines
- Smart Programs: Air Frying
- Bake
- Roast
- Broil
- Dehydrate
- Smart Program Overview
- Cooking Time Chart
- Care and Cleaning
- Troubleshooting
- Warranty

30
Overview of Pressure Control Features
Install the Float Valve
Drop the narrow end of the oat valve into the oat valve hole on the top of the
lid. Place one nger on the at top of the oat valve, then turn the lid over. Firmly
attach the silicone cap to the bottom of the oat valve.
Do not attempt to operate the pressure cooker without the oat valve and/or
silicone cap properly installed in the pressure cooking lid.
Condensation Collector
The condensation collector sits at the back of the cooker base and accumulates
overow moisture from the condensation rim. It should be installed before
cooking, then emptied and rinsed out after each use.
Remove the Condensation Collector
Pull the condensation collector away from the cooker base; do not pull down.
Note the tabs on the cooker base and the grooves on the condensation collector.
Install the Condensation Collector
Align the grooves on the condensation collector over the tabs on the back of the
cooker base and slide the condensation collector into place.