
User Manual
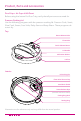
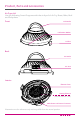
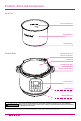
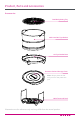
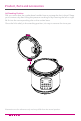

Table Of Contents
- IMPORTANT SAFEGUARDS
- Special Cord Set Instructions
- Initial Setup
- Product, Parts and Accessories
- Control Panel
- Smart Program Settings
- Reset Smart Programs to Factory Default Settings
- Adjust and Save Custom Temperatures
- Reheat Food or Keep Warm for Long Periods
- Status Messages
- Cleaning Before First Use
- Overview of Pressure Control Features
- Steam Release Valve
- Anti-Block Shield
- Sealing Ring
- Float Valve
- Condensation Collector
- Depressurizing the Cooker (Venting Methods)
- 10-Minute NR
- Initial Test Run (Water Test)
- Smart Programs: Non Air Frying
- Sauté
- Slow Cook
- Sous Vide
- Sous Vide Cooking Guidelines
- Smart Programs: Air Frying
- Bake
- Roast
- Broil
- Dehydrate
- Smart Program Overview
- Cooking Time Chart
- Care and Cleaning
- Troubleshooting
- Warranty

16
Product, Parts and Accessories
Lid Standing Position
Did you notice that the cooker base handles have a rectangular slot in them? Keep
your counters dry after lifting the pressure cooking lid by inserting the left or right
lid n into the corresponding slot on the cooker base.
Once the lid is safely in the standing position, it’s easy to remove the inner pot.
Illustrations are for reference only and may differ from the actual product.