CWT-00 C1100 Chilled Water Tank & Cold Only Faucet Owner’s Manual Installation, Care & Use Instalacion, cuidado & uso
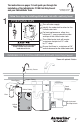
Congratulations on your purchase of this quality InSinkErator® water product. In addition to complete operating and care instructions, in this Owner’s Manual you will find instructions for installing both: • CWT-00 Chilled Water Tank with an existing hot/cool water dispenser – See pages 4-6 • CWT-00 Chilled Water Tank with a C1100 Cold Only Faucet – See pages 7-9 WHAT YOU SHOULD KNOW BEFORE YOU BEGIN IMPORTANT: After unpacking chilled water tank, place the unit upright for 1 hour before connecting power.
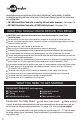
HOW TO USE THIS INSTRUCTION MANUAL These instructions are separated into main sections, indicated by numbers, and subsections, indicated by capital letters. The manual is setup this way to allow you to take a break at any point after completing a section or subsection without affecting the installation process. What you’ll see in the instruction manual: B Outlet 2 3 Property Damage: Do not pinch or break tubing. Do not distort the last 1 inch of tubing.
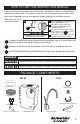
These instructions assume hot/cool faucet has already been installed. Refer to Installation, Care & Use manual included with hot/cool water dispenser. Follow these steps for installing chilled water tank with instant hot/cool water dispenser. 1A PREPARATION Unplug instant hot water tank and hold handle in open position until cool water flows from spout. Turn off water supply. Identify the undersink location for the < 18" chilled water tank.
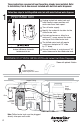
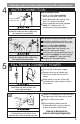
Follow these steps for installing chilled water tank with instant hot/cool water dispenser. 2A INSTALLING THE WATER TANK Attach supplied quick connect elbow to Inlet Property Damage: All tubes must be cut squarely with no burrs. B Attach supplied quick connect elbow to end of supplied blue 1/4" tube. Attach quick connect elbow with blue Outlet White Tape Property Damage: Do not pinch or break tubing. Do not distort the last 1 inch of tubing. Pull on connection to ensure fully engaged.
Follow these steps for installing chilled water tank with instant hot/cool water dispenser. 4A FILL TANK & CONNECT POWER Turn on the cold water supply. Depress the cold faucet handle and hold it until water flows from the spout. Allow water to run for at least 60 seconds after water begins to flow from faucet. Property Damage: Before plugging in chilled water tank, check for leaks in all water supply connections. B Depress the hot water handle until water flows smoothly.
The instructions on pages 7-9 will guide you through the installation of the InSinkErator C1100 Cold Only Faucet and your Chilled Water Tank. InSinkErator C1100 Cold Only Faucet Follow these steps for installing chilled water tank with a cold only faucet. 1A PREPARATION Turn off water supply. Identify the undersink location for the chilled water tank.
Follow these steps for installing chilled water tank with a cold only faucet. 2A INSTALLING THE COLD ONLY FAUCET Unpack faucet components. On a firm, flat surface, carefully straighten the copper tubing. Ensure that the black O-ring is Property Damage: Do not pinch or break copper tubing. Do not distort the last 1 inch of tubing. B Feed tube down through sink hole An assistant may be needed to hold the faucet in place while securing the base.
Follow these steps for installing chilled water tank with a cold only faucet. 4A WATER CONNECTION With no filtration system: Install a T-fitting (not included) onto the cold water supply line. Install dedicated water control valve with 1/4" compression fitting. Attach remaining end of the supplied white 1/4" tube into the 1/4" compression fitting and tighten. To “Inlet” on front of chilled water tank Property Damage: Join remaining tube to cold water supply only.
IMPORTANT: Observe all plumbing/electrical codes and ordinances. Check location in which the chilled water tank will be installed to ensure there is adequate space. Proper installation is the responsibility of the installer. Before beginning installation, ensure that you have all required parts. It is the responsibility of the installer to comply with installation specifications and with state and local plumbing codes.
CARE AND USE Electric Shock Hazard: To prevent electrical shock, disconnect power before servicing unit. Use only a properly grounded and polarized electric outlet. ADJUSTING WATER TEMPERATURE PROPERTY DAMAGE The temperature on the chilled r water lde water tank is controlled by the Co temperature control knob on the front of the unit. For colder water – Turn the control knob clockwise. Allow 60 mins. For less cold water – Turn the control knob counterclockwise.
Please read Troubleshooting Guide and/or visit www.insinkerator.com before calling AnswerLine™ TROUBLESHOOTING PROBLEM Water is not cold. POSSIBLE CAUSE • No power to unit. • The unit is unplugged. • The electric outlet is inoperative. • Copper tubes connected incorrectly. • The unit has not had sufficient time to chill the water. WHAT TO DO • Make sure the circuit breaker or fuses are functioning properly. • Make sure the unit is connected to a properly grounded electric outlet.
Tanque enfriador de agua y grifo de agua fría Manual del propietario Felicitaciones por haber adquirido este producto InSinkErator® de calidad. Además de las instrucciones completas de operación y cuidado, este Manual del propietario también proporciona instrucciones de instalación para: • Tanque enfriador de agua CWT-00 con dispensador de agua caliente/fría ya existente. Consulte las páginas 15-17. • Tanque enfriador de agua CWT-00 con grifo de agua fría C1100. Consulte las páginas 18-20.
CÓMO UTILIZAR ESTE MANUAL DE INSTRUCCIONES Las instrucciones están divididas en secciones principales, que se indican con números, y en subsecciones, que se indican con letras mayúsculas. El manual está organizado de este modo para que usted pueda tomar un descanso en cualquier momento luego de finalizar una sección o subsección sin que esto afecte al proceso de instalación. Lo que encontrará en este manual de instrucciones: B Conecte el codo de conexión rápida suministrado al extremo del tubo azul de 6.
En las instrucciones, se assume que ya se ha instalado el grifo de agua caliente/ fría. Consulte el manual de instalación, cuidado y uso que viene con el dispensador de agua caliente/fría. Siga estos pasos para instalar el tanque enfriador de agua con dispensador de agua caliente/fría instantánea. 1A PREPARACIÓN Desconecte el tanque de agua caliente instantánea y mantenga la palanca en la posición abierta hasta que salga agua fría del surtidor. Cierre el suministro de agua.
Siga estos pasos para instalar el tanque enfriador de agua con dispensador de agua caliente/fría instantánea. 2A INSTALACIÓN DEL TANQUE DE AGUA Conecte el codo de conexión rápida suministrado al extremo del tubo blanco de 6.3 mm (1/4"). Suministro de agua Conecte el codo de conexión rápida a la entrada de agua de la parte frontal del tanque enfriador de agua. Mida la distancia entre la entrada de agua del tanque enfriador y la válvula del suministro de agua (consulte el paso 3).
Siga estos pasos para instalar el tanque enfriador de agua con dispensador de agua caliente/fría instantánea. 4A LLENADO DEL TANQUE Y CONEXIÓN DEL SUMINISTRO ELÉCTRICO Abra el suministro de agua fría. Pulse la palanca del suministro de agua fría y manténgala presionada hasta que salga agua del surtidor. Una vez que el agua comience a fluir, déjela correr durante al menos 60 segundos.
Las instrucciones de las páginas 18-20 lo guiarán a través del proceso de instalación del grifo de agua fría C1100 y del tanque de agua enfriador InSinkErator. Grifo de agua fría C1100 InSinkErator Siga estos pasos para instalar el tanque enfriador de agua con grifo de agua fría. 1A PREPARACIÓN Cierre el suministro de agua. Designe una ubicación debajo del fregadero para instalar el tanque enfriador de agua.
Siga estos pasos para instalar el tanque enfriador de agua con grifo de agua fría. 2A INSTALACIÓN DEL GRIFO DE AGUA FRÍA Desembale los componentes del grifo. Sobre una superficie firme y plana, enderece cuidadosamente la tubería de cobre. Asegúrese de que la junta tórica de goma Daños a la propiedad: no dañe ni rompa la tubería de cobre. No deforme los últimos 25 mm (1 pulgada) de la tubería.
Siga estos pasos para instalar el tanque enfriador de agua con grifo de agua fría. 4A CONEXIÓN DE AGUA Sin sistema de filtración: Instale un empalme en T (no suministrado) en la tubería del suministro de agua fría. Instale una válvula de control de agua A la “entrada” de agua de la parte frontal del tanque enfriador independiente con un empalme de compresión de 9.5 mm (1/4").
IMPORTANTE: respete todos los códigos y reglamentos eléctricos y de plomería. Inspeccione el lugar en donde se desea instalar el tanque enfriador de agua para asegurarse de que haya suficiente espacio. La correcta instalación es responsabilidad del instalador. Antes de comenzar con la instalación, asegúrese de contar con todas las piezas necesarias. Es responsabilidad del instalador cumplir con las especificaciones de instalación y con los códigos de plomería estatales y locales.
CUIDADO Y USO Riesgo de descarga eléctrica: para evitar una descarga eléctrica, desconecte el suministro eléctrico antes de reparar la unidad. Utilice solamente un tomacorriente eléctrico debidamente polarizado y con conexión a tierra. AJUSTE DE LA TEMPERATURA DEL AGUA La temperatura del tanque de más fría ua enfriamiento de agua se regula Ag mediante la perilla de control de temperatura que se encuentra en la parte frontal de la unidad.
Lea la Guía de solución de problemas y/o visite www.insinkerator.com antes de llamar a la línea de atención al cliente AnswerLine™ SOLUCIÓN DE PROBLEMAS PROBLEMA CAUSA POSIBLE El agua no está fría. • La unidad no recibe electricidad. • La unidad está desconectada. • El tomacorriente no funciona. • Los tubos de cobre están conectados incorrectamente. • La unidad no tuvo tiempo suficiente de enfriar el agua. SOLUCIÓN • Asegúrese de que el interruptor y los fusibles funcionen correctamente.
The Emerson logo is a trademark and service mark of Emerson Electric Co. InSinkErator may make improvements and/or changes in the specifications at any time, in its sole discretion, without notice or obligation and further reserves the right to change or discontinue models. 1.800.558.5700 www.insinkerator.com 44149 REV. A Printed in USA © 2008 InSinkErator, a division of Emerson Electric Co. All Rights Reserved.