
User Manual
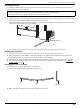
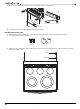
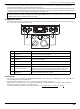

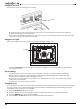
Table Of Contents
- IMPORTANT SAFETY PRECAUTIONS
- IMPORTANT SAFETY INSTRUCTIONS
- FOR YOUR SAFETY
- Additional safety instructions
- SAVE THESE INSTRUCTIONS
- Features
- INSTALLING
- Selecting a location
- Electrical requirements
- Installing your range
- OPERATING INSTRUCTIONS
- Before you begin using your range
- Using the surface burners
- Using the oven
- Minimum and maximum settings
- Positioning the oven racks
- Using the oven vent
- Using the oven light
- Tips for baking
- Setting the clock
- Selecting the 12-hour or 24-hour display setting
- Using the timer
- Baking
- Adjusting the thermostat
- Fan baking and roasting
- Programming the cook time
- Programming a delayed start time
- Broiling
- Keeping food warm
- Switching between Fahrenheit or Celsius
- Turning sound on or off
- Locking oven controls
- MAINTENANCE
- Cleaning and maintenance
- Using the oven vent
- Cleaning the control panel
- Cleaning painted parts and decorative trim
- Cleaning stainless steel surfaces
- Cleaning the oven racks
- Cleaning the oven door
- Cleaning the surface element control knobs
- Cleaning the cooktop
- Removing and replacing the oven door
- Removing and replacing the storage drawer
- Steam cleaning the oven
- Troubleshooting
- Specifications
- ONE-YEAR LIMITED WARRANTY

www.insigniaproducts.com
29
4.8 Cu. Ft. Electric Convection Range with Steam Cleaning
Positioning the oven racks
You can remove and reposition the oven racks in any of the six rack positions. Each oven rack has a built-in stop to prevent
it from accidentally being pulled completely out. Correct positioning of the oven racks provides the best cooking results.
• Centering the baking pans in the oven produces better cooking results.
• When baking multiple items, make sure that you leave a 1 to 1.5 in. (2.5 to 3.8 cm) space around each item.
• When baking or fan baking on a single rack, place the oven rack in position 3 or 4.
• When baking or fan baking on multiple racks, place the oven racks in positions 3 and 5. Place two pans in the rear of
the top rack and the other two pans in the front of the bottom rack.
Removing an oven rack
1 Pull the rack straight out until it stops.
2 Lift the front of the oven rack and pull to remove it from the oven.
Replacing an oven rack
1 Place the back edge of the rack on the a rack support.
2 Lift the front of the rack and slide it into the oven.
WARNING: Stand away from the oven when opening the oven door. Escaping hot air or steam can burn your hands, face, or eyes. Let
hot air or steam escape before removing or replacing food.
Note: The rack position above 6 is not usable.
CAUTION:
• Do not cover an oven rack with aluminum foil. This disturbs the heat circulation and results in poor baking.
• Do not place aluminum foil on the oven bottom because it could cause damage.
• Arrange the oven racks only when the oven is cool.
• When placing an oven rack in the top most rack position, make sure that the rack is stably situated on the embossed stop.
1
2
3
4
5
6
Single rack pan placement
Multi rack pan placement