
User Manual
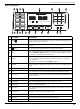
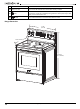
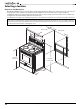
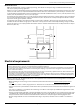
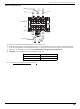
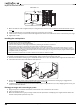
Table Of Contents
- IMPORTANT SAFETY PRECAUTIONS
- IMPORTANT SAFETY INSTRUCTIONS
- FOR YOUR SAFETY
- Additional safety instructions
- SAVE THESE INSTRUCTIONS
- Features
- INSTALLING
- Selecting a location
- Electrical requirements
- Installing your range
- OPERATING INSTRUCTIONS
- Before you begin using your range
- Using the surface burners
- Using the oven
- Minimum and maximum settings
- Positioning the oven racks
- Using the oven vent
- Using the oven light
- Tips for baking
- Setting the clock
- Selecting the 12-hour or 24-hour display setting
- Using the timer
- Baking
- Adjusting the thermostat
- Fan baking and roasting
- Programming the cook time
- Programming a delayed start time
- Broiling
- Keeping food warm
- Switching between Fahrenheit or Celsius
- Turning sound on or off
- Locking oven controls
- MAINTENANCE
- Cleaning and maintenance
- Using the oven vent
- Cleaning the control panel
- Cleaning painted parts and decorative trim
- Cleaning stainless steel surfaces
- Cleaning the oven racks
- Cleaning the oven door
- Cleaning the surface element control knobs
- Cleaning the cooktop
- Removing and replacing the oven door
- Removing and replacing the storage drawer
- Steam cleaning the oven
- Troubleshooting
- Specifications
- ONE-YEAR LIMITED WARRANTY

www.insigniaproducts.com
18
If you are connecting a 4-wire power cord, go to Connect a 4-wire power cord on page 18.
If you are connecting a 3-wire power cord, go to Connect a 3-wire power cord
on page 19.
Connect a 4-wire power cord
1 Disconnect power to the circuit breaker or fuse box before making the electrical connection.
2 Remove the three lower terminal screws from the terminal block and remove the ground screw.
3 Remove and discard the ground strap located between the middle terminal screw and the ground screw. Do not
discard any screws.
4 Insert the ground screw into the power cord ground wire terminal ring and into the frame of the range.
5 Insert the three terminal screws (removed earlier) through each power cord terminal ring and into the lower terminals
of the terminal block. Be certain that the center wire (white/neutral) is connected to the center position of the terminal
block.
6 Reinstall and tighten screws securely to the terminal block.
7 CAUTION: Check the voltage after connecting the power cord.
8 Go to Replace the terminal block cover
on page 20.
Live 1 - Neutral 120 V
Live 2 - Neutral 120 V
Live 1 - Live 2 208 V / 240 V
L1
L2
N
Neutral
Live 2
Live 1
Terminal block
Neutral
Live 2
Live 1
Red
Black
White
Red
Black
White
Green
Remove
ground
strap
Ground wire