
User Manual
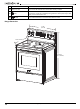
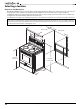
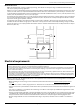
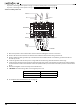
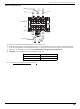
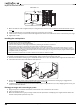
Table Of Contents
- IMPORTANT SAFETY PRECAUTIONS
- IMPORTANT SAFETY INSTRUCTIONS
- FOR YOUR SAFETY
- Additional safety instructions
- SAVE THESE INSTRUCTIONS
- Features
- INSTALLING
- Selecting a location
- Electrical requirements
- Installing your range
- OPERATING INSTRUCTIONS
- Before you begin using your range
- Using the surface burners
- Using the oven
- Minimum and maximum settings
- Positioning the oven racks
- Using the oven vent
- Using the oven light
- Tips for baking
- Setting the clock
- Selecting the 12-hour or 24-hour display setting
- Using the timer
- Baking
- Adjusting the thermostat
- Fan baking and roasting
- Programming the cook time
- Programming a delayed start time
- Broiling
- Keeping food warm
- Switching between Fahrenheit or Celsius
- Turning sound on or off
- Locking oven controls
- MAINTENANCE
- Cleaning and maintenance
- Using the oven vent
- Cleaning the control panel
- Cleaning painted parts and decorative trim
- Cleaning stainless steel surfaces
- Cleaning the oven racks
- Cleaning the oven door
- Cleaning the surface element control knobs
- Cleaning the cooktop
- Removing and replacing the oven door
- Removing and replacing the storage drawer
- Steam cleaning the oven
- Troubleshooting
- Specifications
- ONE-YEAR LIMITED WARRANTY

www.insigniaproducts.com
17
4.8 Cu. Ft. Electric Convection Range with Steam Cleaning
Connecting the power cord
Remove the terminal block cover
1 Remove the two screws that secure the terminal block cover to the back of your range. Don’t discard the screws. You
need them to reinstall the cover.
2 For the power cord installation, hook the strain relief over the 1 3/8 in. (3.5 cm) power cord hole located below the rear
of the oven. Insert the power cord through the strain relief, then tighten the relief.
3 For the conduit installation, insert the conduit strain relief in the 1 1/8 in. (2.8 cm) conduit hole, then install the conduit
through the body of the strain relief and fasten the strain relief with its ring.
WARNING:
• Electrical ground is required on your range.
• Do not connect to the electrical supply until your range is permanently grounded.
• Your range must be connected to a grounded, metallic, permanent wiring system, or a grounding connector should be connected
to the grounding terminal or wire lead on your range.
Failure to do any of the above could result in a fire, personal injury, or electrical shock.
Note: The power cord connections described below are only applicable to NS-RGFESS2. NS-RGFESS1-C comes with a power cord.
Note: You must install the power cord with a strain relief. Attach the strain relief to the opening in the conduit connection plate.
Terminal block
Strain relief
Power cord
hole
Conduit hole
Power cord
hole
Conduit hole
Ring
Body
Power cord hole