
User Manual
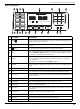
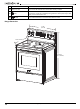
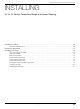
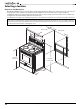
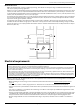
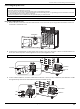
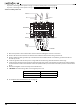
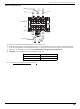
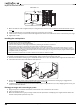
Table Of Contents
- IMPORTANT SAFETY PRECAUTIONS
- IMPORTANT SAFETY INSTRUCTIONS
- FOR YOUR SAFETY
- Additional safety instructions
- SAVE THESE INSTRUCTIONS
- Features
- INSTALLING
- Selecting a location
- Electrical requirements
- Installing your range
- OPERATING INSTRUCTIONS
- Before you begin using your range
- Using the surface burners
- Using the oven
- Minimum and maximum settings
- Positioning the oven racks
- Using the oven vent
- Using the oven light
- Tips for baking
- Setting the clock
- Selecting the 12-hour or 24-hour display setting
- Using the timer
- Baking
- Adjusting the thermostat
- Fan baking and roasting
- Programming the cook time
- Programming a delayed start time
- Broiling
- Keeping food warm
- Switching between Fahrenheit or Celsius
- Turning sound on or off
- Locking oven controls
- MAINTENANCE
- Cleaning and maintenance
- Using the oven vent
- Cleaning the control panel
- Cleaning painted parts and decorative trim
- Cleaning stainless steel surfaces
- Cleaning the oven racks
- Cleaning the oven door
- Cleaning the surface element control knobs
- Cleaning the cooktop
- Removing and replacing the oven door
- Removing and replacing the storage drawer
- Steam cleaning the oven
- Troubleshooting
- Specifications
- ONE-YEAR LIMITED WARRANTY

www.insigniaproducts.com
13
4.8 Cu. Ft. Electric Convection Range with Steam Cleaning
INSTALLING
4.8 Cu. Ft. Electric Convection Range with Steam Cleaning
Selecting a location . . . . . . . . . . . . . . . . . . . . . . . . . . . . . . . . . . . . . . . . . . . . . . . . . . . . . . . . . . . . . . . . . . . . . . . . . . . . . . . . . .14
Clearances and dimensions . . . . . . . . . . . . . . . . . . . . . . . . . . . . . . . . . . . . . . . . . . . . . . . . . . . . . . . . . . . . . . . . . . . . . . . . . . . . . . . . . . . . . . 14
Electrical requirements. . . . . . . . . . . . . . . . . . . . . . . . . . . . . . . . . . . . . . . . . . . . . . . . . . . . . . . . . . . . . . . . . . . . . . . . . . . . . . .15
Installing your range . . . . . . . . . . . . . . . . . . . . . . . . . . . . . . . . . . . . . . . . . . . . . . . . . . . . . . . . . . . . . . . . . . . . . . . . . . . . . . . . .16
Tools you need (not included). . . . . . . . . . . . . . . . . . . . . . . . . . . . . . . . . . . . . . . . . . . . . . . . . . . . . . . . . . . . . . . . . . . . . . . . . . . . . . . . . . . . 16
Items not included. . . . . . . . . . . . . . . . . . . . . . . . . . . . . . . . . . . . . . . . . . . . . . . . . . . . . . . . . . . . . . . . . . . . . . . . . . . . . . . . . . . . . . . . . . . . . . . 16
Notes to the installer: . . . . . . . . . . . . . . . . . . . . . . . . . . . . . . . . . . . . . . . . . . . . . . . . . . . . . . . . . . . . . . . . . . . . . . . . . . . . . . . . . . . . . . . . . . . . 16
Before installing your range . . . . . . . . . . . . . . . . . . . . . . . . . . . . . . . . . . . . . . . . . . . . . . . . . . . . . . . . . . . . . . . . . . . . . . . . . . . . . . . . . . . . . . 16
Connecting the power cord . . . . . . . . . . . . . . . . . . . . . . . . . . . . . . . . . . . . . . . . . . . . . . . . . . . . . . . . . . . . . . . . . . . . . . . . . . . . . . . . . . . . . .17
Installing the anti-tip device. . . . . . . . . . . . . . . . . . . . . . . . . . . . . . . . . . . . . . . . . . . . . . . . . . . . . . . . . . . . . . . . . . . . . . . . . . . . . . . . . . . . . . 20
Placing your range and connecting to power . . . . . . . . . . . . . . . . . . . . . . . . . . . . . . . . . . . . . . . . . . . . . . . . . . . . . . . . . . . . . . . . . . . . .20
Leveling your range. . . . . . . . . . . . . . . . . . . . . . . . . . . . . . . . . . . . . . . . . . . . . . . . . . . . . . . . . . . . . . . . . . . . . . . . . . . . . . . . . . . . . . . . . . . . . . 21
Finishing the installation . . . . . . . . . . . . . . . . . . . . . . . . . . . . . . . . . . . . . . . . . . . . . . . . . . . . . . . . . . . . . . . . . . . . . . . . . . . . . . . . . . . . . . . . . 21