
User Manual


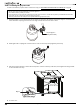
Table Of Contents
- Contents
- IMPORTANT SAFETY INSTRUCTIONS
- Features
- Assembling your fire table
- STEP 1: Attaching the bracket posts to the table top
- STEP 2: Installing the bottom plate
- STEP 3: Installing the gas cylinder block
- STEP 4: Installing the left side panel
- STEP 5: Installing the door pane assembly
- STEP 6: Installing the side panels
- STEP 7: Preparing and installing the burner assembly
- STEP 8: Adding the lava rocks and table lid (optional)
- STEP 9: Installing the propane tank
- STEP 10: Testing for gas leaks
- Before you begin using your fire table
- Using your fire table
- Maintaining your fire table
- Specifications
- ONE-YEAR LIMITED WARRANTY

www.insigniaproducts.com
15
30" Square Fire Table - Black
STEP 5: Installing the door pane assembly
You n e e d :
1 Place the M4 x 5 mm screw (DD) through the hole in the right-center of the door, then screw the knob (EE) onto the
screw until tight.
2 Using four M6 x 25 mm bolts (CC), install the front door panel assembly (N) to the support posts on the front of the
table with the Phillips screwdriver (FF), then tighten the bolts.
FF Phillips screwdriver (1)
N Front door panel assembly
CC M6 × 25 mm bolt (4)
DD M4 × 5 mm bolt (1)
EE Knob (1)
Door frame