USER GUIDE Ice Maker for Insignia Top Mount Freezers NS-ICETMW3 Before using your new product, please read these instructions to prevent any damage.
Contents IMPORTANT SAFETY INSTRUCTIONS . . . . . . . . . . . . . . . . . . . . . . . . . . . . . . . . . . . . . 2 Features and compatibility . . . . . . . . . . . . . . . . . . . . . . . . . . . . . . . . . . . . . . . . . . . . . . 3 Package contents . . . . . . . . . . . . . . . . . . . . . . . . . . . . . . . . . . . . . . . . . . . . . . . . . . . 4 Tools and materials needed . . . . . . . . . . . . . . . . . . . . . . . . . . . . . . . . . . . . . . . . . 4 Installing the ice maker . . . . . . . . . .
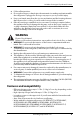
Ice Maker for Insignia Top Mount Freezers 4 5 6 7 Follow all instructions. Do not place fingers or hands into the automatic ice making mechanism while the refrigerator is plugged in. Doing so my expose you to possible injury. Keep your hands away from the ejector mechanism and the heating element that releases the ice cubes, located on the bottom of the ice maker. Refer all servicing to qualified service personnel.
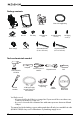
Package contents Plastic water supply tubing Water valve Ice maker unit Mounting box Plastic clamp (3) Ice storage bin Box cover Tube clamp Plastic clip Leveling bracket screw Ice maker mounting screws (2) Short water inlet tube (for 18 cu. ft. freezers) Self-tapping screws (3) Long water inlet tube (for 21 cu. ft.
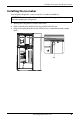
Ice Maker for Insignia Top Mount Freezers Installing the ice maker Your Insignia refrigerator comes set up for ice maker installation. CAUTION: To eliminate the danger of electric shock during installation, you must first unplug the refrigerator. 1 2 3 Unplug the refrigerator from the wall outlet. Remove the freezer shelf and ice tray rack from the freezer. Remove the plug from the inside of the freezer compartment with a putty knife. Plug www.insigniaproducts.
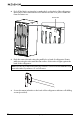
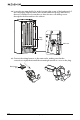
4 Peel off the label covering the ice maker hole on the back of the refrigerator, then remove the foam from the hole with the needle nose pliers. Retain the foam for future use. Remove label 5 Push the water inlet tube into the small hole on back of refrigerator. Rotate while inserting the tube until the flat surface of inlet tube is tight against the back of the refrigerator. Note: Use the short water inlet tube if you have a 18 cu. ft. freezer and the long water inlet tube if you have a 21 cu. ft.
Ice Maker for Insignia Top Mount Freezers 7 Squeeze together and slide the tube clamp over the fill tube. While still squeezing the clamp, insert one end of the plastic tube into the fill tube as far as it will go, then slide the clamp downward to capture the fill tube in place. CAUTION: Leaks may result if the plastic tube is not pushed in as far as it can go and the tube clamp is not in place over the fill tube.
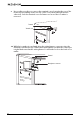
9 Use needle nose pliers to remove the terminal cover located at the top of the freezer by first pulling down one side of the cover, then pulling down the other side. Save the terminal cover for future use in case the ice maker is removed. Terminal Terminal cover 10 With the ice maker in one hand, plug the wiring harness connector into the terminal located at the top of the freezer panel. Make sure that the connection is tight.
Ice Maker for Insignia Top Mount Freezers 11 Mount the ice maker onto the two ice maker mounting screws you installed in step 8. Make sure that the water inlet tube is sitting inside the fill cup, then tighten the screws. Ice maker mounting screws Water inlet tube Fill cup 12 With the ice maker level, insert the third ice maker mounting screw at the bottom of the ice maker and tighten. 13 Reinstall the freezer shelf and set the ice storage bin on the shelf. Ice storage bin www.insigniaproducts.
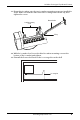
14 Locate the pre-punched holes at the bottom right corner of the back panel of the refrigerator. Align the water valve bracket with the factory drilled holes, then use a Phillips head screwdriver to drive the two self-drilling screws through the bracket and into the cabinet. Fixing clamps Water valve 15 Connect the wiring harness to the water valve, making sure that the connection is tight, then install the mounting box and box cover on the plug. Wiring harness plug 10 www.insigniaproducts.
Ice Maker for Insignia Top Mount Freezers 16 Grasp the other end of the plastic tube and push it firmly into the quick-connection on the valve until it bottoms out, then insert the plastic clip onto the connector to secure the pipe. Water valve Plastic water supply tubing 17 Clean the back of the cabinet with a commercial household cleaner, ammonia, or alcohol before applying the clamps. 18 Secure the plastic water supply tubing to the back of the cabinet with three plastic clamps.
Connecting the ice maker to the water supply Before you begin, please note: • This water line installation is not warranted by the refrigerator or ice maker manufacturer. • Follow these instructions carefully to minimize the risk of water damage. • Water hammer (water banging in the pipe) in house plumbing can cause damage to refrigerator parts and lead to water leakage or flooding. Call a qualified plumber to correct water hammer before installing the water supply line to the refrigerator.
Ice Maker for Insignia Top Mount Freezers 8 9 Tighten the compression nut securely. For plastic tubing, insert the molded end of the tubing into the valve and tighten the compression nut until it is hand-tight, then tighten one additional turn with a wrench. Over-tightening may cause leaks. Place the end of the water supply line into a sink or bucket and flush the water supply line with water until the water runs clear.
16 Reconnect the refrigerator to the electric wall outlet. 17 To turn on the ice maker, lower the wire signal arm. Important: It takes approximately 24 hours for the ice maker to begin producing usable ice. Air in new plumbing lines may cause the ice maker to cycle two or three times before making a full tray of ice. New plumbing may cause ice to be discolored or have poor flavor. Discard ice made during the first 24 hours.
Ice Maker for Insignia Top Mount Freezers Troubleshooting CAUTION: Do not try to repair your ice maker yourself. Doing so invalidates the warranty. PROBLEM POSSIBLE CAUSE POSSIBLE SOLUTION The ice maker makes no ice The freezer temperature is too high. Make sure that the freezer temperature is low enough to make ice. There may be something mechanically wrong with the ice maker.
PROBLEM POSSIBLE CAUSE POSSIBLE SOLUTION The ice smells funny or tastes bad The ice storage bin or freezer needs cleaning. Empty and wash the ice storage bin and discard the old ice cubes. Wash the interior of the freezer. Remove any old food. The water inlet filter (if Replace the water inlet filter. you are using one) needs to be replaced. There may be Flush out the water supply line. impurities in the water supply line.
Ice Maker for Insignia Top Mount Freezers ONE-YEAR LIMITED WARRANTY Definitions: The Distributor* of Insignia branded products warrants to you, the original purchaser of this new Insignia-branded product (“Product”), that the Product shall be free of defects in the original manufacturer of the material or workmanship for a period of one (1) year from the date of your purchase of the Product (“Warranty Period”).
• • • • • • • • Damage due to incorrect operation or maintenance Connection to an incorrect voltage or power supply Attempted repair by any person not authorized by Insignia to service the Product Products sold “as is” or “with all faults” Consumables, including but not limited to batteries (i.e. AA, AAA, C etc.
www.insigniaproducts.com 1-877-467-4289 (U.S. and Canada) INSIGNIA is a trademark of Best Buy and its affiliated companies. Distributed by Best Buy Purchasing, LLC 7601 Penn Ave South, Richfield, MN 55423 U.S.A. ©2022 Best Buy. All rights reserved.